Samoa Cookie Ice Cream Cake
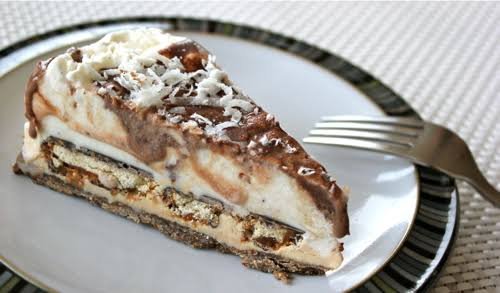
There is something special about the combination of chocolate, toasted coconut, caramel, and creamy ice cream. This Samoa Cookie Ice Cream Cake brings all of those favorite flavors together in one chilled, layered dessert that feels both indulgent and surprisingly easy to make. With a crunchy cookie crust, smooth vanilla ice cream, sweet caramel, rich chocolate, and plenty of toasted coconut, every bite has a satisfying mix of creamy, chewy, crispy, and chocolatey textures.
This ice cream cake is inspired by the classic Samoa cookie flavor, but you do not need to spend hours in the kitchen to make it. The layers come together with simple ingredients and a little freezer time, making it a wonderful choice for birthdays, summer gatherings, potlucks, or any occasion when you want a dessert that can be prepared ahead.
The best part is the contrast between the cold, velvety ice cream and the buttery cookie base, followed by ribbons of caramel, toasted coconut, and chocolate. Once sliced, the layers look beautiful on a dessert table, yet the recipe is simple enough for a beginner to handle with confidence.
If you love coconut caramel desserts or classic Samoa cookie flavors, this homemade ice cream cake is a fun way to turn those familiar flavors into a cool, crowd-friendly treat.
Why You’ll Love This Recipe
- Easy to assemble: This Samoa Cookie Ice Cream Cake uses simple layers rather than complicated baking techniques, so it is approachable even if you are new to making ice cream cakes.
- Classic Samoa-inspired flavors: Chocolate, caramel, toasted coconut, and buttery cookies come together for a familiar combination that feels extra special in cake form.
- Creamy and crunchy: The soft ice cream contrasts beautifully with the crisp cookie crust and toasted coconut topping.
- Make-ahead friendly: Because the cake needs time to freeze, you can prepare it well before serving and keep it ready for your gathering.
- Perfect for warm weather: A chilled ice cream dessert is especially refreshing for summer birthdays, cookouts, and family celebrations.
- Beautiful without complicated decorating: Drizzled chocolate and caramel with toasted coconut create an attractive finish with very little effort.
- Easy to customize: You can switch the ice cream flavor, adjust the toppings, or use different cookies to make the cake your own.
- Great for sharing: The rich layers make this a satisfying dessert for a crowd, with each slice offering a little bit of everything.
Ingredients
Here is everything you need to make this Samoa Cookie Ice Cream Cake. The ingredients are simple, but each one helps create the signature combination of chocolate, caramel, coconut, and creamy ice cream.
For the Cookie Crust
- 24 chocolate sandwich cookies, finely crushed
- 5 tablespoons unsalted butter, melted
For the Ice Cream Layer
- 1 ½ quarts vanilla ice cream, slightly softened
- 1 cup sweetened shredded coconut, toasted
For the Caramel Layer
- ¾ cup thick caramel sauce
- ½ cup sweetened shredded coconut, toasted
For the Chocolate Topping
- ¾ cup semisweet chocolate chips
- 2 tablespoons heavy cream
For Finishing
- ¼ cup caramel sauce, for drizzling
- ¼ cup toasted shredded coconut
- 2 tablespoons chocolate chips or chopped chocolate, optional
Ingredient Preparation Notes
Use a good-quality vanilla ice cream with a creamy texture rather than a very icy variety. Let it soften just enough to spread easily without allowing it to melt.
For the coconut, lightly toast it in a dry skillet or in the oven until golden and fragrant. Keep a close eye on it because shredded coconut can go from lightly golden to burnt quickly.
For the cookie crumbs, process the cookies into fine, even crumbs so the crust holds together firmly when sliced. There is no need to remove the cream filling before crushing the cookies.
Ingredient Notes & Substitutions
A few small ingredient choices can make a noticeable difference in the texture and flavor of this Samoa Cookie Ice Cream Cake. Here are some easy substitutions and tips to help you work with what you already have.
Chocolate Sandwich Cookies
Chocolate sandwich cookies create a rich, slightly crunchy base that pairs beautifully with the creamy ice cream. Regular chocolate sandwich cookies work well, but you can also use chocolate wafer cookies if you prefer a less sweet crust.
For a gluten-free version, choose certified gluten-free chocolate sandwich cookies and check the labels on all other packaged ingredients.
Unsalted Butter
Unsalted butter gives you better control over the sweetness and saltiness of the crust. If you only have salted butter, it can still be used without any major changes.
For a dairy-free cake, use a plant-based butter that melts and firms up well when chilled.
Vanilla Ice Cream
Vanilla ice cream provides a neutral, creamy base that lets the caramel, coconut, and chocolate stand out. French vanilla or homemade vanilla ice cream can also be used for a richer flavor.
If you want a stronger coconut flavor, coconut ice cream is an excellent alternative.
Shredded Coconut
Sweetened shredded coconut gives the cake its classic chewy coconut texture. Toasting it first adds a deeper, nutty flavor and helps keep the dessert from tasting flat.
Unsweetened coconut can be substituted if you prefer a less sweet dessert. You may want to add a little extra caramel sauce to balance the flavor.
Caramel Sauce
A thick, spoonable caramel sauce works best because it stays in place between the layers instead of spreading too quickly. Homemade caramel is wonderful, but a good-quality store-bought sauce is perfectly convenient.
If your caramel sauce is very thin, chill it briefly before assembling the cake.
Chocolate
Semisweet chocolate provides enough richness without making the cake overwhelmingly sweet. Dark chocolate can be used for a deeper, slightly less sweet finish, while milk chocolate creates a sweeter and softer chocolate flavor.
Chocolate chips, chopped chocolate bars, or chocolate melting wafers can all work.
Heavy Cream
Heavy cream helps create a smooth chocolate topping with a soft texture that is easy to drizzle over the frozen cake. For a dairy-free option, use a full-fat coconut cream that has been well chilled and stirred until smooth.
Allergy-Friendly Options
For a gluten-free Samoa Cookie Ice Cream Cake, use certified gluten-free cookies and verify that the ice cream, caramel sauce, chocolate, and coconut are also gluten-free.
For a dairy-free version, choose dairy-free cookies, plant-based butter, dairy-free vanilla or coconut ice cream, dairy-free caramel, and dairy-free chocolate. Always check ingredient labels because brands and formulations can vary.
Kitchen Tools Needed
You do not need any specialized equipment to make this Samoa Cookie Ice Cream Cake. A few basic kitchen tools are enough to build the layers and create a neat, bakery-style finish.
- 9-inch springform pan: Makes it much easier to remove the frozen cake without damaging the layers.
- Food processor: Quickly turns the chocolate sandwich cookies into fine, even crumbs. A zip-top bag and rolling pin can also work.
- Small saucepan or microwave-safe bowl: Useful for melting the butter and preparing the chocolate topping.
- Mixing bowl: Gives you room to combine the cookie crumbs with melted butter.
- Rubber spatula: Helps spread the softened ice cream evenly and smooth the layers.
- Small skillet: Ideal for toasting the shredded coconut until lightly golden.
- Measuring cups and spoons: Helpful for keeping the layers balanced and consistent.
- Offset spatula: Optional, but useful for creating a smooth, even ice cream surface.
- Parchment paper: Optional for lining the bottom of the pan and making cleanup easier.
- Freezer-safe plastic wrap: Essential for covering the cake tightly while it freezes.
Helpful Tip
If you do not have a springform pan, you can use a deep 9-inch cake pan lined with parchment paper. Leave enough parchment hanging over the sides to help lift the frozen cake out when you are ready to serve it.
Step-by-Step Instructions
Making a Samoa Cookie Ice Cream Cake is mostly about creating even layers and giving each one enough time to set. Take your time during assembly, especially when spreading the ice cream, and you will end up with clean slices and distinct layers.
1. Toast the Coconut
Start by toasting the shredded coconut. Place it in a dry skillet over medium-low heat and stir frequently. Cook until the coconut turns lightly golden and smells nutty and fragrant.
Transfer it to a plate immediately so it stops cooking. Let it cool completely before assembling the cake.
Tip: Do not walk away while the coconut is toasting. It can brown quickly near the end.
2. Prepare the Cookie Crust
Crush the chocolate sandwich cookies into fine crumbs using a food processor. If you do not have one, place the cookies in a sealed bag and crush them with a rolling pin.
Pour the crumbs into a bowl and add the melted butter. Stir until the crumbs are evenly coated and resemble damp sand.
Press the mixture firmly into the bottom of a 9-inch springform pan. Use the bottom of a measuring cup or glass to create a compact, even layer.
Place the crust in the freezer for about 15 to 20 minutes to firm up.
3. Soften the Ice Cream
Remove the vanilla ice cream from the freezer and let it sit at room temperature for several minutes.
You want the ice cream soft enough to spread, but not melted. If it becomes too soft, return it to the freezer for a few minutes before continuing.
4. Add the First Ice Cream Layer
Spoon about half of the softened ice cream over the chilled cookie crust.
Use a rubber spatula or offset spatula to gently spread it into an even layer, reaching all the way to the edges of the pan.
Avoid pressing too aggressively because this can disturb the cookie crust underneath.
5. Add Toasted Coconut and Caramel
Sprinkle part of the toasted coconut evenly over the ice cream.
Drizzle the caramel sauce across the coconut layer. Try to distribute it evenly rather than pouring it into one thick spot.
The caramel should form thin ribbons throughout the layer so that every slice gets a little caramel.
6. Add the Remaining Ice Cream
Spread the remaining softened vanilla ice cream over the caramel and coconut.
Work gently from the center toward the edges until the top is smooth and level.
If the ice cream starts becoming difficult to spread, place the cake in the freezer for 10 to 15 minutes, then continue.
7. Freeze Until Firm
Cover the pan tightly with plastic wrap and place the cake in the freezer.
Freeze for at least 6 hours, or preferably overnight. The cake should be completely firm in the center before you add the final toppings.
A longer freezing time also makes it much easier to cut clean slices.
8. Prepare the Chocolate Topping
Place the chocolate chips and heavy cream in a small microwave-safe bowl.
Heat in short intervals, stirring between each one, until the chocolate is mostly melted. Continue stirring until the mixture becomes smooth and glossy.
Allow the chocolate to cool slightly before decorating the cake. It should still be pourable but not hot enough to melt the ice cream.
9. Decorate the Frozen Cake
Remove the cake from the freezer and carefully release it from the springform pan.
Drizzle the chocolate mixture over the top. Follow with additional caramel sauce and a generous sprinkle of toasted coconut.
For a more polished finish, let some of the chocolate and caramel fall naturally toward the edges.
10. Let It Sit Before Slicing
Allow the cake to rest at room temperature for about 5 to 10 minutes before cutting.
Run a sharp knife under warm water, wipe it dry, and then slice through the cake. Repeat the process between cuts for cleaner slices.
Serve immediately while the ice cream is firm but creamy.
Common Mistakes to Avoid
Do not melt the ice cream completely. Softened ice cream should spread easily while still holding its shape.
Do not skip chilling the crust. A cold crust is much easier to layer without breaking apart.
Do not use hot chocolate sauce. Hot chocolate can soften the ice cream and cause the top layer to melt.
Do not rush the freezing time. The cake needs to become completely firm before slicing or decorating.
Do not over-toast the coconut. Light golden coconut has a sweet, nutty flavor, while dark coconut can taste bitter.
For cleaner slices, use a warm knife. Wipe the knife dry after warming it and repeat between every cut. This simple step makes a noticeable difference in presentation.
Expert Tips
A few simple techniques can make this Samoa Cookie Ice Cream Cake easier to assemble and even better to serve. These are the little details that help you get a firm crust, smooth layers, and clean slices.
Toast the Coconut for Better Flavor
Toasting the coconut is worth the extra few minutes. The gentle heat brings out a deeper nutty flavor and gives the coconut a lightly crisp texture that contrasts with the creamy ice cream.
Keep the heat moderate and stir often. Remove it from the pan as soon as it turns pale golden because it will continue cooking from residual heat.
Use Firm, Quality Ice Cream
Choose a full-bodied vanilla ice cream that freezes firmly. Very soft or icy ice cream can make the finished cake harder to slice neatly.
Premium vanilla ice cream also gives the dessert a smoother texture and allows the caramel, chocolate, and coconut flavors to stand out.
Chill the Crust Before Layering
A short freezer rest helps the cookie crust become firm enough to support the ice cream. This also prevents crumbs from mixing into the first layer as you spread it.
For the most compact crust, press the crumbs firmly and evenly into the pan.
Work Quickly With Softened Ice Cream
The goal is soft, spreadable ice cream, not melted ice cream. If it becomes runny while you are assembling the cake, return the pan to the freezer for several minutes before continuing.
Working with one container of ice cream at a time can also help keep the texture under control.
Keep the Caramel Layer Thin
A generous amount of caramel sounds tempting, but too much can make the center sticky and difficult to cut when frozen.
Spread or drizzle a moderate layer so the caramel complements the ice cream instead of overpowering it.
Cool the Chocolate Before Decorating
Let the melted chocolate mixture cool until it is warm or just slightly above room temperature. If it is too hot, it can melt the surface of the ice cream.
For attractive chocolate drizzles, use a spoon, piping bag, or small squeeze bottle.
Freeze Overnight When Possible
Although the cake can become firm after several hours, an overnight freeze gives the layers more time to set completely.
This is especially helpful if you are preparing the dessert for a party or special occasion. It also takes the pressure off serving it immediately after assembly.
Warm Your Knife for Clean Slices
A sharp knife warmed under hot water makes cutting frozen ice cream cake much easier. Dry the knife thoroughly before slicing so excess water does not end up on the cake.
For especially neat slices, warm and wipe the knife between every cut.
Give the Cake a Short Rest Before Serving
Do not leave the entire cake sitting out for too long. Instead, let it rest for only a few minutes before slicing.
This gives the ice cream just enough time to soften slightly while keeping the layers firm and defined.
Variations
One of the best things about this Samoa Cookie Ice Cream Cake is how easy it is to customize. Keep the chocolate, caramel, and coconut combination as the foundation, then adjust the ice cream, toppings, or cookie crust to suit your taste.
Chocolate Samoa Ice Cream Cake
For a more intense chocolate dessert, replace the vanilla ice cream with chocolate ice cream. You can also use chocolate cookie crumbs for the crust and add extra chocolate drizzle on top.
The result is richer and more chocolate-forward while still keeping the toasted coconut and caramel flavors at the center.
Coconut Lover’s Version
Use coconut ice cream instead of vanilla and add an extra layer of toasted shredded coconut between the ice cream layers.
A little coconut extract can also be stirred into the ice cream if you want an even stronger coconut flavor.
Salted Caramel Version
Add a small pinch of flaky sea salt to the caramel layer before adding the next ice cream layer.
The salt balances the sweetness of the caramel and chocolate while giving the dessert a slightly more sophisticated flavor.
Dark Chocolate Version
Swap semisweet chocolate for dark chocolate in the topping. The slightly bitter cocoa flavor works especially well with sweet caramel and toasted coconut.
This is a good option if you prefer desserts that are rich without tasting overly sweet.
Gluten-Free Version
Use certified gluten-free chocolate sandwich cookies for the crust and verify that the ice cream, caramel sauce, chocolate, and other packaged ingredients are gluten-free.
The rest of the preparation can remain essentially the same.
Dairy-Free Version
Choose dairy-free chocolate cookies, plant-based butter, dairy-free vanilla or coconut ice cream, dairy-free caramel sauce, and dairy-free chocolate.
Full-fat coconut-based products are particularly well suited to this dessert because they complement the toasted coconut flavor.
Mini Ice Cream Cakes
Instead of making one large cake, assemble individual portions in small ramekins or muffin cups lined with parchment strips.
Press a thin cookie crust into each one, add the ice cream and toppings, then freeze until firm. These individual Samoa-inspired ice cream cakes are convenient for parties and easier to serve.
Peanut Butter Twist
Add a thin drizzle of creamy peanut butter between the ice cream layers. Peanut butter brings a salty, nutty flavor that pairs naturally with chocolate and caramel.
Use a smooth peanut butter that is easy to drizzle rather than a very thick variety.
Extra Crunch Version
For more texture, add chopped chocolate sandwich cookies or finely chopped toasted nuts between the layers.
Keep the pieces small so the cake remains easy to slice once frozen.
Storage Instructions
Because this is an ice cream cake, the freezer is the best place to store it. Proper wrapping helps protect the cake from freezer odors and keeps the cookie crust and toppings tasting fresh.
Freezer Storage
Keep the assembled cake tightly covered with plastic wrap, followed by a layer of aluminum foil if you plan to store it for more than a day or two.
For the best texture and flavor, enjoy the cake within 1 to 2 weeks. It can remain frozen longer, but the ice cream may gradually develop freezer crystals and the cookie crust can lose some of its original texture.
If you have already sliced the cake, wrap individual pieces tightly or place them in airtight freezer-safe containers. This makes it easy to take out only the portions you need.
Before Serving
Remove the cake from the freezer and let it sit at room temperature for about 5 to 10 minutes before slicing. This short resting period softens the ice cream slightly while keeping the cake firm enough to cut cleanly.
For the neatest slices, warm a sharp knife under hot water, dry it thoroughly, and cut through the cake. Repeat between slices.
Can You Store Leftover Slices?
Yes. Individual slices are convenient to freeze and can be stored in airtight containers or tightly wrapped in plastic wrap.
Try to minimize the amount of air around each slice. Excess air can lead to freezer burn and affect the texture of the ice cream.
Avoid Refreezing Melted Cake
If the cake has completely melted, it is better not to refreeze it. Repeated melting and freezing can significantly change the texture of the ice cream and may affect its quality.
For the best results, take out only the amount you plan to serve and return the remaining cake to the freezer promptly.
Frequently Asked Questions
Can I make Samoa Cookie Ice Cream Cake ahead of time?
Yes. This dessert is ideal for making ahead because it needs several hours in the freezer to set. You can assemble the cake the day before serving and keep it covered in the freezer until you are ready to decorate and slice it.
Can I use homemade caramel sauce?
Absolutely. Homemade caramel sauce works beautifully and gives the cake a rich, buttery flavor. Just allow it to cool completely before adding it to the ice cream layers.
What is the best ice cream for this cake?
A creamy vanilla ice cream is a great choice because its mild flavor allows the chocolate, caramel, and toasted coconut to stand out. French vanilla or coconut ice cream can also be used.
How long should the ice cream sit out before assembling?
Usually, about 5 to 10 minutes is enough, depending on how cold your freezer is and how firm the ice cream is. It should be soft enough to spread but should not look melted or runny.
Can I make this cake without a springform pan?
Yes. Use a deep 9-inch cake pan lined with parchment paper, leaving some parchment extending over the sides. Once frozen, use the parchment to help lift the cake from the pan.
Why is my cookie crust falling apart?
The cookie crumbs may not have enough butter or may not have been pressed firmly enough. Make sure the crumbs are evenly coated with melted butter and compact the mixture firmly into the pan before freezing.
How do I prevent the ice cream from melting while assembling?
Work quickly and keep the ice cream only slightly softened. If the cake starts becoming too soft, place it back in the freezer for 10 to 15 minutes before continuing with the next layer.
Can I use store-bought caramel sauce?
Yes. A thick, good-quality caramel sauce is a convenient option and works well in this recipe. Avoid very thin caramel sauces because they can spread too quickly between the layers.
Can I use a different cookie for the crust?
Yes. Chocolate wafer cookies, chocolate graham crackers, or other crisp chocolate cookies can work. Choose a cookie with a firm texture so the crust holds together when frozen.
How do I get clean slices?
Let the cake rest for about 5 to 10 minutes, then use a sharp knife warmed under hot water. Dry the knife completely before slicing and repeat the process between cuts.
Can I make this Samoa ice cream cake gluten-free?
Yes. Use certified gluten-free chocolate sandwich cookies and check the labels on the ice cream, caramel sauce, chocolate, and other packaged ingredients to make sure they meet your dietary needs.
How long does Samoa Cookie Ice Cream Cake last in the freezer?
For the best quality, enjoy it within 1 to 2 weeks. Keep it tightly wrapped or stored in an airtight freezer-safe container to help prevent freezer burn and unwanted freezer odors.
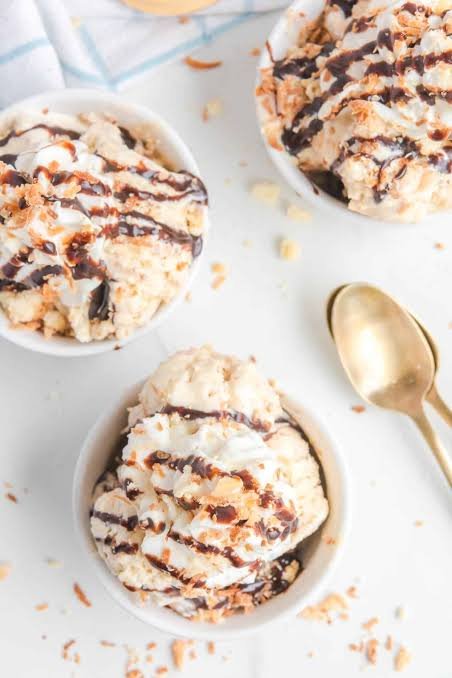

Samoa Cookie Ice Cream Cake
Ingredients
Method
- Toast the coconut: Place the shredded coconut in a dry skillet over medium-low heat. Stir frequently until lightly golden and fragrant. Transfer to a plate and cool completely.
- Make the crust: Crush the chocolate sandwich cookies into fine crumbs. Mix with melted butter until evenly combined. Press firmly into the bottom of a 9-inch springform pan
- Chill the crust: Place the crust in the freezer for 15 to 20 minutes, until firm.
- Soften the ice cream: Let the vanilla ice cream sit at room temperature for about 5 to 10 minutes. It should be spreadable but not melted
- Build the first layer: Spread half of the softened ice cream evenly over the chilled cookie crust.
- Add coconut and caramel: Sprinkle toasted coconut over the ice cream and drizzle with caramel sauce.
- Add the remaining ice cream: Spread the remaining ice cream over the caramel and coconut. Smooth the surface with a spatula.
- Freeze: Cover tightly and freeze for at least 6 hours, preferably overnight
- Make the chocolate topping: Melt the chocolate chips with heavy cream in short microwave intervals, stirring between each interval until smooth. Allow the mixture to cool slightly
- Decorate: Remove the frozen cake from the springform pan. Drizzle with chocolate and caramel, then sprinkle with toasted coconut.
- Slice and serve: Let the cake sit at room temperature for 5 to 10 minutes. Slice with a sharp, warm, dry knife and serve immediately.
Video
Notes
- Use slightly softened ice cream so it spreads easily without melting.
- Toast the coconut carefully because it can burn quickly.
- A thick caramel sauce gives the best layer definition.
- Freeze the cake overnight when possible for firmer, cleaner slices.
- For a gluten-free version, use certified gluten-free cookies and check all packaged ingredients.
- Store leftover cake tightly covered in the freezer and enjoy within 1 to 2 weeks for the best texture.
Final Thoughts
Samoa Cookie Ice Cream Cake brings together everything that makes the classic cookie combination so appealing: creamy vanilla ice cream, buttery chocolate cookies, sweet caramel, toasted coconut, and smooth chocolate. The layers create a wonderful contrast of textures, while the chilled finish makes this dessert especially welcome on warm days.
It is also a practical make-ahead dessert. You can assemble the cake well in advance, let the freezer do most of the work, and finish it with a simple drizzle of chocolate, caramel, and toasted coconut just before serving.
Whether you are making it for a birthday, summer gathering, family dinner, or simply craving a coconut caramel dessert, this ice cream cake is an easy way to turn familiar flavors into something special.
Slice it, serve it cold, and enjoy every creamy, chocolatey, caramel-filled bite. If you make this Samoa Cookie Ice Cream Cake, consider sharing how it turned out and which variation you tried.