No Churn Tiramisu Ice Cream
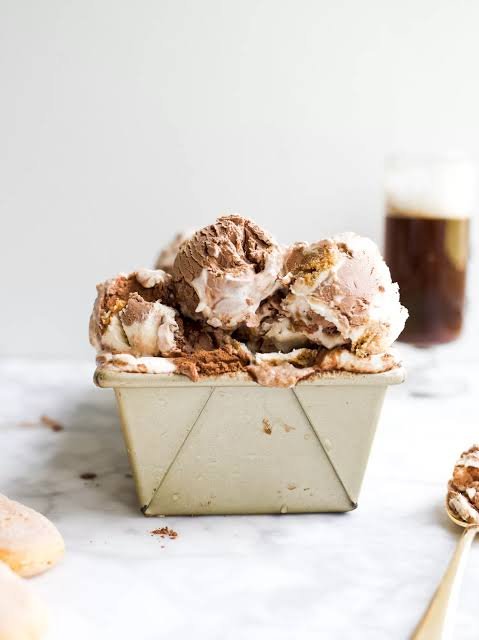
If you love classic tiramisu and creamy homemade ice cream, this No Churn Tiramisu Ice Cream brings both desserts together in one irresistible treat. It has a smooth, velvety ice cream base infused with rich coffee flavor, sweet mascarpone, delicate chocolate, and tender pieces of ladyfingers. Every spoonful has that familiar tiramisu character, but in a cold, creamy dessert that feels especially inviting on a warm day.
The best part is how simple this homemade tiramisu ice cream is to prepare. You do not need an ice cream machine or complicated equipment. A few everyday ingredients and some freezer time are all it takes to create a luxurious dessert with layers of coffee, cream, chocolate, and classic tiramisu flavor.
The mascarpone gives the ice cream a wonderfully rich texture, while coffee adds a gentle bitterness that balances the sweetness. Little pieces of chocolate and ladyfingers bring pleasant bites throughout, making each scoop more interesting than plain ice cream.
Whether you are serving it after dinner, preparing dessert for guests, or simply craving a coffee-inspired frozen treat, this easy no-churn ice cream is a beautiful way to enjoy the flavors of tiramisu in a completely different form.
Why You’ll Love This Recipe
There is something especially satisfying about turning the familiar flavors of tiramisu into a scoopable frozen dessert. This recipe keeps the process simple while still giving you the creamy texture and coffee-rich flavor you expect from a good tiramisu.
- No ice cream machine needed: The mixture comes together with basic kitchen equipment, so there is no special appliance required.
- Classic tiramisu flavor: Coffee, mascarpone, chocolate, and ladyfingers create the familiar flavor combination in frozen form.
- Creamy and smooth: The whipped cream base creates a soft, velvety texture that makes every spoonful rich and satisfying.
- Easy to prepare: Most of the work happens before freezing, making this a convenient dessert for entertaining or weekend baking.
- Great make-ahead dessert: Prepare it ahead of time and let the freezer do the work while you take care of the rest of the meal.
- Delicious texture contrast: Soft ice cream, tender coffee-flavored cake pieces, and small bits of chocolate add variety to every bite.
- Easy to customize: You can adjust the coffee intensity, chocolate, or toppings to suit your taste.
- A fun twist on tiramisu: It delivers the comforting flavors of the classic Italian dessert in a cool and refreshing way.
Ingredients
For this No Churn Tiramisu Ice Cream, you only need a handful of simple ingredients. Each one plays an important role in creating the creamy texture and classic tiramisu flavor.
For the Ice Cream Base
- 2 cups heavy whipping cream: Creates the light, creamy foundation and helps the ice cream stay smooth after freezing.
- 1 can sweetened condensed milk, about 14 ounces: Adds sweetness and gives the ice cream its rich, creamy consistency.
- 8 ounces mascarpone cheese, softened: Brings the signature creamy, slightly tangy flavor associated with traditional tiramisu.
- 2 teaspoons instant espresso powder: Gives the ice cream a deep coffee flavor without adding excess liquid.
- 1 teaspoon pure vanilla extract: Rounds out the coffee and mascarpone flavors with a gentle sweetness.
- 1 tablespoon coffee liqueur, optional: Adds extra depth to the coffee flavor if you are making this dessert for adults.
For the Tiramisu Layers
- 12 to 16 ladyfingers: Adds the soft, cake-like texture that makes tiramisu recognizable.
- 1/3 cup strong brewed coffee or espresso, cooled: Gives the ladyfingers a classic coffee-soaked flavor.
- 2 tablespoons unsweetened cocoa powder: Adds a delicate chocolate bitterness and gives the finished dessert a traditional tiramisu touch.
- 1/3 cup mini chocolate chips or finely chopped semisweet chocolate: Adds little pockets of chocolate throughout the ice cream.
For Serving
- Unsweetened cocoa powder, for dusting: A light sprinkle on top gives each serving a classic tiramisu finish.
- Finely grated chocolate, optional: Adds extra chocolate flavor and an elegant finishing touch.
Ingredient Notes & Substitutions
A few small ingredient choices can make a noticeable difference in the texture and flavor of your No Churn Tiramisu Ice Cream. Here are some helpful tips before you begin.
Heavy Whipping Cream
Use cold heavy whipping cream with at least 35 percent milk fat. It whips more easily and creates a fuller, creamier texture. Keep it refrigerated until you are ready to use it.
Mascarpone Cheese
Mascarpone gives this ice cream its signature tiramisu character. Let it soften slightly at room temperature before mixing so it blends smoothly without leaving lumps.
If mascarpone is difficult to find, full-fat cream cheese can work as a substitute. The flavor will be slightly tangier and less delicate, but the texture will still be creamy.
Instant Espresso Powder
Espresso powder provides concentrated coffee flavor without making the ice cream mixture watery. Instant coffee can be used instead, although the coffee taste may be a little milder.
For a stronger coffee flavor, dissolve the espresso powder in a small amount of the cooled brewed coffee before adding it to the mixture.
Sweetened Condensed Milk
Sweetened condensed milk provides both sweetness and body. Avoid replacing it with regular evaporated milk because the consistency and sweetness will not be the same.
If you prefer a less sweet dessert, use slightly less condensed milk, but keep in mind that it also contributes to the soft texture of the frozen ice cream.
Ladyfingers
Traditional dry ladyfingers work particularly well because they absorb coffee without immediately becoming mushy. If you cannot find ladyfingers, small pieces of sponge cake can be used instead.
Do not soak the cake pieces for too long. A quick dip is enough to give them coffee flavor while keeping some structure.
Coffee or Espresso
Freshly brewed espresso gives the strongest and most authentic coffee flavor. Strong brewed coffee is an easy alternative. Let it cool completely before using it.
Chocolate
Semisweet mini chocolate chips provide small chocolate bites throughout the ice cream. Finely chopped dark chocolate is another excellent option if you prefer a deeper cocoa flavor.
Dairy-Free Option
For a dairy-free version, use a plant-based whipping cream and a dairy-free condensed milk alternative. Choose products that whip well and have a neutral flavor. A dairy-free mascarpone-style product can also be used if available.
Gluten-Free Option
Use certified gluten-free ladyfingers or gluten-free sponge cake. The remaining ingredients are naturally suitable for a gluten-free version as long as their individual labels do not contain gluten-containing additives.
Alcohol-Free Option
The coffee liqueur is completely optional. Simply leave it out for a family-friendly dessert. You will still have plenty of coffee and mascarpone flavor from the other ingredients.
Kitchen Tools Needed
You do not need an ice cream maker or complicated equipment to make this No Churn Tiramisu Ice Cream. A few basic kitchen tools are enough.
- Large mixing bowl: Gives the whipped cream enough room to expand as you mix.
- Electric hand mixer or stand mixer: Makes whipping the cream quick and easy. A whisk can also work, but it requires more effort.
- Medium mixing bowl: Useful for combining the mascarpone, condensed milk, espresso, and vanilla.
- Rubber spatula: Helps fold the whipped cream into the mascarpone mixture gently without deflating it.
- Measuring cups and spoons: Helpful for getting the coffee, espresso powder, and other ingredients balanced.
- Small bowl: Use this for the cooled coffee when dipping the ladyfingers.
- Loaf pan or freezer-safe container: A 9-by-5-inch loaf pan works well for layering and freezing the ice cream.
- Plastic wrap or airtight lid: Covers the ice cream and helps protect it from freezer odors and ice crystals.
- Fine-mesh sieve: Optional, but useful for dusting cocoa powder evenly over the finished ice cream.
Helpful Tip
Chill your mixing bowl and beaters for about 10 to 15 minutes before whipping the cream. Cold equipment helps the cream whip more efficiently and gives you a stable, fluffy base for the ice cream.
Step-by-Step Instructions
Making No Churn Tiramisu Ice Cream is simple, but a few details matter. Take your time with the whipped cream and avoid over-soaking the ladyfingers so the finished ice cream stays light, creamy, and easy to scoop.

1. Prepare the Coffee
Brew the coffee or espresso and let it cool completely. If you are using instant espresso powder in the ice cream base, measure it out and set it aside.
The coffee should be cool before it comes into contact with the other ingredients. Warm coffee can loosen the mixture and affect the final texture.
2. Prepare the Mascarpone Mixture
Place the softened mascarpone in a medium bowl. Add the sweetened condensed milk, espresso powder, and vanilla extract.
Beat the mixture on low speed until smooth and creamy. Scrape down the sides of the bowl as needed so everything combines evenly.
If you are using coffee liqueur, add it at this stage.
The mixture should look thick, smooth, and free of visible mascarpone lumps.
3. Whip the Heavy Cream
Pour the cold heavy whipping cream into a large chilled mixing bowl.
Using a hand mixer or stand mixer, whip the cream on medium to medium-high speed until it reaches firm peaks. When you lift the beaters, the cream should hold its shape without looking dry or grainy.
Do not keep mixing once the cream reaches the right consistency. Over-whipped cream can become grainy and may eventually separate.
4. Combine the Cream and Mascarpone
Add about one-third of the whipped cream to the mascarpone mixture. Fold gently with a rubber spatula until mostly combined.
Add the remaining whipped cream in two additions, folding carefully after each addition.
Use slow, sweeping motions rather than vigorous stirring. The goal is to keep as much air in the whipped cream as possible.
The finished mixture should be thick, fluffy, and smooth.
5. Prepare the Ladyfingers
Pour the cooled coffee into a shallow bowl.
Break the ladyfingers into bite-sized pieces. Dip each piece briefly into the coffee, turning it quickly so it absorbs some coffee without becoming soggy.
Set the pieces aside as you work.
A quick dip is enough. If the ladyfingers become saturated, they can turn mushy and disappear into the ice cream.
6. Start the First Layer
Spoon about half of the ice cream mixture into a freezer-safe loaf pan or container.
Spread it gently into an even layer using a spatula.
Add some of the coffee-soaked ladyfinger pieces and sprinkle over part of the mini chocolate chips or chopped chocolate.
For an extra tiramisu touch, lightly sift cocoa powder over this layer.
7. Add the Second Layer
Spread the remaining ice cream mixture over the first layer.
Smooth the surface carefully with a spatula, then add the remaining ladyfingers and chocolate.
Finish with a light dusting of cocoa powder.
You can also swirl a few of the coffee-soaked cake pieces through the top layer for a more rustic homemade appearance.
8. Cover and Freeze
Cover the container tightly with plastic wrap or an airtight lid.
Place it in the freezer for at least 6 hours, preferably overnight.
The ice cream should be firm enough to scoop but still creamy rather than icy.
Avoid repeatedly opening the freezer during the first few hours. Consistent freezing helps the ice cream set evenly.
9. Let It Soften Before Serving
When you are ready to serve, remove the ice cream from the freezer and let it sit at room temperature for about 5 to 10 minutes.
This short resting time makes scooping much easier and gives the ice cream a softer, creamier texture.
Use a warm ice cream scoop to create neat scoops.
10. Finish and Serve
Place the scoops in chilled bowls or cones.
Add a light sprinkle of unsweetened cocoa powder and finely grated chocolate just before serving.
For the best texture, serve the ice cream while it is creamy and slightly softened. The combination of cold coffee ice cream, mascarpone, tender ladyfingers, and chocolate makes each bite taste like a frozen version of classic tiramisu.
Common Mistakes to Avoid
- Using warm coffee: Always cool the coffee completely before adding it to the recipe.
- Over-soaking the ladyfingers: A quick dip gives them enough coffee flavor without making them mushy.
- Over-whipping the cream: Stop once firm peaks form to keep the texture smooth.
- Mixing too aggressively: Gentle folding preserves the air in the whipped cream.
- Skipping the covered container: Properly covering the ice cream helps prevent freezer burn and unwanted freezer odors.
- Serving immediately from the freezer: Letting it soften for a few minutes makes scooping easier and improves the texture.
Expert Tips
A few simple techniques can make your No Churn Tiramisu Ice Cream smoother, richer, and easier to scoop. These small details are especially helpful if you are making homemade ice cream for the first time.
Use Very Cold Cream
Keep the heavy whipping cream refrigerated until you are ready to whip it. Cold cream traps air more effectively, which helps create the light, creamy texture that makes no-churn ice cream so appealing.
Soften the Mascarpone, But Do Not Warm It
Mascarpone should be soft enough to mix smoothly, but it should not become warm or runny. Let it sit at room temperature briefly, then blend it until creamy before combining it with the other ingredients.
Choose Strong Coffee
Tiramisu depends on coffee for much of its character. Use espresso or strongly brewed coffee rather than weak coffee. The flavor should be noticeable even after the dessert is frozen.
Balance the Coffee Flavor
If you prefer a bold coffee taste, add a little extra espresso powder to the mascarpone mixture. Start with a small amount and taste the mixture before adding more. Frozen desserts can taste slightly less sweet and less intense than the mixture at room temperature.
Fold, Do Not Stir
Once the whipped cream is ready, gently fold it into the mascarpone mixture. Stirring too vigorously can knock out the air you worked into the cream and leave the finished ice cream heavier.
Keep the Ladyfingers Slightly Firm
The ladyfingers should absorb enough coffee to become tender but still retain some structure. A fast dip is usually all they need.
Add Chocolate in Small Pieces
Mini chocolate chips or finely chopped chocolate distribute more evenly than large chunks. This gives you little pockets of chocolate throughout the ice cream instead of a few large pieces in each serving.
Freeze in a Shallow Container
A loaf pan or another relatively shallow freezer-safe container helps the mixture freeze more evenly and makes it easier to scoop later.
Cover the Surface Well
Press plastic wrap gently over the surface before adding a lid, if your container allows it. Reducing air exposure helps limit ice crystals and keeps the surface creamy.
Give It a Few Minutes Before Scooping
Homemade ice cream can become quite firm after several hours in the freezer. Let the container rest at room temperature for about 5 to 10 minutes before scooping. A warm scoop can also help create smoother portions.
Finish With Cocoa Just Before Serving
For the most attractive presentation and freshest flavor, dust the scoops with cocoa powder right before serving. A little finely grated chocolate on top adds another layer of classic tiramisu flavor.
Variations
One of the best things about homemade No Churn Tiramisu Ice Cream is how easily you can adjust it. Keep the creamy coffee base, then change the mix-ins or toppings to create a version that suits your taste.
Chocolate Tiramisu Ice Cream
For a richer chocolate flavor, add extra finely chopped dark chocolate to the ice cream mixture. You can also layer in a thin dusting of cocoa powder between the ice cream and coffee-soaked ladyfingers.
Mocha Tiramisu Ice Cream
Increase the espresso powder slightly and add a little melted, cooled dark chocolate to the mascarpone mixture. The result has a deeper coffee-and-chocolate flavor without losing the creamy tiramisu character.
Extra Coffee Version
If you are a serious coffee lover, use espresso instead of brewed coffee for soaking the ladyfingers. You can also add a small amount of additional espresso powder to the ice cream base.
Berry Tiramisu Ice Cream
Add a few fresh raspberries or finely chopped strawberries between the layers. The bright fruit provides a fresh contrast to the rich mascarpone and coffee flavors.
For the best texture, use fruit sparingly and pat fresh berries dry before adding them.
Nutty Tiramisu Ice Cream
Fold in finely chopped toasted hazelnuts or almonds. Toasting the nuts first brings out their natural aroma and gives the soft ice cream a pleasant crunchy contrast.
Dairy-Free Tiramisu Ice Cream
Use dairy-free whipping cream, dairy-free condensed milk, and a plant-based mascarpone alternative. Check each product carefully to make sure it is suitable for your dietary needs.
Gluten-Free Tiramisu Ice Cream
Replace traditional ladyfingers with certified gluten-free ladyfingers or small pieces of gluten-free sponge cake. Keep the coffee and chocolate components the same for a familiar tiramisu flavor.
Alcohol-Free Version
Simply leave out the coffee liqueur. The espresso, mascarpone, cocoa, and chocolate provide plenty of depth without alcohol.
Lower-Sugar Option
For a less sweet variation, reduce the amount of sweetened condensed milk slightly and use unsweetened chocolate. Keep in mind that changing the amount of condensed milk can affect the softness and texture of the finished ice cream.
Tiramisu Sundae
Turn each scoop into a simple dessert centerpiece. Add a little cocoa powder, grated dark chocolate, and a small piece of coffee-soaked ladyfinger on top. Serve immediately for the best contrast between the cold, creamy ice cream and tender cake.
Make It Extra Creamy
For an especially rich version, use full-fat mascarpone and heavy whipping cream. Avoid low-fat dairy products because they can produce a less creamy texture and a firmer frozen result.
Storage Instructions
Proper storage helps your No Churn Tiramisu Ice Cream stay creamy, flavorful, and protected from freezer burn. Since this is a homemade frozen dessert without stabilizers, keeping it well covered makes a noticeable difference.
How to Store in the Freezer
Transfer the ice cream to a freezer-safe container with a tight-fitting lid. A shallow container works especially well because it helps the ice cream freeze evenly.
For the best texture, press a sheet of plastic wrap directly against the surface of the ice cream before sealing the container. This limits contact with air and helps reduce ice crystals.
Keep the container toward the back of the freezer where the temperature stays more consistent. Avoid storing it in the freezer door, where frequent temperature changes can affect the texture.
How Long Does It Last?
For the best quality, enjoy the ice cream within 1 to 2 weeks. It can remain safe for longer when continuously frozen, but the texture and flavor are usually at their best during the first couple of weeks.
Always use a clean scoop or spoon when serving to avoid introducing moisture or food particles into the container.
Can You Refreeze It?
Yes, but repeated thawing and refreezing can make homemade ice cream icy and less creamy. Take out only the amount you plan to serve and return the container to the freezer promptly.
If the entire container has softened significantly, avoid leaving it at room temperature for an extended period before freezing it again.
How to Make It Easier to Scoop
Homemade ice cream can become firm after spending several hours in the freezer. Let the container sit at room temperature for about 5 to 10 minutes before serving.
Dip your ice cream scoop in warm water, shake off the excess, and use it to create smoother scoops.
Can You Store It in the Refrigerator?
No. This recipe is designed to remain frozen. Keeping it in the refrigerator will cause the ice cream to melt and lose its intended texture.
If it melts completely, the whipped cream structure can break down, and refreezing may result in a harder, icier dessert.
Freezer Storage Tip
For the freshest flavor, add cocoa powder and grated chocolate toppings when serving rather than before long-term freezing. This keeps the toppings looking fresh and prevents excess moisture from forming on the surface.
Frequently Asked Questions
Can I make No Churn Tiramisu Ice Cream without an ice cream maker?
Yes. That is one of the main benefits of this recipe. The whipped cream and sweetened condensed milk create a creamy base that freezes without requiring an ice cream machine.
Can I use regular coffee instead of espresso?
Absolutely. Use strongly brewed coffee for a good coffee flavor. Allow it to cool completely before using it with the ladyfingers.
What type of mascarpone should I use?
Full-fat mascarpone works best because it provides a rich, smooth texture and the mild creamy flavor associated with traditional tiramisu.
Can I use cream cheese instead of mascarpone?
Yes. Full-fat cream cheese can be substituted, although it has a tangier flavor. For a milder result, let the cream cheese soften fully and beat it until completely smooth before combining it with the other ingredients.
How do I keep the ladyfingers from becoming soggy?
Dip them very quickly in cooled coffee. They should absorb enough coffee to become tender while still holding their shape.
Why is my no-churn ice cream too hard?
Homemade ice cream can become firm when stored for several hours. Let it sit at room temperature for about 5 to 10 minutes before scooping. A warm ice cream scoop can also make serving easier.
Can I make this recipe without coffee liqueur?
Yes. The coffee liqueur is optional. Leave it out for an alcohol-free version without changing the rest of the recipe.
Can I add cocoa powder directly to the ice cream?
Yes. A small amount of unsweetened cocoa powder can be added to the base for a deeper chocolate flavor. You can also use cocoa between the layers or as a finishing dusting.
Can I use chocolate chips instead of chopped chocolate?
Yes. Mini chocolate chips are especially convenient because they distribute evenly throughout the ice cream. Semisweet or dark chocolate both work well.
How long should I freeze the ice cream?
Freeze it for at least 6 hours, although overnight is ideal. The ice cream should be fully firm before serving.
Can I make this dessert ahead of time?
Yes. It is an excellent make-ahead dessert. Prepare it the day before serving and keep it tightly covered in the freezer.
Is this recipe gluten-free?
It can be made gluten-free by using certified gluten-free ladyfingers or another suitable gluten-free cake alternative. Check the labels on all packaged ingredients if you need to avoid gluten completely.
How can I make the coffee flavor stronger?
Use espresso or strongly brewed coffee for the ladyfingers and increase the espresso powder slightly in the ice cream base. Add it gradually so the coffee flavor stays balanced with the mascarpone and sweetness.
Can I add alcohol to the ice cream?
Yes. A small amount of coffee liqueur works well with the espresso and mascarpone flavors. Keep the amount moderate because too much liquid alcohol can affect how firmly the ice cream freezes.


No Churn Tiramisu Ice Cream
Ingredients
Method
- Brew the coffee or espresso and allow it to cool completely.
- In a medium bowl, beat the softened mascarpone with the sweetened condensed milk, espresso powder, and vanilla until smooth and creamy. Add the coffee liqueur if using.
- Pour the cold heavy whipping cream into a large mixing bowl. Beat until firm peaks form. Be careful not to over-whip the cream.
- Gently fold about one-third of the whipped cream into the mascarpone mixture. Add the remaining whipped cream in two additions, folding carefully until the mixture is smooth and fluffy.
- Pour the cooled coffee into a shallow bowl. Break the ladyfingers into smaller pieces and dip each piece briefly into the coffee. Do not oversoak them.
- Spread half of the ice cream mixture into a freezer-safe loaf pan or container.
- Add half of the coffee-soaked ladyfingers, followed by half of the chocolate chips or chopped chocolate. Lightly dust with cocoa powder.
- Spread the remaining ice cream mixture over the first layer. Add the remaining ladyfingers and chocolate, then finish with another light dusting of cocoa powder.
- Cover the container tightly with plastic wrap or an airtight lid
- Freeze for at least 6 hours, preferably overnight, until firm.
- Let the ice cream sit at room temperature for 5 to 10 minutes before scooping.
- Serve with a light dusting of cocoa powder and grated chocolate, if desired.
Video
Notes
- Keep the heavy cream cold until you are ready to whip it.
- Use full-fat mascarpone for the richest texture.
- Cool the coffee completely before using it.
- Dip the ladyfingers quickly so they remain tender instead of becoming soggy.
- Fold the whipped cream gently to keep the ice cream light and creamy.
- For easier scooping, let the ice cream soften slightly before serving.
- Store tightly covered in the freezer and enjoy within 1 to 2 weeks for the best texture and flavor.
- The coffee liqueur is optional and can be omitted for an alcohol-free dessert.
Final Thoughts
This No Churn Tiramisu Ice Cream is a simple way to bring the comforting flavors of classic tiramisu into a cool, creamy dessert. The combination of rich mascarpone, bold coffee, soft ladyfingers, cocoa, and chocolate creates a balanced treat with plenty of texture in every scoop.
What makes this recipe especially convenient is that you can prepare it without an ice cream maker. Once the creamy mixture is layered and placed in the freezer, most of the work is done. A little patience gives you a dessert that is smooth, rich, and easy to serve.
For the best experience, give the ice cream a few minutes to soften before scooping, then finish each serving with a light dusting of cocoa powder and a little grated chocolate. It makes a lovely dessert for dinner parties, family gatherings, or a quiet evening when you want something special from the freezer.
If you make this recipe, try your own variation by adjusting the coffee strength, adding extra dark chocolate, or using toasted hazelnuts for a little crunch. Share which version you enjoyed most and how you made it your own.