
Smores Peanut Butter Cup Ice Cream
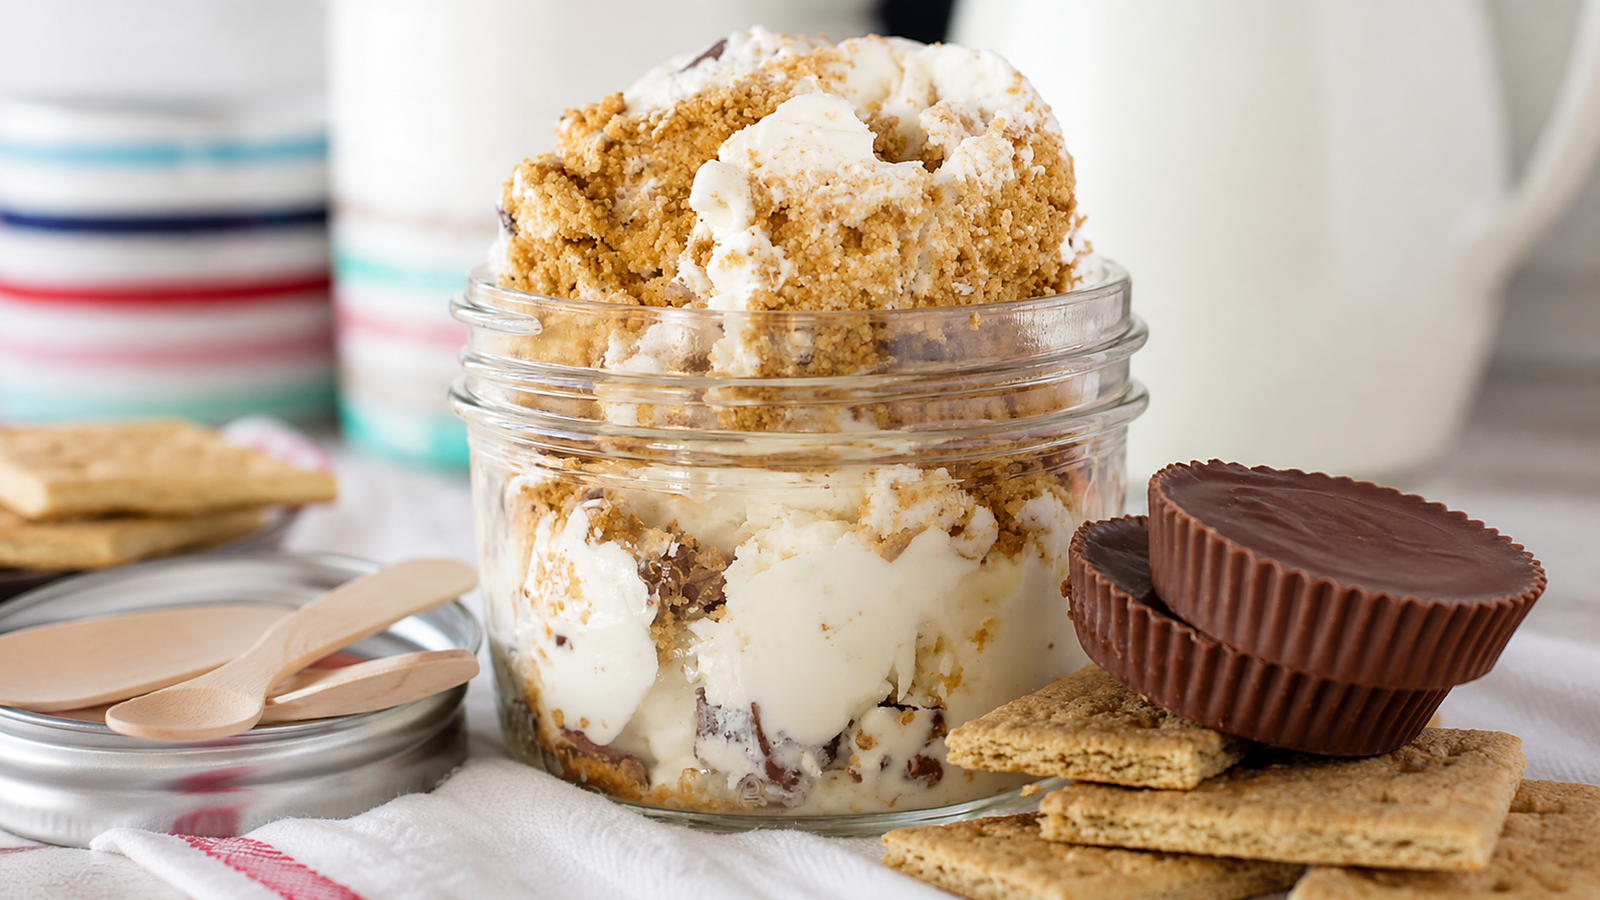
S’mores Peanut Butter Cup Ice Cream brings together three irresistible dessert flavors in one creamy, crunchy scoop. Rich peanut butter cups, sweet marshmallow, and buttery graham cracker crumbs come together with smooth homemade ice cream for a dessert that feels both nostalgic and indulgent.
What makes this ice cream especially appealing is the contrast in every bite. The base is cool and velvety, the peanut butter cups add little pockets of chocolatey richness, and the graham cracker pieces bring a delicate crunch. Marshmallow adds that classic campfire sweetness that makes the whole combination taste like a frozen version of a favorite summer treat.
This recipe is perfect when you want something homemade without making a complicated custard. With a few simple ingredients and an ice cream maker, you can create a generous batch that is ideal for family desserts, summer gatherings, or a quiet night with a bowl and a spoon. Once you taste those creamy layers with peanut butter, chocolate, graham crackers, and marshmallow together, it is easy to see why this flavor combination works so well.
Why You’ll Love This Recipe
- Classic s’mores flavor: Graham crackers, marshmallow, and chocolate create the familiar campfire combination in every scoop.
- Rich peanut butter cups: Chopped peanut butter cups add creamy peanut butter and chocolate in delicious little bites.
- Creamy homemade texture: The ice cream base freezes smooth and rich, while the crunchy mix-ins keep each spoonful interesting.
- Easy to customize: Add extra graham cracker crumbs, more peanut butter cups, or a drizzle of chocolate depending on your taste.
- Perfect for summer: It is a refreshing frozen dessert for cookouts, birthdays, family gatherings, or warm evenings at home.
- Make-ahead friendly: Prepare it in advance and keep it in the freezer so dessert is ready whenever you need it.
- A fun twist on s’mores: Instead of making traditional campfire s’mores, you get all those familiar flavors in a cold, creamy dessert.
Ingredients for S’mores Peanut Butter Cup Ice Cream
This homemade ice cream uses a short list of simple ingredients, but each one adds something important to the final texture and flavor. Full-fat dairy gives the ice cream a smooth, creamy base, while graham crackers, marshmallow, and peanut butter cups create the classic s’mores-inspired layers.
- 3 cups heavy whipping cream: Use full-fat heavy cream for the richest, smoothest texture.
- 3/4 cup granulated sugar: Sweetens the ice cream and helps keep the frozen texture softer.
- Pinch of salt: Balances the sweetness and brings out the chocolate and peanut butter flavors.
- 1 teaspoon pure vanilla extract: Adds a warm vanilla note to the creamy base.
- 1/2 cup marshmallow fluff: Creates soft, sweet marshmallow ribbons throughout the ice cream.
- 6 peanut butter cups: Chop them into small pieces so every scoop gets plenty of chocolate and peanut butter.
- 1 cup graham cracker crumbs: Adds the buttery, slightly crisp element that gives this dessert its s’mores character.
- 2 tablespoons unsalted or salted butter, melted: Coats the graham cracker crumbs and gives them a richer, more crumbly texture.
For the best results, have your ice cream maker properly chilled before you begin. The original recipe also emphasizes using full-fat heavy cream because lower-fat dairy contains more water, which can lead to a harder, icier frozen texture.
Ingredient Notes & Substitutions
A few small ingredient choices can make a noticeable difference in the texture and flavor of your S’mores Peanut Butter Cup Ice Cream.
- Heavy whipping cream: Full-fat heavy cream gives the ice cream its rich, creamy texture. Avoid replacing it with milk or light cream, as the extra water can make homemade ice cream freeze harder and icier.
- Granulated sugar: Regular white sugar works well here because it dissolves easily and keeps the base simple. Avoid reducing the sugar too much, since sugar also helps create a softer frozen texture.
- Marshmallow fluff: Marshmallow creme gives the ice cream its smooth marshmallow flavor and helps create sweet pockets throughout the mixture. If you cannot find marshmallow fluff, a soft marshmallow spread can work as a substitute.
- Peanut butter cups: Chopped mini or regular peanut butter cups both work. For smaller bites throughout the ice cream, chop the cups into roughly pea-sized pieces. You can also use a similar chocolate and peanut butter candy if needed.
- Graham crackers: Honey graham crackers are a natural choice for the classic s’mores flavor. Chocolate graham crackers can also be used if you want a deeper chocolate taste.
- Butter: Melted butter helps turn the graham cracker crumbs into rich, buttery pieces. Unsalted butter gives you more control over the salt level, while salted butter adds a subtle savory contrast.
- Vanilla extract: Pure vanilla extract adds warmth to the creamy base. If you only have vanilla flavoring, it can still be used, although pure vanilla gives the cleanest flavor.
- Dairy-free option: For a dairy-free version, use a plant-based heavy cream alternative that is specifically designed for whipping or ice cream making. Choose dairy-free chocolate peanut butter cups and dairy-free graham crackers as well.
- Gluten-free option: Use certified gluten-free graham crackers and check the labels on your peanut butter cups and marshmallow products to make sure all ingredients meet your dietary needs.
A Simple Budget-Friendly Tip
You do not need premium candy or specialty ingredients to make this ice cream taste great. Store-brand graham crackers, chocolate peanut butter cups, and marshmallow creme can work beautifully. The biggest difference comes from using a rich cream base and allowing the finished ice cream enough time to freeze properly.
Kitchen Tools Needed
You do not need a complicated setup to make S’mores Peanut Butter Cup Ice Cream at home. A few basic kitchen tools are enough to get the job done.
- Ice cream maker: The most important tool for creating a smooth, scoopable texture.
- Large mixing bowl: Use a spacious bowl so the cream mixture is easy to whisk without splashing.
- Electric hand mixer: Helpful for whipping the heavy cream until it becomes light and fluffy.
- Measuring cups and spoons: For accurately measuring the cream, sugar, vanilla, and mix-ins.
- Rubber spatula: Useful for gently folding ingredients together without knocking too much air out of the mixture.
- Small bowl: Perfect for combining the graham cracker crumbs with melted butter.
- Sharp knife and cutting board: Use these to chop the peanut butter cups into bite-sized pieces.
- Freezer-safe container: A shallow, airtight container works especially well for storing and freezing the finished ice cream.
- Plastic wrap or parchment paper: Optional, but pressing a piece directly against the surface of the ice cream can help reduce ice crystals during longer storage.
If you do not have an ice cream maker, you can still try a no-churn variation, although the texture will be slightly different from ice cream churned in a machine.
Step-by-Step Instructions
1. Prepare the Graham Cracker Crumbs
Place the graham cracker crumbs in a small bowl. Pour in the melted butter and stir until the crumbs are evenly coated and resemble moist, buttery crumbs.
Set them aside while you prepare the ice cream base.
2. Make the Creamy Ice Cream Base
Pour the heavy whipping cream into a large mixing bowl. Add the granulated sugar, vanilla extract, and a small pinch of salt.
Using an electric mixer, beat the mixture until it becomes thick and creamy. You want soft peaks that hold their shape without becoming stiff or grainy.
Be careful not to overmix the cream. Once it reaches the right consistency, stop mixing.
3. Add the Marshmallow
Gently fold the marshmallow fluff into the whipped cream mixture using a rubber spatula.
Fold slowly until the marshmallow is distributed throughout the base. A few visible ribbons are perfectly fine and can create lovely pockets of marshmallow flavor once the ice cream freezes.
4. Fold in the Peanut Butter Cups
Add the chopped peanut butter cups to the mixture. Fold gently until the pieces are spread evenly throughout the creamy base.
Try not to stir too aggressively, since you want to keep the mixture light and airy.
5. Churn the Ice Cream
Transfer the mixture to your prepared ice cream maker and churn according to the manufacturer’s instructions.
As the mixture churns, it should gradually become thicker and resemble soft-serve ice cream. This is the stage when the base develops its smooth, creamy texture.
6. Add the Graham Cracker Pieces
Once the ice cream has thickened, add the buttery graham cracker crumbs or pieces.
If your ice cream maker has a recommended time for adding mix-ins, follow those instructions. Otherwise, add them toward the end of churning so they remain distinct instead of becoming completely blended into the base.
7. Transfer to a Freezer-Safe Container
Spoon the freshly churned ice cream into a freezer-safe container. Smooth the surface with a spatula.
For an extra s’mores-inspired finish, scatter a few additional graham cracker crumbs and chopped peanut butter cups over the top before freezing.
8. Freeze Until Firm
Cover the container tightly and place it in the freezer for several hours, preferably overnight.
Freshly churned ice cream will be soft and easy to scoop, but additional freezing time allows it to develop a firmer, more scoopable texture.
Common Mistakes to Avoid
- Do not overwhip the cream. Stop once you reach soft, creamy peaks.
- Do not add too many mix-ins at once. Excess candy and crumbs can make the ice cream difficult to scoop.
- Do not skip the freezing time. The ice cream needs several hours to fully firm up.
- Do not leave the container uncovered. Exposure to freezer air can create unwanted ice crystals and affect the texture.
- Do not use a warm ice cream maker bowl. If your machine requires a frozen bowl, make sure it has been frozen for the full time recommended by the manufacturer.
Expert Tips for the Best S’mores Peanut Butter Cup Ice Cream
A few simple techniques can make your homemade ice cream smoother, richer, and easier to scoop.
- Use cold ingredients: Keep the heavy cream chilled until you are ready to whip it. A cold base churns more efficiently and helps create a smoother texture.
- Freeze the ice cream maker bowl properly: If your machine uses a freezer bowl, give it plenty of time to freeze completely. A bowl that is not cold enough can leave the mixture too soft.
- Keep the graham crackers chunky: Avoid turning every graham cracker piece into a fine powder. Small buttery chunks add a pleasant contrast to the creamy ice cream.
- Chop the peanut butter cups evenly: Smaller pieces distribute more easily, giving you chocolate and peanut butter in almost every spoonful.
- Create visible marshmallow ribbons: Instead of completely blending the marshmallow fluff into the base, gently fold it through. This leaves sweet marshmallow pockets throughout the finished ice cream.
- Do not overload the ice cream: Mix-ins should complement the creamy base rather than overwhelm it. Save a few peanut butter cup pieces and graham crumbs for the top.
- Use an airtight container: Press the ice cream into the container and smooth the surface before covering it tightly. This helps protect the texture during freezing.
- Let it sit before scooping: If the ice cream becomes very firm in the freezer, leave it at room temperature for about 5 to 10 minutes before serving. It should soften enough to scoop without becoming melted.
- Add toppings just before serving: A little extra marshmallow fluff, chopped peanut butter cups, or graham cracker crumbs can give each serving a fresh contrast in texture.
For the Creamiest Texture
The biggest secret is patience. Start with cold ingredients, churn the mixture until properly thickened, and give the finished ice cream enough time to freeze. These small details help create a smooth, creamy scoop instead of an icy or overly hard dessert.
Variations
One of the best things about homemade S’mores Peanut Butter Cup Ice Cream is how easy it is to customize. Keep the creamy base the same and switch up the mix-ins to create a version that suits your taste.
Chocolate S’mores Ice Cream
For a richer chocolate flavor, add a little unsweetened cocoa powder to the ice cream base. You can also mix in chocolate graham cracker crumbs and extra chopped peanut butter cups.
Extra Peanut Butter Version
If peanut butter is your favorite part, swirl a few spoonfuls of creamy peanut butter through the churned ice cream before freezing. Slightly warm the peanut butter first so it is easier to swirl without disturbing the texture.
Chocolate Chip S’mores Ice Cream
Add mini chocolate chips along with the peanut butter cups. The small chips provide a pleasant chocolate crunch without making each bite too heavy.
Marshmallow Lover’s Version
For more marshmallow flavor, add extra marshmallow fluff in thin layers as you transfer the ice cream to its freezer container. This creates visible sweet marshmallow swirls throughout the finished dessert.
Gluten-Free Version
Use certified gluten-free graham crackers and carefully check the labels on your chocolate and peanut butter cups. This keeps the classic s’mores flavor while making the recipe suitable for a gluten-free diet.
Dairy-Free Version
Use a dairy-free heavy cream alternative designed for whipping or frozen desserts. Choose dairy-free peanut butter cups, chocolate, graham crackers, and marshmallow products as needed.
Nut-Free Option
For a nut-free version, replace the peanut butter cups with chocolate candies or chocolate chips that are made without peanuts or other tree nuts. Always check the packaging for allergen and cross-contact information.
S’mores Sundae Style
Turn each scoop into a full dessert by adding crushed graham crackers, chopped chocolate, marshmallow fluff, and a light chocolate drizzle just before serving. A toasted marshmallow on top makes a fun finishing touch.
Storage Instructions
Proper storage helps keep your S’mores Peanut Butter Cup Ice Cream creamy and protects the graham crackers and chocolate pieces from becoming overly hard.
Freezer Storage
Transfer the finished ice cream to a clean, airtight freezer-safe container. Smooth the surface and place a piece of plastic wrap or parchment directly over the ice cream before sealing the container.
Store it in the freezer for up to 2 weeks for the best texture and flavor. It can remain frozen longer, but the texture may gradually become harder and less creamy.
How to Keep It Scoopable
Keep the container toward the back of the freezer rather than near the door. The temperature is usually more stable there, which helps reduce repeated softening and refreezing.
When ready to serve, let the container sit at room temperature for about 5 to 10 minutes. This gives the ice cream enough time to soften slightly without melting.
Can You Refreeze Melted Ice Cream?
It is best to avoid completely melting and refreezing homemade ice cream. Repeated thawing and freezing can create larger ice crystals and make the texture noticeably less creamy.
For the best results, take out only the amount you plan to serve and return the container to the freezer promptly.
Frequently Asked Questions
Can I make S’mores Peanut Butter Cup Ice Cream without an ice cream maker?
Yes, you can try a no-churn method, although the texture will be somewhat different. The ice cream maker helps incorporate air and creates a smoother, creamier consistency.
How long does homemade ice cream need to freeze?
After churning, freeze the ice cream for several hours until firm. For the best scoopable texture, letting it freeze overnight works well.
Can I use mini peanut butter cups?
Absolutely. Mini peanut butter cups are easy to chop and distribute throughout the ice cream. You can also leave a few whole for topping individual servings.
Can I use regular marshmallows instead of marshmallow fluff?
You can, but the texture will be different. Marshmallow fluff blends and swirls into ice cream more easily, while regular marshmallows tend to become firmer and chewier when frozen.
Why is my homemade ice cream too hard?
Homemade ice cream can become quite firm after several hours in the freezer. Let it sit at room temperature for about 5 to 10 minutes before scooping. Using enough fat and sugar in the base also helps maintain a softer texture.
How do I prevent ice crystals from forming?
Store the ice cream in an airtight container and keep the surface well covered. Avoid repeatedly letting the ice cream soften and refreeze.
Can I add extra graham crackers?
Yes. Extra graham cracker pieces add more crunch and buttery flavor. For the best texture, reserve some pieces for the topping rather than mixing all of them into the base.
Can I make this ice cream gluten-free?
Yes. Use certified gluten-free graham crackers and check the labels of all packaged ingredients to make sure they meet your dietary requirements.
Can I make this recipe dairy-free?
Yes. Use suitable dairy-free alternatives for the heavy cream, peanut butter cups, and other dairy-containing ingredients. The final texture may vary depending on the products you choose.
Smores Peanut Butter Cup Ice Cream
Ingredients
Method
- Combine the graham cracker crumbs and melted butter in a small bowl. Stir until evenly coated and set aside
- Pour the cold heavy whipping cream into a large mixing bowl. Add the sugar, vanilla extract, and salt
- Beat with an electric mixer until the mixture becomes thick and reaches soft peaks. Do not overwhip
- Gently fold the marshmallow fluff into the whipped cream mixture.
- Fold in the chopped peanut butter cups, distributing them evenly.
- Transfer the mixture to a prepared ice cream maker and churn according to the manufacturer's instructions.
- Add the buttery graham cracker crumbs toward the end of churning so they remain in distinct pieces
- Transfer the churned ice cream to an airtight freezer-safe container.
- Add extra peanut butter cup pieces or graham cracker crumbs on top, if desired.
- Cover tightly and freeze for at least 4 to 6 hours, or until firm enough to scoop.
Video
Notes
- Use cold, full-fat heavy cream for the creamiest texture.
- Make sure your ice cream maker bowl is completely frozen if your machine requires a freezer bowl.
- Chop the peanut butter cups into small pieces so they are easier to scoop.
- Keep some graham cracker crumbs and candy pieces aside for topping.
- Let the ice cream rest at room temperature for 5 to 10 minutes before scooping if it becomes very firm.
- Store in an airtight freezer-safe container for the best quality.
Final Thoughts
S’mores Peanut Butter Cup Ice Cream is a fun way to bring together the flavors of a classic campfire treat with rich peanut butter and chocolate. The creamy base, buttery graham cracker pieces, soft marshmallow, and chopped peanut butter cups create a satisfying mix of smooth, crunchy, chewy, and chocolatey textures.
It is also an easy dessert to prepare ahead of time, making it a great choice for summer gatherings, family dinners, or whenever you have a craving for homemade ice cream.
For the best experience, serve each scoop with a few extra graham cracker crumbs and peanut butter cup pieces on top. A little extra marshmallow fluff adds an especially nice finishing touch.
If you make this S’mores Peanut Butter Cup Ice Cream, try your favorite mix-ins and make the recipe your own. Then enjoy a scoop straight from the freezer and share how it turned out.
3 Comments