
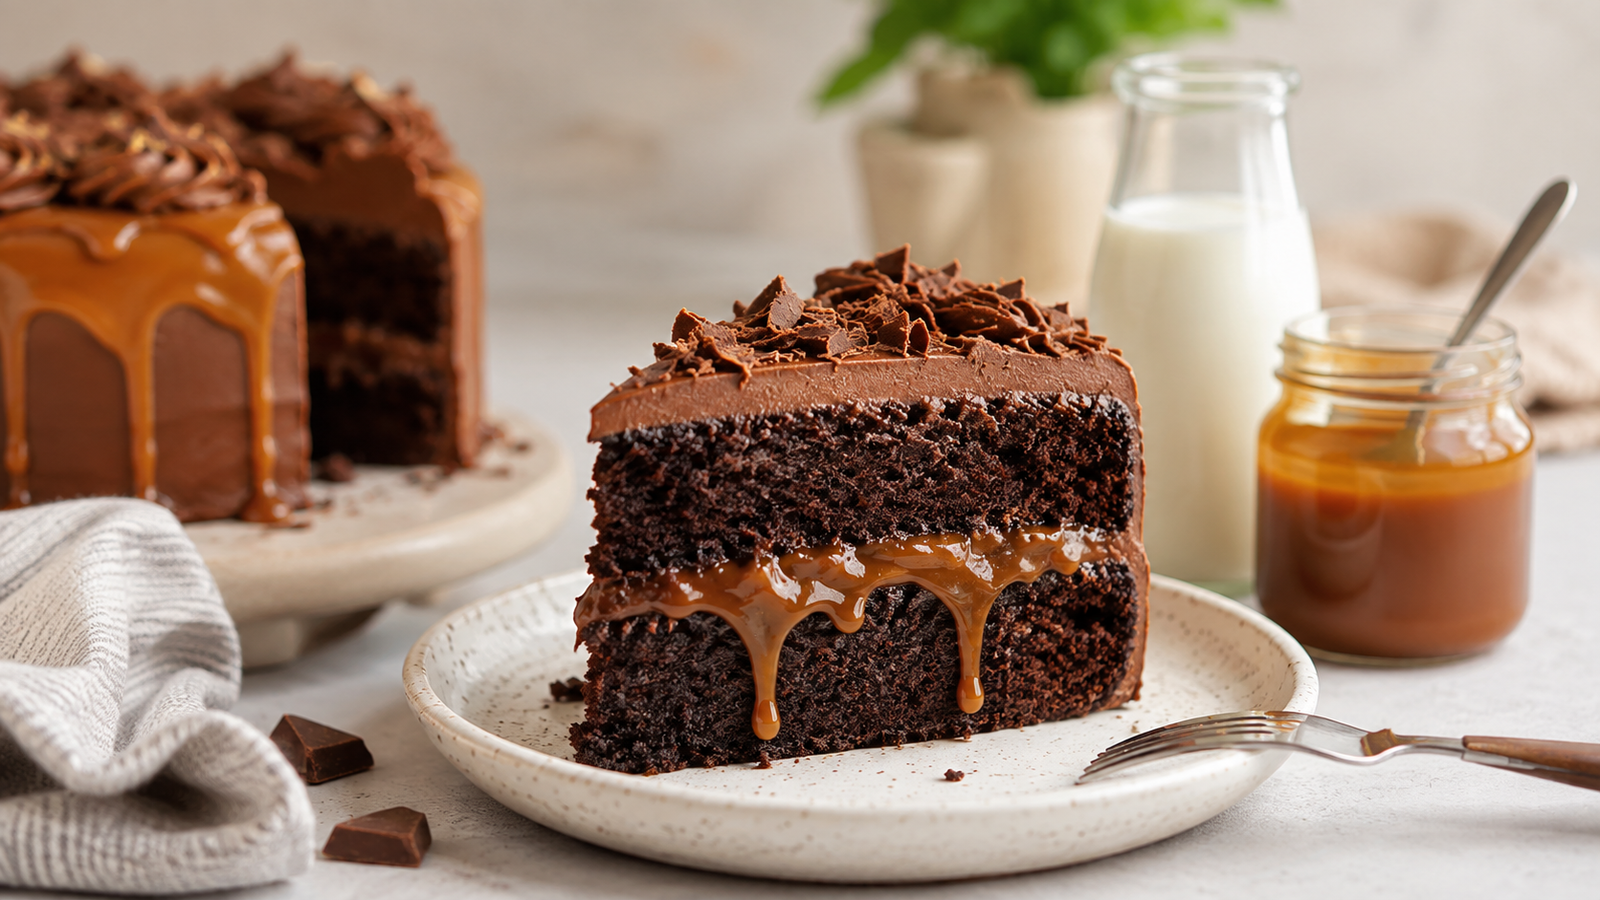
Caramel Hot Chocolate Brownie Mousse Cake
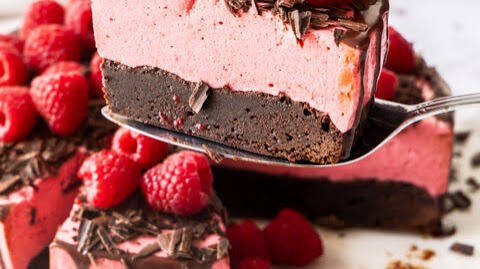
If you love the cozy combination of chocolate and caramel, this Caramel Hot Chocolate Brownie Mousse Cake brings those flavors together in one beautiful dessert. A rich, fudgy brownie forms the base, followed by a silky hot chocolate mousse and a light caramel cream layer that melts into every bite.
What makes this cake especially tempting is the contrast in textures. The brownie is dense and chocolatey, while the mousse is soft and velvety, and the caramel topping adds a smooth sweetness that ties everything together. It feels elegant enough for a holiday table or special celebration, yet the individual layers are simple enough to make at home.
Serve each slice chilled for the best texture, with a little extra caramel drizzled over the top if you want an especially pretty finish. This is the kind of chocolate mousse cake that turns an ordinary dessert into something worth gathering around.
Why You’ll Love This Recipe
- Three irresistible layers: A fudgy brownie base, creamy hot chocolate mousse, and sweet caramel topping create a dessert with plenty of texture and flavor.
- Rich chocolate flavor: The brownie and mousse bring deep cocoa notes without making the cake feel overly heavy.
- Smooth and creamy texture: The mousse layer is light, silky, and soft enough to balance the dense brownie underneath.
- Caramel adds the perfect finish: A buttery caramel layer gives the chocolate a warm sweetness and makes every bite feel extra special.
- Great for make-ahead desserts: This cake needs time to chill and set, so you can prepare it ahead of a dinner party or celebration.
- Beautiful without complicated decorating: The layered design looks impressive once sliced, even with a simple caramel drizzle on top.
- Perfect for chocolate lovers: If brownies, hot chocolate, caramel, and mousse are all favorites in your kitchen, this dessert brings them together in one memorable cake.
Ingredients
This Caramel Hot Chocolate Brownie Mousse Cake uses simple baking ingredients, but each one plays an important role in creating the rich brownie base, creamy mousse, and sweet caramel finish.
For the Brownie Base
- 1/2 cup unsalted butter, melted
- 1 cup granulated sugar
- 2 large eggs
- 1 teaspoon vanilla extract
- 1/2 cup all-purpose flour
- 1/3 cup unsweetened cocoa powder
- 1/4 teaspoon salt
- 1/2 cup semi-sweet chocolate chips
For the Hot Chocolate Mousse
- 1 1/2 cups heavy whipping cream, divided
- 1 cup semi-sweet chocolate chips
- 1/4 cup powdered sugar
- 2 tablespoons unsweetened cocoa powder
- 1 teaspoon vanilla extract
- 1/4 teaspoon salt
For the Caramel Topping
- 1/2 cup caramel sauce
- 1/2 cup heavy whipping cream
- 2 tablespoons powdered sugar
- 1/2 teaspoon vanilla extract
- Pinch of salt
For Garnishing
- Extra caramel sauce, for drizzling
- Chocolate shavings or finely chopped chocolate, optional
- Mini marshmallows, optional
For the best texture, use good-quality chocolate and full-fat heavy cream. These ingredients help create a smooth mousse and a rich, creamy finish without making the dessert complicated.
Ingredient Notes & Substitutions
A few small ingredient choices can make a noticeable difference in the texture and flavor of this Caramel Hot Chocolate Brownie Mousse Cake. Here are some practical options if you need to adjust the recipe.
Brownie Base
Unsalted butter: Unsalted butter lets you control the amount of salt in the brownie. If you only have salted butter, simply reduce or skip the added salt.
Granulated sugar: Regular white sugar works best for a classic fudgy brownie texture. Avoid replacing all of it with liquid sweeteners, which can change the structure of the base.
All-purpose flour: This gives the brownie enough structure while keeping it tender. For a gluten-free version, use a reliable 1-to-1 gluten-free baking flour.
Unsweetened cocoa powder: Natural or Dutch-process cocoa can both work here. Dutch-process cocoa gives the brownie a darker color and a smoother chocolate flavor.
Chocolate chips: Semi-sweet chocolate provides a good balance against the sweet caramel. Dark chocolate can be used for a deeper, less sweet flavor.
Hot Chocolate Mousse
Heavy whipping cream: Use cold heavy cream with at least 35 percent milk fat for the smoothest mousse and the best volume.
Chocolate: Semi-sweet chocolate works well, but milk chocolate can be used if you prefer a sweeter mousse. For a richer flavor, choose dark chocolate with around 60 to 70 percent cocoa.
Powdered sugar: Powdered sugar dissolves easily into whipped cream. If your chocolate is already quite sweet, you can slightly reduce the amount.
Cocoa powder: This gives the mousse a familiar hot chocolate flavor and adds extra chocolate depth.
Vanilla extract: A small amount rounds out the chocolate and caramel flavors. Pure vanilla extract is ideal, but imitation vanilla can work in a pinch.
Caramel Topping
Caramel sauce: Store-bought caramel sauce is a convenient choice and saves preparation time. Homemade caramel sauce can also be used for a more buttery flavor.
Heavy whipping cream: Keep the cream cold when whipping it for the topping. Cold cream reaches soft, fluffy peaks more easily.
Salt: A tiny pinch helps balance the sweetness and makes the caramel taste more pronounced. For a salted caramel variation, add a little more to taste.
Allergy-Friendly Options
For a gluten-free brownie mousse cake, replace the all-purpose flour with a certified gluten-free 1-to-1 baking blend and check that your chocolate and caramel sauce are also gluten-free.
For a dairy-free version, use plant-based butter, dairy-free chocolate, coconut or other suitable dairy-free whipping cream, and a dairy-free caramel sauce. Keep in mind that the texture may vary depending on the brands you use.
Budget-Friendly Tips
You do not need expensive chocolate to make this dessert taste special. Choose a good-quality cocoa powder and semi-sweet chocolate that you already enjoy eating. Homemade whipped cream is also an inexpensive way to create a soft, bakery-style finish.
If you are short on time, a good prepared caramel sauce works perfectly well. The brownie and mousse provide plenty of homemade texture and flavor, so there is no need to make every component from scratch.
Kitchen Tools Needed
You do not need a professional baking setup to make this Caramel Hot Chocolate Brownie Mousse Cake. A few basic tools are enough to create clean layers and a smooth finish.
- 8-inch or 9-inch springform pan: Makes it much easier to remove the chilled cake without damaging the mousse layers.
- Mixing bowls: Use separate bowls for the brownie batter, chocolate mixture, and whipped cream.
- Electric hand mixer or stand mixer: Helps whip the cream quickly and evenly. A sturdy whisk can also work, although it takes more effort.
- Rubber spatula: Essential for gently folding whipped cream into the chocolate mixture without losing too much air.
- Measuring cups and spoons: Accurate measurements are especially important when baking the brownie base.
- Microwave-safe bowl or heatproof bowl: Useful for melting the chocolate and butter smoothly.
- Small saucepan: Helpful if you prefer to warm the cream or prepare homemade caramel sauce.
- Offset spatula: Optional, but useful for spreading the mousse into an even layer.
- Parchment paper: Helps prevent the brownie base from sticking and makes cleanup easier.
Helpful Tip
If you do not have a springform pan, a deep 8-inch cake pan lined with parchment paper can work. Leave some parchment extending above the sides so you can carefully lift the chilled cake out after it has fully set.
For the neatest slices, keep a sharp knife nearby and dip the blade in hot water before wiping it dry and cutting each slice. Repeating this between cuts helps create clean, defined layers.
Step-by-Step Instructions
1. Prepare the Pan and Oven
Preheat your oven to 350°F (175°C). Lightly grease an 8-inch or 9-inch springform pan and line the bottom with parchment paper.
The parchment makes the brownie layer easier to release later. Make sure the oven is fully preheated before the batter goes in so the brownie bakes evenly.
2. Make the Brownie Batter
In a mixing bowl, whisk the melted butter and granulated sugar until smooth. Add the eggs and vanilla extract, then whisk until the mixture looks glossy and well combined.
In a separate bowl, whisk together the flour, cocoa powder, and salt. Gradually add the dry ingredients to the wet mixture, stirring just until no dry streaks remain.
Fold in the chocolate chips. Do not overmix the batter, as too much stirring can make the brownie firm instead of fudgy.
3. Bake the Brownie Base
Spread the batter evenly into the prepared pan. Bake for about 20 to 25 minutes, or until the center looks set but still feels slightly soft when gently pressed.
A toothpick inserted near the center should come out with a few moist crumbs rather than completely clean. That is a good sign that the brownie will stay fudgy after chilling.
Let the brownie cool completely in the pan before adding the mousse.
4. Prepare the Chocolate Mousse Mixture
Place the chocolate chips in a heatproof bowl. Warm about 1/2 cup of the heavy cream until hot but not boiling.
Pour the warm cream over the chocolate and let it sit for a minute or two. Stir slowly until the chocolate melts into a smooth, glossy mixture.
Whisk in the cocoa powder, vanilla extract, and salt. Let the chocolate mixture cool until it is slightly warm or close to room temperature.
Do not add hot chocolate mixture directly to whipped cream. Excess heat can deflate the cream and leave you with a loose mousse.
5. Whip the Cream
Pour the remaining 1 cup of cold heavy cream into a clean mixing bowl. Add the powdered sugar and beat until soft to medium peaks form.
The whipped cream should hold its shape but still look smooth and creamy. Avoid whipping it until it becomes stiff or grainy.
6. Fold the Mousse Together
Add a small portion of the whipped cream to the cooled chocolate mixture and gently stir to lighten it.
Then add the remaining whipped cream in two additions. Use a rubber spatula and fold gently from the bottom of the bowl upward until the mixture is evenly combined.
The finished mousse should look airy, smooth, and creamy with no large streaks of whipped cream.
7. Add the Mousse Layer
Once the brownie has cooled completely, spoon the chocolate mousse over the brownie base.
Use an offset spatula or the back of a spoon to spread the mousse into an even layer. Gently smooth the surface without pressing down too firmly.
Cover the pan and refrigerate for at least 4 hours, preferably overnight. The mousse needs enough time to become firm enough to slice cleanly.
8. Prepare the Caramel Cream Topping
Place the cold heavy cream, powdered sugar, and vanilla extract in a mixing bowl. Beat until soft peaks form.
Gently fold in the caramel sauce until the mixture is smooth and evenly combined.
If the caramel sauce is very thick, let it sit at room temperature for a few minutes before mixing. Avoid using warm caramel, which can soften the whipped cream.
9. Finish the Cake
Spread the caramel cream evenly over the chilled mousse layer.
Drizzle additional caramel sauce over the top. For a little extra chocolate flavor, sprinkle with chocolate shavings or finely chopped chocolate. Mini marshmallows are another fun option if you want the dessert to resemble a classic cup of hot chocolate.
10. Chill Before Serving
Return the finished cake to the refrigerator for another 30 to 60 minutes before slicing.
When ready to serve, carefully loosen the springform pan. Run a thin knife around the edge if necessary.
For clean slices, dip a sharp knife in hot water, wipe it dry, and cut through the cake. Clean and warm the knife between slices.
Common Mistakes to Avoid
Adding hot chocolate to the whipped cream: Let the chocolate mixture cool first. Warm chocolate can melt the whipped cream and prevent the mousse from setting properly.
Overbaking the brownie: A brownie base that is too dry will become firm and difficult to cut once chilled. Look for moist crumbs rather than a completely clean toothpick.
Overwhipping the cream: Stop once soft to medium peaks form. Grainy whipped cream will not fold smoothly into the mousse.
Skipping the chilling time: The layers need time to firm up. Cutting the cake too soon can cause the mousse and caramel topping to slide.
Using warm caramel sauce: Make sure the caramel is cool before folding it into whipped cream or drizzling it over the cake.
Expert Tips
A few simple techniques can make this layered dessert easier to assemble and give you cleaner slices, a smoother mousse, and a richer chocolate flavor.
Use Room-Temperature Brownie Base
Let the brownie cool completely before adding the mousse. If the brownie is still warm, it can soften the mousse and make the layers difficult to keep distinct.
Do Not Overbake the Brownie
The brownie should remain slightly fudgy in the center. Since the cake will be chilled later, a dry brownie can become quite firm. Pull it from the oven when a toothpick shows a few moist crumbs.
Cool the Chocolate Properly
The melted chocolate mixture should be cool enough that it will not melt the whipped cream, but it should still be fluid enough to fold easily. If it becomes too thick, let it sit at room temperature for a few minutes and stir gently before combining.
Whip the Cream to the Right Stage
Soft to medium peaks are ideal for mousse. Cream that is too loose will make the mousse unstable, while overwhipped cream can create a dense or slightly grainy texture.
Fold Gently
Use a rubber spatula and fold rather than vigorously stirring. Gentle folding preserves the air in the whipped cream, which gives the hot chocolate mousse its light, velvety texture.
Chill the Cake Long Enough
For the firmest mousse and cleanest layers, refrigerate the assembled cake for at least 4 hours. Overnight chilling is even better when you are preparing it for a special occasion.
Choose Quality Chocolate
The chocolate is a major part of the mousse, so use a brand with a flavor you enjoy. Semi-sweet chocolate creates a balanced dessert, while dark chocolate gives the cake a deeper cocoa taste.
Balance the Sweetness
Caramel and chocolate can both be quite sweet. A small pinch of salt in the mousse and caramel topping helps sharpen the flavors without making the dessert taste salty.
Get Cleaner Cake Slices
For bakery-style slices, use a thin, sharp knife. Dip it briefly in hot water, dry it thoroughly, then cut straight down through the cake. Warm and clean the blade between slices for the neatest results.
Make It Ahead
This cake is especially convenient for entertaining because the brownie and mousse layers can be prepared ahead of time. Keep the cake covered and chilled, then add the final caramel decorations shortly before serving for the freshest appearance.
Variations
Once you have the basic Caramel Hot Chocolate Brownie Mousse Cake down, it is easy to adjust the flavors and toppings to suit different occasions or dietary needs.
Salted Caramel Chocolate Cake
Turn the caramel layer into a salted caramel topping by adding a small pinch of flaky sea salt. Finish each slice with a few flakes of salt for a sweet and salty contrast.
Dark Chocolate Version
For a more intense chocolate dessert, replace the semi-sweet chocolate with dark chocolate. Choose chocolate around 60 to 70 percent cocoa for a rich flavor that balances nicely with the sweet caramel.
Milk Chocolate Mousse
If you prefer a softer, sweeter chocolate flavor, use milk chocolate for the mousse. Since milk chocolate contains more sugar, you can reduce the powdered sugar slightly to keep the dessert balanced.
Mocha Caramel Cake
Add 1 to 2 teaspoons of instant espresso powder to the chocolate mixture. Coffee enhances the cocoa flavor without making the mousse taste strongly like coffee.
Peppermint Hot Chocolate Cake
For a festive winter variation, add a small amount of peppermint extract to the chocolate mousse. Finish the cake with crushed peppermint candies or thin chocolate curls.
Toasted Marshmallow Topping
Give the dessert a classic hot chocolate feel by adding mini marshmallows just before serving. If you have a kitchen torch, lightly toast the tops for a golden finish.
Peanut Butter Caramel Version
Spread a thin layer of creamy peanut butter over the cooled brownie before adding the mousse. The salty peanut butter pairs especially well with chocolate and caramel.
Gluten-Free Option
Use a certified gluten-free 1-to-1 baking flour in the brownie layer. Also check the labels on the chocolate, caramel sauce, and other packaged ingredients to make sure they meet your dietary requirements.
Dairy-Free Option
Use dairy-free butter, dairy-free chocolate, and a suitable plant-based whipping cream. Choose a dairy-free caramel sauce or prepare one using your preferred dairy-free ingredients.
Because dairy-free products vary in fat and moisture, the mousse may have a slightly different consistency from the original recipe.
Individual Dessert Cups
Instead of making one large cake, layer the brownie pieces, chocolate mousse, and caramel cream in small dessert glasses. This version does not require slicing and is especially convenient for parties and dinner gatherings.
Storage Instructions
Because this cake contains whipped cream and mousse, it should be kept refrigerated until you are ready to serve it.
Refrigerator Storage
Cover the cake loosely with plastic wrap or place it in an airtight cake container. Store it in the refrigerator for up to 4 days.
For the best texture, keep the cake chilled and avoid leaving it at room temperature for extended periods. The mousse and caramel cream will soften as they warm.
If possible, store the cake on a flat shelf in the refrigerator rather than near the door, where temperatures can fluctuate more often.
Freezer Storage
You can freeze the brownie and mousse cake for longer storage, although the texture of the whipped cream topping may change slightly after thawing.
Place the fully chilled cake in the freezer until firm. Wrap it securely in plastic wrap, followed by a layer of aluminum foil, or place it in a freezer-safe airtight container.
Freeze for up to 1 month for the best quality.
For the best results, add fresh caramel drizzle and decorative toppings after thawing rather than freezing them with the finished cake.
How to Thaw
Transfer the frozen cake to the refrigerator and let it thaw slowly for several hours or overnight.
Do not thaw it at room temperature. Slow refrigerator thawing helps the mousse maintain its structure and keeps the dairy-based layers safely chilled.
Before Serving
Once thawed, check the mousse layer before serving. If the cake looks slightly soft, return it to the refrigerator for 30 to 60 minutes to firm up.
For the cleanest slices, serve the cake cold and use a warm, dry knife to cut through each layer.
Frequently Asked Questions
Can I make this cake a day ahead?
Yes. In fact, making it the day before is a great option. The extra chilling time helps the mousse set firmly and makes the cake easier to slice.
Can I use a different size pan?
Yes, but the thickness of the layers will change. An 8-inch pan creates a taller cake, while a 9-inch pan produces slightly thinner layers. If using a different size, keep an eye on the brownie baking time.
How do I know when the brownie is done?
The edges should look set while the center remains slightly soft. A toothpick inserted into the center should come out with a few moist crumbs attached.
Why is my mousse too soft?
The chocolate mixture may have been too warm when combined with the whipped cream, or the cream may not have been whipped enough. Make sure the cake is thoroughly chilled before serving.
Can I use store-bought caramel sauce?
Absolutely. A good-quality prepared caramel sauce is a convenient choice and works well in this recipe. Choose a thick sauce for the best topping consistency.
Can I use homemade caramel?
Yes. Homemade caramel sauce adds a lovely buttery flavor. Let it cool completely before mixing it with whipped cream or adding it to the cake.
Can I use milk chocolate instead of semi-sweet chocolate?
Yes. Milk chocolate will give the mousse a sweeter and creamier flavor. You may want to reduce the powdered sugar slightly to keep the dessert balanced.
Can I make this cake without a springform pan?
Yes. Line a deep cake pan with parchment paper, leaving some paper extending above the sides. Once chilled, use the parchment to carefully lift the cake from the pan.
How long should the cake chill?
Chill the cake for at least 4 hours before serving. For the firmest mousse and cleanest slices, refrigerating it overnight is ideal.
Can I freeze the cake?
Yes. The cake can be frozen for up to 1 month when wrapped well. For the best presentation, add fresh caramel and decorative toppings after thawing.
How should I cut the cake neatly?
Use a sharp knife warmed briefly in hot water, then wipe it completely dry. Cut straight down and clean the knife between slices for defined layers.
Recipe Card
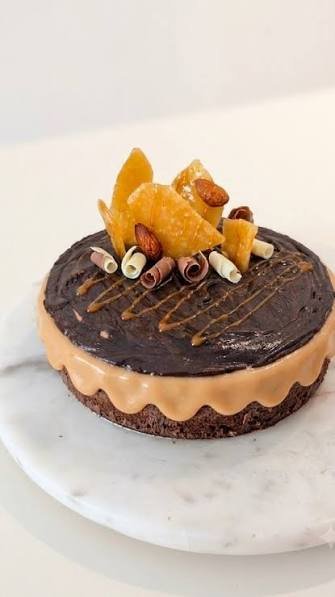
Caramel Hot Chocolate Brownie Mousse Cake
A rich fudgy brownie base topped with smooth hot chocolate mousse and fluffy caramel cream. This chilled layered dessert is perfect for holidays, birthdays, dinner parties, or any occasion that calls for an impressive chocolate treat.
Prep Time: 35 minutes
Cook Time: 20 to 25 minutes
Chill Time: 4 to 5 hours
Total Time: About 5 hours 30 minutes
Servings: 10 slices
Calories: About 590 calories per serving
Course: Dessert
Cuisine: American-inspired
Skill Level: Intermediate

Caramel Hot Chocolate Brownie Mousse Cake
Ingredients
Method
- Preheat the oven to 350°F (175°C). Grease an 8-inch or 9-inch springform pan and line the bottom with parchment paper.
- Whisk together the melted butter and granulated sugar. Add the eggs and vanilla and mix until smooth.
- In a separate bowl, combine the flour, cocoa powder, and salt. Add the dry ingredients to the wet ingredients and stir just until combined. Fold in the chocolate chips.
- Spread the brownie batter evenly into the prepared pan. Bake for 20 to 25 minutes, until the edges are set and the center remains slightly fudgy.
- Let the brownie cool completely before adding the mousse.
- Place the chocolate chips in a heatproof bowl. Heat 1/2 cup of the heavy cream until hot but not boiling. Pour it over the chocolate and let it sit for 1 to 2 minutes. Stir until smooth
- Mix the cocoa powder, vanilla, and salt into the melted chocolate. Allow the mixture to cool until slightly warm or close to room temperature.
- Whip the remaining 1 cup heavy cream with the powdered sugar until soft to medium peaks form.
- Fold the whipped cream gently into the cooled chocolate mixture in two or three additions. Do not overmix.
- Spread the mousse evenly over the cooled brownie base. Cover and refrigerate for at least 4 hours.
- To make the caramel cream, whip the cold heavy cream, powdered sugar, and vanilla until soft peaks form. Gently fold in the caramel sauce and pinch of salt.
- Drizzle with additional caramel sauce and garnish with chocolate shavings or mini marshmallows if desired.
- Chill for another 30 to 60 minutes before slicing. For clean slices, use a sharp knife warmed in hot water and wiped dry between cuts.
Video
Notes
- Do not add hot chocolate mixture to the whipped cream because it can melt the cream and loosen the mousse.
- Avoid overbaking the brownie. A few moist crumbs on a toothpick indicate the right texture.
- Use cold heavy cream for the best whipping results.
- Refrigerate overnight when possible for the cleanest layers.
- Store covered in the refrigerator for up to 4 days.
- The cake can be frozen for up to 1 month. Add fresh caramel drizzle and toppings after thawing.
- Nutrition information is an estimate and can vary depending on the brands and ingredients used.
Final Thoughts
This Caramel Hot Chocolate Brownie Mousse Cake is the kind of dessert that makes a special occasion feel a little more memorable. The fudgy brownie base gives every slice a rich chocolate foundation, while the smooth hot chocolate mousse adds a soft, creamy layer. A generous spoonful of caramel cream brings everything together with its buttery sweetness.
The best part is that much of the work can be done ahead of time. Once the layers are assembled and chilled, you simply add the finishing touches and slice. Take your time with the chilling steps, and you will be rewarded with beautiful layers and a dessert that holds together nicely on the plate.
Serve it after a family dinner, bring it to a holiday gathering, or make it when you are craving something more special than a traditional brownie. A little extra caramel and chocolate on top makes each slice even more inviting.
If you make this recipe, consider sharing how you served it or which variation you tried. Whether you prefer dark chocolate, salted caramel, peppermint, or classic hot chocolate flavors, there are plenty of ways to make this cake your own.
2 Comments