
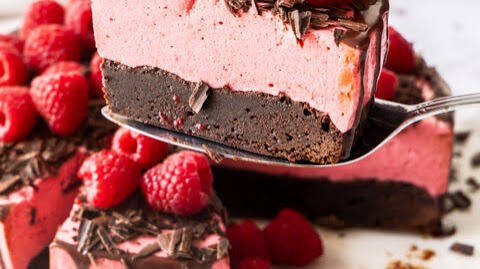
No Bake Raspberry Chocolate Mousse Cake
If you love the combination of rich chocolate and bright, juicy raspberries, this No-Bake Raspberry Chocolate Mousse Cake is the dessert to keep in your back pocket. It brings together a buttery cookie crust, silky chocolate mousse, and a light raspberry layer for a dessert that feels elegant without requiring you to turn on the oven.
Every slice has a lovely contrast of textures. The crust is crisp and chocolatey, the mousse is smooth and velvety, and the raspberry layer adds a fresh, slightly tangy finish that keeps the chocolate from feeling too heavy. Served cold with a little whipped cream and fresh raspberries, it makes a beautiful centerpiece for birthdays, holidays, dinner parties, or a relaxed weekend dessert.
The best part is how much can be done ahead of time. Once the layers are assembled, the cake simply rests in the refrigerator until firm and sliceable. That makes this raspberry chocolate dessert especially handy when you want something impressive on the table without juggling a complicated baking schedule.
If you are new to mousse cakes, do not let the layered look intimidate you. With a few simple techniques and enough chilling time, you can create a smooth, creamy No-Bake Raspberry Chocolate Mousse Cake with a bakery-style finish right in your own kitchen.
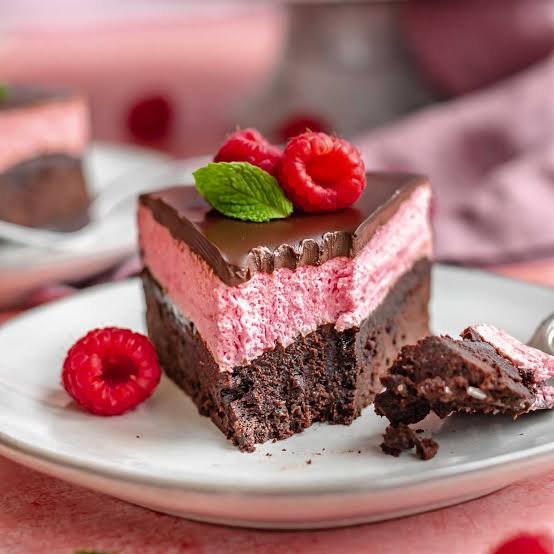
Why You’ll Love This Recipe
- No oven required: This is a true no-bake dessert, so it is especially convenient when you want something elegant without heating up the kitchen.
- Rich chocolate and fresh raspberry: The deep flavor of chocolate pairs beautifully with the bright, slightly tart taste of raspberries.
- Creamy, velvety texture: The mousse is light and smooth, while the cookie crust adds a satisfying contrast in every bite.
- Perfect make-ahead dessert: The cake needs time to chill and set, making it easy to prepare several hours or even a day before serving.
- Beautiful for special occasions: The layered chocolate and raspberry colors give this mousse cake a polished look with very little decorating effort.
- Beginner-friendly: There is no complicated cake batter or baking technique to master. The key is simply to work carefully with the mousse and allow each layer enough time to set.
- Easy to customize: You can finish it with fresh raspberries, chocolate curls, whipped cream, or a simple dusting of cocoa powder depending on the occasion.
- Great for chocolate lovers: The chocolate flavor is rich and satisfying, while the raspberry layer adds enough freshness to keep each bite balanced.
Ingredients
Before you begin, gather everything and have your ingredients measured. Since this is a no-bake mousse cake, a little preparation makes the layering process much easier.
For the Chocolate Cookie Crust
- 24 chocolate sandwich cookies, finely crushed
- 5 tablespoons unsalted butter, melted
For the Raspberry Layer
- 2 cups fresh or frozen raspberries
- 1/3 cup granulated sugar
- 1 tablespoon fresh lemon juice
- 2 teaspoons unflavored gelatin
- 2 tablespoons cold water
For the Chocolate Mousse
- 8 ounces semi-sweet chocolate, finely chopped
- 1 1/2 cups heavy whipping cream, divided
- 1 teaspoon pure vanilla extract
- 2 tablespoons powdered sugar
For the Topping
- 1 cup fresh raspberries
- 1/2 cup heavy whipping cream
- 2 tablespoons powdered sugar
- Chocolate shavings or curls, optional
Helpful Ingredient Tips
Use good-quality chocolate because it plays a major role in the flavor and texture of the mousse. Fresh raspberries give the brightest flavor, but frozen berries work well when fresh berries are unavailable.
For the crust, chocolate sandwich cookies create a rich, slightly crisp base that pairs naturally with the creamy mousse. Make sure the cookies are crushed into fine crumbs so the crust holds together neatly when sliced.
Ingredient Notes & Substitutions
A few simple ingredient choices can make a noticeable difference in the texture and flavor of this raspberry chocolate mousse cake. Here are some useful swaps and tips before you start.
Chocolate Cookies
Chocolate sandwich cookies make a convenient crust because the filling helps bind the crumbs together. If you prefer a less sweet base, use plain chocolate wafer cookies or chocolate graham crackers instead.
For a gluten-free version, choose certified gluten-free chocolate cookies.
Butter
Unsalted butter gives you the most control over the sweetness and seasoning. Salted butter can also be used. If using salted butter, you may want to avoid adding any additional salt to the crust.
For a dairy-free cake, use a plant-based butter that works well for baking.
Raspberries
Fresh raspberries provide a bright, naturally tart flavor and a vibrant color. Frozen raspberries are also a good option and can be especially useful when berries are out of season.
If using frozen raspberries, there is no need to thaw them first when making the raspberry layer. Simply allow the cooked mixture to cool properly before adding it to the cake.
Sugar
Granulated sugar works well for the raspberry layer because it dissolves easily as the berries cook. If your raspberries are particularly sweet, you can slightly reduce the amount.
Gelatin
Unflavored gelatin helps the raspberry layer become firm enough to slice while keeping it soft and pleasant to eat. For a vegetarian alternative, agar-agar can be used, although the setting texture will be somewhat different. Follow the package directions because agar-agar does not behave exactly like gelatin.
Chocolate
Semi-sweet chocolate gives the mousse a balanced chocolate flavor without making the finished cake overly sweet. Dark chocolate can be used if you prefer a deeper, more intense flavor.
Avoid using chocolate chips unless they are specifically designed to melt smoothly. Chopped chocolate bars generally produce a silkier mousse.
Heavy Whipping Cream
Use cold heavy whipping cream with enough fat to whip properly. This creates the airy structure that gives chocolate mousse its light, creamy texture.
For a dairy-free option, use a full-fat plant-based whipping cream that is suitable for whipping.
Vanilla Extract
Pure vanilla extract adds a subtle warmth to the chocolate mousse. You can also use vanilla bean paste for a slightly more pronounced vanilla flavor.
Fresh Lemon Juice
A small amount of lemon juice brightens the raspberry layer and helps balance the richness of the chocolate. Freshly squeezed lemon juice gives the cleanest flavor.
Topping Options
Fresh raspberries and chocolate shavings make a simple, elegant finish. You can also add whipped cream, a light dusting of cocoa powder, or a drizzle of melted chocolate.
For a less sweet dessert, skip the sweetened whipped cream and let the raspberries provide the fresh finishing touch.
Kitchen Tools Needed
You do not need a large collection of specialty equipment to make this no-bake raspberry chocolate mousse cake. A few basic kitchen tools will make the process smooth and help you achieve clean, even layers.
Essential Tools
- 9-inch springform pan: The removable sides make it much easier to release the chilled mousse cake without damaging the layers.
- Food processor: Useful for turning the chocolate cookies into fine, even crumbs. A zip-top bag and rolling pin can also do the job.
- Mixing bowls: You will need a few bowls for preparing the crust, raspberry mixture, and chocolate mousse.
- Small saucepan: Ideal for cooking the raspberry layer until the berries soften.
- Heatproof bowl: Use this for melting the chocolate gently over a saucepan of simmering water if you prefer a double-boiler method.
- Electric hand mixer or stand mixer: Makes whipping the cream quick and easy.
- Rubber spatula: Essential for gently folding whipped cream into the chocolate mixture without knocking out too much air.
- Measuring cups and spoons: Accurate measurements are particularly important when working with gelatin.
- Fine-mesh strainer: Optional, but helpful if you want a completely smooth raspberry layer without seeds.
Helpful Extras
- Offset spatula: Makes it easier to spread each layer evenly across the pan.
- Parchment paper: A round of parchment on the bottom of the pan can make transferring the finished cake easier.
- Sharp chef’s knife: Useful for cutting clean slices once the cake has fully chilled.
- Warm kitchen towel: Wrapping the outside of the springform pan briefly with a warm towel can help loosen the edges when removing the cake.
A Quick Setup Tip
Before you start assembling the cake, prepare your springform pan and clear enough space in the refrigerator for it to sit completely flat. Mousse cakes need undisturbed chilling time, so making room ahead of time helps prevent accidental tilting or uneven layers.
Step-by-Step Instructions
This no-bake raspberry chocolate mousse cake comes together in a few simple stages. The most important things are keeping the mousse light, allowing the raspberry layer to cool before assembling, and giving the finished cake plenty of time to chill.
1. Prepare the Pan
Lightly grease the bottom and sides of a 9-inch springform pan. If desired, line the bottom with parchment paper for easier removal later.
Place the prepared pan on a flat surface where it can remain undisturbed while the cake sets.
2. Make the Chocolate Cookie Crust
Add the chocolate sandwich cookies to a food processor and pulse until they become fine crumbs.
Pour in the melted butter and pulse again until the mixture resembles damp sand and holds together when pressed between your fingers.
Transfer the crumbs to the springform pan. Press them firmly and evenly across the bottom using the flat bottom of a glass or measuring cup.
Chill the crust for at least 15 minutes while you prepare the raspberry layer.
A firm crust is important here. If the crumbs are pressed too lightly, the base can crumble when you cut the finished cake.
3. Prepare the Gelatin
Place the cold water in a small bowl and sprinkle the gelatin evenly over the surface. Let it stand for about 5 minutes so the gelatin can soften.
Do not stir it immediately. Allowing the gelatin to absorb the water first helps it dissolve more evenly later.
4. Cook the Raspberry Mixture
Add the raspberries, granulated sugar, and lemon juice to a small saucepan.
Cook over medium heat, stirring occasionally, until the berries soften and release their juices. This should take about 5 to 7 minutes.
For a smoother raspberry layer, press the cooked berries through a fine-mesh strainer to remove the seeds. If you enjoy the texture of raspberry seeds, you can skip this step.
Return the strained raspberry mixture to the saucepan if needed.
5. Add the Gelatin
Warm the softened gelatin gently until it becomes liquid, following the package instructions for your gelatin.
Stir the melted gelatin into the warm raspberry mixture until completely incorporated.
Set the raspberry mixture aside and let it cool until it is no longer hot but is still fluid. Do not pour hot raspberry mixture over the chilled crust, as the heat can soften the butter in the base.
6. Make the Chocolate Mixture
Place the finely chopped chocolate in a heatproof bowl.
Heat about 1/2 cup of the heavy cream until it is hot and steaming but not boiling. Pour it over the chocolate and let it sit for 2 to 3 minutes.
Stir slowly from the center outward until the chocolate melts into a smooth, glossy mixture.
Add the vanilla extract and stir until combined.
Let the chocolate mixture cool to room temperature. It should feel slightly warm or neutral, never hot, before you combine it with whipped cream.
7. Whip the Cream
Pour the remaining 1 cup of cold heavy cream into a large mixing bowl.
Add the powdered sugar and beat with an electric mixer until soft to medium peaks form.
The cream should hold its shape but still look smooth and creamy. Avoid whipping it until it becomes stiff or grainy.
8. Fold the Chocolate Mousse
Add about one-third of the whipped cream to the cooled chocolate mixture.
Gently fold with a rubber spatula to lighten the chocolate base.
Add the remaining whipped cream in two additions, folding carefully after each addition. Use slow, sweeping motions and scrape along the bottom of the bowl so the mousse stays airy.
The finished chocolate mousse should look smooth, fluffy, and evenly blended.
9. Assemble the Cake
Remove the chilled cookie crust from the refrigerator.
Spread about half of the chocolate mousse over the crust and gently smooth the surface with an offset spatula.
Spoon the cooled raspberry mixture over the mousse, spreading it carefully into an even layer. Leave a small border around the edge if you want the chocolate mousse to frame the raspberry center.
Top with the remaining chocolate mousse and smooth the surface.
Do not press down firmly while spreading. Gentle movements will help preserve the mousse’s airy texture.
10. Chill Until Firm
Cover the springform pan loosely and refrigerate the cake for at least 6 hours, preferably overnight.
The cake should feel firm when lightly touched in the center. If it still feels soft or wobbly, give it more chilling time.
This step is essential for clean slices. Rushing the chilling process can cause the layers to collapse or smear when cut.
11. Prepare the Topping
When you are ready to serve, whip the heavy cream with powdered sugar until soft peaks form.
Spoon or pipe small amounts of whipped cream around the top of the cake.
Add fresh raspberries and finish with chocolate shavings or curls if desired.
12. Release and Slice
Run a thin, sharp knife around the inside edge of the springform pan to loosen the cake.
Carefully release the sides of the pan.
For neat slices, dip a sharp knife in hot water, wipe it dry, and gently cut through the cake. Clean and warm the knife between slices for the sharpest layers.
Common Mistakes to Avoid
- Using hot raspberry mixture: Let it cool before assembling so it does not soften the mousse or crust.
- Overwhipping the cream: Stop when soft to medium peaks form. Overwhipped cream can make the mousse heavy and slightly grainy.
- Stirring the mousse too aggressively: Fold gently to keep the mixture light and fluffy.
- Skipping the chilling time: The cake needs several hours to become firm enough to slice properly.
- Cutting with a cold knife: A warm, clean knife makes much neater cuts through the chilled mousse.
- Making a loose crust: Press the cookie crumbs firmly and evenly so the base stays intact when served.
Expert Tips for the Best No-Bake Raspberry Chocolate Mousse Cake
A few small techniques can make the difference between a good mousse cake and one with smooth layers, clean slices, and a beautifully balanced flavor.
Use Finely Crushed Cookies
The cookie crumbs should be as fine as possible. Larger pieces can prevent the crust from pressing together evenly and may cause it to crumble when sliced.
If you do not have a food processor, place the cookies in a sturdy zip-top bag and crush them thoroughly with a rolling pin.
Choose Good Chocolate
Chocolate is one of the main flavors in this dessert, so use chocolate that you enjoy eating on its own. Semi-sweet chocolate gives the mousse a pleasant balance, while dark chocolate creates a deeper, less sweet flavor.
Finely chopping the chocolate before adding the hot cream also helps it melt evenly.
Let the Chocolate Cool Before Folding
This is one of the most important mousse-making tips. The melted chocolate mixture should be cool enough that it does not melt the whipped cream.
If the chocolate is still hot, the whipped cream can lose its volume, leaving you with a dense mousse instead of a light one.
Keep the Whipped Cream Soft and Smooth
For the best texture, whip the cream until soft to medium peaks form. It should look fluffy and hold its shape without becoming stiff or grainy.
Cold cream also whips more easily, so keep it refrigerated until you are ready to use it.
Fold, Do Not Stir
When combining the whipped cream and chocolate, use a gentle folding motion. Cut through the center of the mixture with a spatula, sweep underneath, and fold the mixture over itself.
This preserves the tiny air bubbles that give chocolate mousse its light texture.
Cool the Raspberry Layer Properly
The raspberry mixture should be cool before it is layered into the cake, but it should not be completely set. If it is too warm, it can soften the chocolate mousse. If it becomes too firm, it will be difficult to spread evenly.
Chill Overnight for the Cleanest Slices
Six hours is enough in most cases, but an overnight chill gives the layers extra time to firm up. It also makes this dessert an excellent make-ahead option for dinner parties and celebrations.
Use a Warm Knife
For bakery-style slices, dip your knife in hot water, wipe it completely dry, and cut straight down through the cake. Repeat the process between slices.
A warm blade glides through the chilled mousse more cleanly and keeps the layers looking distinct.
Add the Fresh Toppings Just Before Serving
Fresh raspberries and chocolate shavings look their best when added shortly before serving. This keeps the berries firm and prevents excess moisture from collecting on the surface.
Balance the Sweetness
Raspberries naturally bring a pleasant tartness to this dessert. If your berries are very tart, you can slightly increase the sugar in the raspberry layer. If they are naturally sweet, keep the sugar moderate so the chocolate remains the star.
Variations
One of the best things about this raspberry chocolate mousse cake is how easily you can change the flavors and toppings while keeping the same basic method.
Dark Chocolate Raspberry Mousse Cake
Replace the semi-sweet chocolate with good-quality dark chocolate for a richer, more intense dessert. The darker chocolate also creates a lovely contrast with the tart raspberry layer.
White Chocolate Raspberry Version
For a sweeter, creamier variation, use white chocolate in the mousse. The delicate vanilla-like flavor works especially well with fresh raspberries.
Because white chocolate is sweeter than semi-sweet chocolate, you may want to reduce the powdered sugar in the whipped cream.
Chocolate Raspberry Cheesecake Style
Add a thin layer of softened cream cheese to the chocolate mousse for a cheesecake-inspired texture. Beat the cream cheese until smooth before gently combining it with the cooled chocolate mixture.
This version is especially good when you want a slightly denser, richer filling.
Gluten-Free Version
Use certified gluten-free chocolate sandwich cookies or gluten-free chocolate wafers for the crust. Check the labels on your chocolate and other packaged ingredients as well to ensure they meet your dietary needs.
Dairy-Free Version
Choose dairy-free chocolate and a plant-based butter for the crust. Replace the heavy whipping cream with a full-fat dairy-free whipping cream that can be whipped and folded into mousse.
The exact texture may vary depending on the plant-based cream you use, so choose one designed specifically for whipping.
Fresh Berry Variation
Add sliced strawberries or blueberries along with the raspberries. You can arrange a thin layer of fresh berries between the mousse layers or use them as a colorful topping.
Raspberry Orange Chocolate Cake
Add a little finely grated orange zest to the raspberry mixture for a bright citrus note. Orange and chocolate create a naturally rich combination, while the raspberry keeps the dessert fresh.
Mint Chocolate Raspberry Cake
Add a small amount of peppermint extract to the chocolate mousse for a cool mint flavor. Start with a tiny amount because peppermint extract is quite concentrated.
Finish with dark chocolate shavings and fresh raspberries.
Nutty Chocolate Crust
Replace part of the chocolate cookie crumbs with finely ground toasted almonds or hazelnuts. The nuts add a subtle roasted flavor and a little extra texture to the crust.
Lower-Sugar Option
Use a darker chocolate and reduce the added sugar in the raspberry layer slightly if your berries are naturally sweet. Keep in mind that changing the sugar too much can affect the balance and texture of the finished dessert.
Individual Mousse Cakes
Instead of using one large springform pan, divide the crust and mousse among small dessert glasses or individual ramekins.
This creates an easy no-bake raspberry chocolate dessert that does not need to be sliced and is ideal for dinner parties.
Storage Instructions
This no-bake raspberry chocolate mousse cake is an excellent make-ahead dessert because it keeps well when properly covered and chilled.
Refrigerator Storage
Cover the cake loosely with plastic wrap or place it in an airtight cake container. Store it in the refrigerator for up to 3 days.
For the best texture and appearance, add fresh raspberries, whipped cream, and chocolate shavings shortly before serving rather than storing the finished toppings for several days.
Keep the cake refrigerated until you are ready to serve it. Since the mousse contains whipped cream, it should not sit at room temperature for extended periods.
Freezer Storage
You can freeze the cake before adding the fresh toppings. Wrap the chilled cake tightly in plastic wrap, followed by a layer of aluminum foil to help protect it from freezer odors and moisture.
Freeze for up to 1 month for the best quality.
When ready to serve, transfer the cake to the refrigerator and let it thaw slowly for several hours or overnight. Do not thaw it at room temperature, as the mousse can soften unevenly.
Can You Freeze Individual Slices?
Yes. Once the cake is fully chilled, cut it into individual portions and freeze the slices on a parchment-lined tray until firm. Then wrap each slice well and place the portions in a freezer-safe container.
Thaw individual slices in the refrigerator before serving.
Serving After Storage
For the cleanest presentation, allow a refrigerated cake to sit at room temperature for about 10 to 15 minutes before slicing. It should remain cold and firm but not be completely hard.
If the cake has been frozen, give it enough time to thaw completely in the refrigerator before cutting.
Avoid repeatedly freezing and thawing the entire cake, as temperature changes can affect the texture of the mousse and make the crust softer.
Frequently Asked Questions
Can I make this no-bake raspberry chocolate mousse cake ahead of time?
Yes. This cake is ideal for making ahead. Prepare it the day before serving and keep it covered in the refrigerator. The extra chilling time also helps the layers become firm and easier to slice.
How long does the mousse cake need to chill?
Allow at least 6 hours for the cake to set properly. For the firmest texture and cleanest slices, chilling it overnight is even better.
Can I use frozen raspberries?
Yes. Frozen raspberries work well in the raspberry layer and are a convenient option when fresh berries are unavailable. Cook them with the sugar and lemon juice as directed, then allow the mixture to cool before assembling the cake.
Do I have to remove the raspberry seeds?
No. It is completely optional. Straining the cooked raspberries creates a smoother, seedless layer, while leaving the seeds in gives the cake a more rustic raspberry texture.
Why is my chocolate mousse too runny?
The chocolate mixture may have been too warm when the whipped cream was folded in, or the cream may not have been whipped enough. Make sure the chocolate has cooled to room temperature and whip the cream until soft to medium peaks before folding.
Why did my mousse become dense?
Overmixing can knock the air out of the whipped cream. Fold the whipped cream gently into the chocolate mixture and stop as soon as everything is evenly combined.
Can I make this cake without a springform pan?
Yes. A deep 9-inch cake pan can work, although removing the finished cake may be more difficult. Line the pan with parchment paper with some overhang to help lift the chilled cake out.
Can I use milk chocolate instead of semi-sweet chocolate?
Yes, but the finished mousse will be noticeably sweeter and milder. If using milk chocolate, consider reducing the powdered sugar in the whipped cream.
How do I get clean slices?
Make sure the cake is thoroughly chilled. Use a sharp knife dipped briefly in hot water, wipe it dry, and slice straight down. Clean and warm the knife again between cuts.
Can I make this dessert gluten-free?
Yes. Use certified gluten-free chocolate cookies for the crust and check all packaged ingredients for gluten-containing additives.
Can I make it dairy-free?
Yes. Use dairy-free chocolate, plant-based butter, and a full-fat dairy-free whipping cream that is suitable for making mousse.
How long will the cake last in the refrigerator?
For the best quality, keep the covered cake refrigerated and enjoy it within 3 days. Add fresh berries and whipped cream close to serving time for the best appearance.
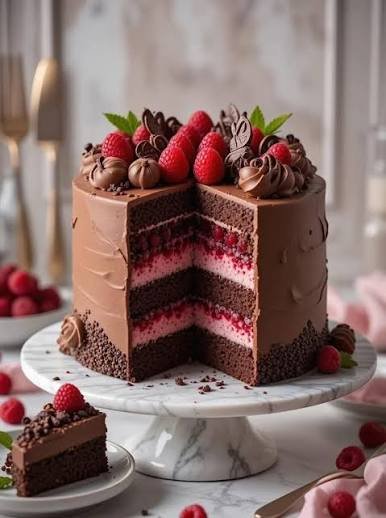

No Bake Raspberry Chocolate Mousse Cake
Ingredients
Method
- Lightly grease a 9-inch springform pan and line the bottom with parchment paper if desired.
- Crush the chocolate sandwich cookies into fine crumbs. Mix with the melted butter until evenly moistened.
- Press the cookie mixture firmly into the bottom of the prepared pan. Refrigerate for 15 minutes.
- Place the cold water in a small bowl and sprinkle the gelatin over it. Let it soften for about 5 minutes.
- Combine the raspberries, granulated sugar, and lemon juice in a small saucepan. Cook over medium heat for 5 to 7 minutes, stirring occasionally, until the berries soften.
- Strain the raspberry mixture through a fine-mesh strainer if you prefer a seedless layer. Stir in the prepared gelatin until fully dissolved.
- Set the raspberry mixture aside to cool until it is no longer hot but remains pourable.
- Place the chopped chocolate in a heatproof bowl. Heat 1/2 cup of the heavy cream until steaming, then pour it over the chocolate. Let stand for 2 to 3 minutes before stirring until smooth
- Stir in the vanilla extract and allow the chocolate mixture to cool to room temperature.
- Beat the remaining 1 cup heavy cream with the powdered sugar until soft to medium peaks form
- Gently fold the whipped cream into the cooled chocolate mixture in several additions until the mousse is smooth and fluffy.
- Spread half of the chocolate mousse over the chilled cookie crust.
- Carefully spread the cooled raspberry mixture over the mousse.
- Add the remaining chocolate mousse and smooth the top with an offset spatula.
- Cover and refrigerate for at least 6 hours, preferably overnight.
- Before serving, decorate with whipped cream, fresh raspberries, and chocolate shavings if desired.
- Run a warm, dry knife around the edge of the cake before releasing the springform pan. Slice with a warm, sharp knife for clean layers.
Video
Notes
- Make sure the chocolate mixture has cooled before folding in the whipped cream.
- Do not overwhip the cream or the mousse may become dense and grainy.
- Allow the raspberry mixture to cool before adding it to the mousse.
- For the cleanest slices, chill the cake overnight.
- Fresh toppings are best added shortly before serving.
- The finished cake can be refrigerated for up to 3 days.
- For longer storage, freeze the cake without fresh toppings for up to 1 month and thaw overnight in the refrigerator.
Final Thoughts
This No-Bake Raspberry Chocolate Mousse Cake brings together everything that makes a homemade dessert feel special: a crisp chocolate cookie crust, smooth and airy chocolate mousse, and a bright raspberry layer that cuts through the richness beautifully.
It is also a practical dessert for busy days. You can prepare it ahead, let it chill in the refrigerator, and finish it with fresh raspberries and chocolate shavings just before serving. There is no oven to preheat and no complicated cake layers to bake.
For the best results, give the cake plenty of time to chill and handle the mousse gently as you assemble it. Those two details will help you achieve the soft, velvety texture and clean layers that make this dessert so appealing.
Whether you are making it for a birthday, holiday gathering, dinner party, or simply a weekend treat, this raspberry chocolate dessert is an elegant choice that feels homemade from the first slice to the last bite.
If you make this recipe, consider sharing how it turned out and which variation you tried. Your tips and ideas can help other home bakers make the cake their own.

One Comment