
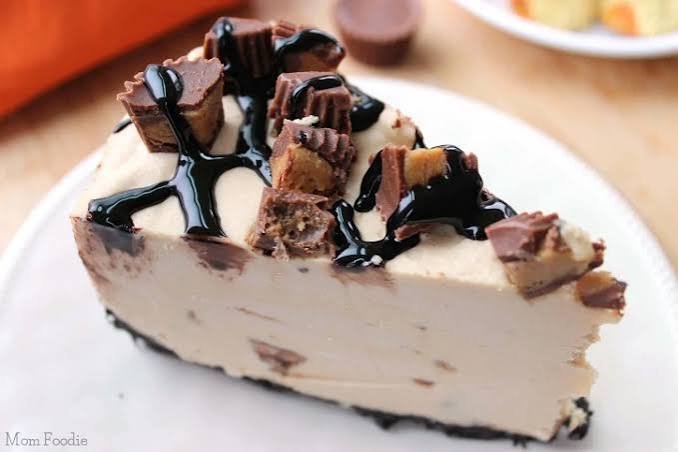
No Bake Reese’s Peanut Butter Cup Cheesecake
If you love the classic combination of chocolate and peanut butter, this No Bake Reese’s Peanut Butter Cup Cheesecake is the dessert to keep in your recipe collection. It has a buttery chocolate cookie crust, a smooth and creamy peanut butter cheesecake filling, and plenty of chopped Reese’s peanut butter cups tucked into every slice. Best of all, there is no oven required, so you can make an impressive dessert without spending hours in the kitchen.
The texture is rich yet wonderfully fluffy, with the crisp cookie crust adding just the right contrast to the velvety filling. Each bite brings together creamy peanut butter, tangy cream cheese, chocolate cookies, and those familiar peanut butter cup pieces for a dessert that feels both nostalgic and special.
This easy no bake cheesecake is also a great make-ahead option for birthdays, holidays, family dinners, or whenever you need a dessert that can be prepared in advance. Once assembled, it simply needs time to chill and set in the refrigerator. When you’re ready to serve, add your favorite toppings, slice it up, and enjoy a beautifully creamy cheesecake with plenty of chocolate and peanut butter flavor.
Why You’ll Love This Recipe
There is a lot to appreciate about this easy no bake cheesecake, especially when you want a rich dessert without turning on the oven.
- No baking required: The cheesecake sets in the refrigerator, making it simple to prepare even if you are new to making cheesecake.
- Classic chocolate and peanut butter flavor: Creamy peanut butter and chocolate cookies create a familiar combination that feels indulgent without being complicated.
- Smooth, fluffy filling: Cream cheese and whipped cream give the filling a light, creamy texture that slices beautifully once chilled.
- Loaded with Reese’s cups: Chopped peanut butter cups are mixed into the filling and can also be sprinkled over the top for extra texture and flavor.
- Easy make-ahead dessert: You can prepare the cheesecake several hours before serving, giving it plenty of time to firm up in the refrigerator.
- Perfect for special occasions: Its rich chocolate-peanut butter layers make it an excellent choice for birthdays, holidays, potlucks, and family gatherings.
- Simple ingredients: Most of the ingredients are easy to find at a regular grocery store, and there are no complicated baking techniques involved.
- Customizable toppings: Finish each slice with extra Reese’s pieces, chocolate shavings, whipped cream, or a drizzle of melted peanut butter for a more decorative presentation.
Ingredients
You only need a handful of simple ingredients to make this creamy no bake cheesecake. For the best texture, let the cream cheese soften at room temperature before mixing.
For the Chocolate Cookie Crust
- 24 chocolate sandwich cookies, finely crushed
- 5 tablespoons unsalted butter, melted
For the Peanut Butter Cheesecake Filling
- 16 ounces full-fat cream cheese, softened
- 1 cup creamy peanut butter
- 1 cup powdered sugar
- 1 teaspoon pure vanilla extract
- 1 cup heavy whipping cream, cold
- 10 Reese’s Peanut Butter Cups, chopped
For the Topping
- 4 to 6 Reese’s Peanut Butter Cups, chopped
- 1/2 cup whipped cream, optional
- 2 tablespoons melted peanut butter, optional
- Chocolate cookie crumbs, optional
For the richest cheesecake filling, use regular creamy peanut butter rather than natural peanut butter that separates easily. Full-fat cream cheese also helps the cheesecake develop a firm, creamy texture after chilling.
Ingredient Notes & Substitutions
A few small ingredient choices can make a noticeable difference in the texture and flavor of your no bake Reese’s peanut butter cup cheesecake. Here are some helpful tips before you start.
Chocolate Sandwich Cookies
Chocolate sandwich cookies create a sturdy, slightly crisp crust that pairs beautifully with the creamy peanut butter filling. You can use regular chocolate sandwich cookies or a similar chocolate cream-filled cookie.
For a less sweet crust, use plain chocolate wafer cookies instead.
Unsalted Butter
Melted butter binds the crushed cookies together and helps the crust hold its shape after chilling. If you only have salted butter, you can use it without making any other changes.
Cream Cheese
Full-fat block cream cheese is the best choice for a firm, creamy cheesecake. Avoid spreadable cream cheese from tubs when possible because it contains more moisture and can leave the filling too soft.
For a lighter version, reduced-fat cream cheese can work, although the final cheesecake may not be quite as rich or firm.
Creamy Peanut Butter
Regular creamy peanut butter gives the filling a smooth consistency and dependable texture. Natural peanut butter can be used, but stir it extremely well before measuring because the oil tends to separate.
Crunchy peanut butter is another option if you enjoy little bits of roasted peanuts throughout the cheesecake.
Powdered Sugar
Powdered sugar sweetens the filling while blending smoothly into the cream cheese. It is preferable to granulated sugar here because it helps keep the cheesecake filling silky rather than gritty.
Heavy Whipping Cream
Cold heavy whipping cream helps create a light, fluffy cheesecake filling. Keep it refrigerated until you are ready to whip it for the best volume.
Do not replace it with regular milk, as the filling needs the fat from heavy cream to achieve its proper consistency.
Reese’s Peanut Butter Cups
Chopped Reese’s Peanut Butter Cups add pockets of chocolate and peanut butter throughout the cheesecake. You can use mini cups, regular-size cups, or a combination of both.
If you need an alternative, chopped chocolate peanut butter candies can work well.
Dairy-Free Option
For a dairy-free version, use dairy-free cream cheese, dairy-free whipping cream, plant-based butter, and dairy-free chocolate sandwich cookies. Check the candy ingredients carefully, since many peanut butter cups contain milk.
Gluten-Free Option
Use certified gluten-free chocolate sandwich cookies and gluten-free peanut butter candies. Always check the package labels if the cheesecake is being prepared for someone with celiac disease or a serious gluten intolerance.
Budget-Friendly Tip
Store-brand chocolate sandwich cookies and cream cheese can work perfectly well in this recipe. The Reese’s cups provide plenty of chocolate and peanut butter flavor, so there is no need to spend extra on premium ingredients.
Kitchen Tools Needed
You do not need any specialized equipment to make this no bake cheesecake. A few basic kitchen tools will make the process easier and help you get clean, even layers.
- 9-inch springform pan: The removable sides make it much easier to release the chilled cheesecake without damaging the crust or filling.
- Food processor: Ideal for turning the chocolate sandwich cookies into fine, even crumbs. A resealable plastic bag and rolling pin also work.
- Mixing bowls: Use separate bowls for preparing the cookie crust and cheesecake filling.
- Electric hand mixer or stand mixer: Helps whip the heavy cream and beat the cream cheese until smooth and creamy.
- Rubber spatula: Useful for gently folding the whipped cream into the peanut butter mixture without losing too much air.
- Measuring cups and spoons: Accurate measurements are important for getting the right cheesecake consistency.
- Sharp knife: Use a sharp knife to chop the Reese’s Peanut Butter Cups into bite-size pieces.
- Offset spatula: Optional, but helpful for spreading the cheesecake filling evenly across the crust and smoothing the top.
- Refrigerator: The cheesecake needs plenty of chilling time to become firm enough to slice cleanly.
Helpful Tip
If you want especially neat slices, line the bottom of the springform pan with parchment paper before adding the crust. It makes transferring the cheesecake to a serving plate much easier.
Step-by-Step Instructions
1. Prepare the Chocolate Cookie Crust
Start by crushing the chocolate sandwich cookies into fine crumbs. A food processor makes this quick and easy, but you can also place the cookies in a sealed bag and crush them with a rolling pin.
Pour the crumbs into a bowl and mix them with the melted butter until everything is evenly moistened. The mixture should resemble damp sand and hold together when pressed.
Transfer the crumbs to a 9-inch springform pan. Press them firmly and evenly across the bottom, using the bottom of a measuring cup to create a compact surface.
Place the crust in the refrigerator while you prepare the filling.
2. Prepare the Cream Cheese Mixture
Add the softened cream cheese to a large mixing bowl. Beat it with an electric mixer until completely smooth and creamy.
Add the creamy peanut butter, powdered sugar, and vanilla extract. Continue mixing until the ingredients are fully combined and the mixture looks thick, smooth, and free of lumps.
Stop and scrape down the sides of the bowl as needed. This helps prevent pockets of unmixed cream cheese from remaining in the filling.
3. Whip the Heavy Cream
Pour the cold heavy whipping cream into a separate clean bowl.
Beat it with an electric mixer until stiff peaks form. The whipped cream should hold its shape when the beaters are lifted.
Be careful not to overbeat it. Once stiff peaks form, stop mixing.
4. Fold the Whipped Cream Into the Peanut Butter Mixture
Add the whipped cream to the peanut butter and cream cheese mixture in portions.
Use a rubber spatula to gently fold everything together. Work slowly rather than stirring aggressively. The goal is to keep the filling light and airy while creating a smooth, even mixture.
When finished, the cheesecake filling should look fluffy, thick, and creamy.
5. Add the Reese’s Peanut Butter Cups
Chop the Reese’s Peanut Butter Cups into small pieces.
Fold most of the chopped candy into the cheesecake filling, reserving some pieces for decorating the top.
Distribute the candy evenly so each slice gets a good amount of chocolate and peanut butter throughout the filling.
6. Fill the Chilled Crust
Remove the crust from the refrigerator.
Spoon the cheesecake filling over the chilled crust and spread it evenly with a rubber or offset spatula.
Gently smooth the surface. Press lightly as you spread so you do not create large air pockets inside the filling.
7. Add the Toppings
Scatter the remaining chopped Reese’s Peanut Butter Cups over the top.
For an extra decorative finish, add small swirls of whipped cream or drizzle melted peanut butter over the surface.
Keep the toppings simple if you want the chocolate and peanut butter combination to remain the focus.
8. Chill Until Firm
Cover the cheesecake loosely with plastic wrap or foil and refrigerate it for at least 6 hours, preferably overnight.
This chilling period is essential. The filling needs enough time to firm up so the cheesecake holds its shape when sliced.
Avoid rushing this step. A cheesecake that has not chilled long enough can be soft in the center and difficult to serve neatly.
9. Release and Slice
Once completely chilled, carefully remove the sides of the springform pan.
For cleaner slices, dip a sharp knife into hot water, wipe it dry, and then cut the cheesecake. Repeat between slices for a smooth finish.
Serve the cheesecake cold with extra Reese’s pieces, whipped cream, or a light peanut butter drizzle if desired.
Common Mistakes to Avoid
Using cold cream cheese: Cold cream cheese can leave lumps in the filling. Let it soften before mixing.
Overmixing the whipped cream: Whipping too long can make the cream grainy and eventually turn it toward butter. Stop once stiff peaks form.
Folding too aggressively: Rough mixing can deflate the whipped cream and make the cheesecake heavier.
Skipping the chilling time: The cheesecake needs several hours in the refrigerator to become firm enough to slice.
Not pressing the crust firmly: A loose crust can crumble when you cut the cheesecake. Pack the cookie mixture tightly and evenly into the pan.
Expert Tips
A few simple techniques can make this no bake cheesecake smoother, firmer, and easier to slice.
Bring the Cream Cheese to Room Temperature
Softened cream cheese blends much more easily with peanut butter and powdered sugar. Leave it at room temperature for about 30 to 45 minutes before starting, but do not leave it out for an extended period.
Use Cold Heavy Cream
While the cream cheese should be softened, the heavy whipping cream should stay cold. Cold cream whips faster and holds its structure better, which helps create a fluffy cheesecake filling.
Crush the Cookies Finely
Fine cookie crumbs create a more compact crust. Larger pieces can prevent the butter from coating the crumbs evenly, which may cause the crust to crumble when sliced.
Pack the Crust Firmly
Use the flat bottom of a glass or measuring cup to press the crust firmly into the pan. Pay special attention to the edges, where loose crumbs are more likely to fall apart.
Do Not Rush the Chilling Time
For the cleanest slices, refrigerate the cheesecake for at least 6 hours. Overnight chilling is even better because it gives the filling plenty of time to firm up.
Fold Instead of Stir
When combining whipped cream with the peanut butter mixture, use a gentle folding motion. This keeps more air in the filling and gives the cheesecake its soft, fluffy texture.
Keep Some Reese’s Cups for the Top
Mixing candy pieces into the filling gives you peanut butter cup flavor throughout the cheesecake, while saving some for the topping makes the finished dessert look more inviting.
Make Cleaner Slices
For bakery-style slices, use a sharp knife warmed under hot water. Dry the knife completely before cutting, then wipe and warm it again between slices.
Add a Peanut Butter Drizzle
For a richer finish, gently warm a small amount of creamy peanut butter until it becomes pourable. Drizzle it lightly over the chilled cheesecake just before serving.
Chill the Serving Plate
If you are serving the cheesecake at a gathering, placing it on a chilled serving plate can help it stay firm for longer, especially in a warm kitchen.
Variations
This cheesecake is easy to customize, so you can adjust the crust, filling, and toppings to suit different tastes or dietary needs.
Mini Reese’s Cheesecakes
Turn the recipe into individual desserts by preparing the crust and filling in a muffin pan lined with paper liners. Press a small amount of cookie crust into each cup, add the cheesecake filling, and chill until firm.
Mini cheesecakes are especially convenient for parties because there is no slicing or serving required.
Chocolate Peanut Butter Cheesecake
For a stronger chocolate flavor, add a small amount of melted and cooled semisweet chocolate to the cheesecake filling. You can also use chocolate whipped cream as a topping.
Extra Peanut Butter Version
If peanut butter is the main attraction, add a little extra creamy peanut butter to the filling and finish the cheesecake with a generous peanut butter drizzle.
For even more texture, sprinkle finely chopped roasted peanuts over the top.
Oreo-Style Cookie Crust
Use chocolate sandwich cookies with different filling flavors to change the character of the crust. A chocolate wafer crust also works well if you prefer a less sweet base.
Crunchy Peanut Butter Version
Replace creamy peanut butter with crunchy peanut butter for small pieces of peanuts throughout the filling. This gives the cheesecake a more textured bite.
Gluten-Free Cheesecake
Use certified gluten-free chocolate sandwich cookies and gluten-free peanut butter cups. Check all packaged ingredients carefully if you are preparing the dessert for someone with celiac disease or a serious gluten intolerance.
Dairy-Free Version
Use dairy-free cream cheese, dairy-free whipping cream, plant-based butter, and suitable dairy-free chocolate cookies. Choose a dairy-free peanut butter cup alternative for the candy pieces.
The texture may vary slightly depending on the dairy-free products you use.
Lower-Sugar Option
Use reduced-sugar chocolate cookies and peanut butter where available, and reduce the powdered sugar slightly in the filling. Keep in mind that changing the sugar can affect both sweetness and texture.
Holiday Cheesecake
Decorate the top according to the occasion. Add seasonal sprinkles, extra chopped peanut butter cups, chocolate curls, or small whipped cream swirls for birthdays, holidays, and family celebrations.
Storage Instructions
Because this is a no bake cheesecake with a creamy filling, proper storage is important for keeping the texture firm and fresh.
Refrigerator Storage
Cover the cheesecake tightly with plastic wrap or place it in an airtight cake container. Store it in the refrigerator for up to 4 days.
Keep the cheesecake chilled until you are ready to serve it. For the best texture, avoid leaving it at room temperature for longer than about 2 hours.
If you have already sliced the cheesecake, cover each exposed area well to help prevent the filling from drying out and absorbing refrigerator odors.
Freezer Storage
You can freeze the cheesecake if you want to prepare it well ahead of time.
For best results, freeze the cheesecake without delicate toppings such as whipped cream. Place it on a flat surface and freeze until firm, then wrap it securely in plastic wrap followed by a layer of aluminum foil.
Store it in the freezer for up to 1 month for the best quality.
How to Thaw
Transfer the frozen cheesecake to the refrigerator and let it thaw slowly for several hours or overnight.
Do not thaw it on the kitchen counter. A slow refrigerator thaw helps the filling maintain a smooth, creamy texture.
Add fresh toppings and extra Reese’s Peanut Butter Cups after thawing.
Can You Refreeze It?
It is best not to refreeze cheesecake after it has completely thawed. Repeated freezing and thawing can affect the creamy texture and make the filling less smooth.
Reheating Instructions
No reheating is needed for this dessert. No bake cheesecake is designed to be served chilled.
If the cheesecake feels too firm after refrigeration, let an individual slice sit at room temperature for about 10 minutes before serving. This allows the filling to soften slightly while remaining pleasantly cool.
Frequently Asked Questions
Can I make this no bake cheesecake ahead of time?
Yes. This cheesecake is ideal for making ahead. Prepare it the day before serving and keep it covered in the refrigerator overnight. The extra chilling time also helps the filling become firm and easier to slice.
How long does no bake cheesecake need to chill?
Plan for at least 6 hours in the refrigerator. For the firmest texture and cleanest slices, chilling overnight is recommended.
Why is my no bake cheesecake too soft?
The most common reasons are insufficient chilling time, using spreadable cream cheese instead of block cream cheese, or not whipping the heavy cream enough. Make sure the cheesecake is fully chilled before slicing.
Can I use natural peanut butter?
Yes, but regular creamy peanut butter is more reliable for this recipe. If using natural peanut butter, stir it thoroughly so the oil is evenly incorporated before measuring.
Can I use crunchy peanut butter?
Absolutely. Crunchy peanut butter adds small pieces of roasted peanuts and gives the filling extra texture.
Can I make this cheesecake without a springform pan?
Yes. A deep 9-inch pie dish can work, although removing individual slices may be a little more difficult. A springform pan is preferred because it makes releasing the finished cheesecake much easier.
Can I freeze Reese’s peanut butter cup cheesecake?
Yes. Wrap the cheesecake securely and freeze it for up to 1 month for the best quality. Thaw it slowly in the refrigerator before serving.
Can I use homemade whipped cream?
Yes. Freshly whipped heavy cream works very well and gives the cheesecake a light, airy texture. Whip it until stiff peaks form before folding it into the filling.
Can I use mini Reese’s Peanut Butter Cups?
Yes. Mini cups are easy to chop and distribute throughout the filling. You can also leave a few whole mini cups on top for decoration.
How do I get clean cheesecake slices?
Chill the cheesecake thoroughly, then use a sharp knife warmed with hot water. Wipe the knife dry before each cut and repeat the process between slices.
Can I make this cheesecake gluten-free?
Yes. Choose certified gluten-free chocolate cookies and verify that the peanut butter cups and other packaged ingredients are gluten-free.
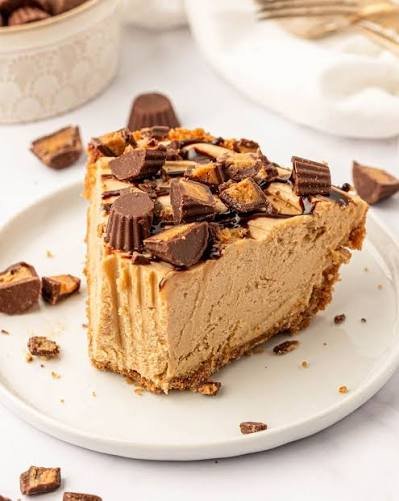
No Bake Reeses Peanut Butter Cup Cheesecake
Ingredients
Method
- Crush the chocolate sandwich cookies into fine crumbs. Mix with melted butter until evenly moistened
- Press the cookie mixture firmly into the bottom of a 9-inch springform pan. Refrigerate while preparing the filling
- Beat the softened cream cheese until smooth. Add peanut butter, powdered sugar, and vanilla. Mix until creamy and fully combined.
- In a separate bowl, whip the cold heavy cream until stiff peaks form.
- Gently fold the whipped cream into the peanut butter mixture until the filling is smooth and fluffy.
- Fold in the chopped Reese's Peanut Butter Cups, reserving some pieces for the topping.
- Spread the filling evenly over the chilled cookie crust. Smooth the top with a spatula.
- Decorate with the remaining chopped Reese's cups. Add whipped cream, cookie crumbs, or a light peanut butter drizzle if desired
- Cover and refrigerate for at least 6 hours, preferably overnight
- Remove the springform sides and slice with a sharp, warmed knife. Serve chilled
Video
Final Thoughts
This No Bake Reese’s Peanut Butter Cup Cheesecake brings together everything that makes a great chocolate peanut butter dessert: a crisp chocolate cookie crust, creamy peanut butter cheesecake filling, and plenty of Reese’s Peanut Butter Cups in every bite.
The best part is how simple the process is. There is no oven to preheat and no complicated baking technique to master. Once the cheesecake is assembled, the refrigerator does the work while the filling becomes smooth, firm, and perfectly sliceable.
Make it the night before a family dinner, bring it to a holiday gathering, or keep the recipe handy for those times when a rich homemade dessert is in order. Add extra peanut butter cups on top for a classic finish, or keep the decoration simple and let the creamy filling speak for itself.
If you make this cheesecake, try your favorite topping combination and share how it turned out. A good chocolate and peanut butter dessert is always worth passing around the table.
12 Comments