Red White And Blue Cake
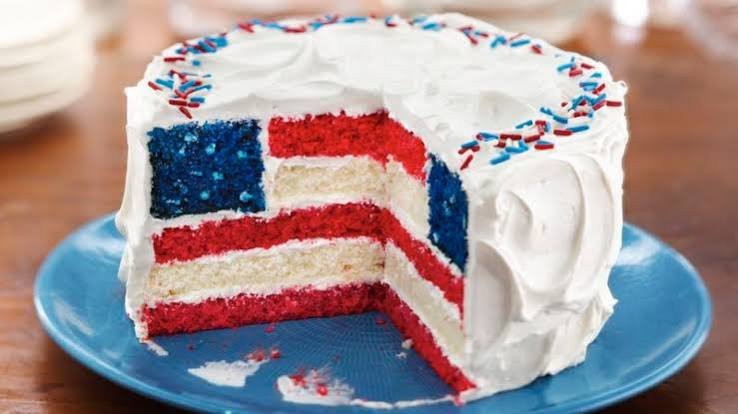
There is something special about a cake dressed in bright red, creamy white, and beautiful blue. This Red White and Blue Cake is a festive dessert that looks impressive on the table but is surprisingly simple to make. With soft, fluffy cake, smooth frosting, and colorful layers, every slice feels made for a celebration.
The cake has a tender texture and a sweet, buttery flavor that pairs beautifully with creamy frosting and fresh berries. Whether you are planning a Fourth of July gathering, Memorial Day cookout, patriotic birthday party, or summer family dinner, this colorful layer cake makes a cheerful centerpiece without requiring complicated decorating skills.
What makes this recipe especially appealing is the balance of simplicity and presentation. You can prepare the cake with easy-to-find ingredients, add vibrant red and blue colors, and finish it with a generous layer of frosting and fresh fruit. The result is a homemade dessert that looks festive, slices beautifully, and is easy enough for beginner bakers to tackle with confidence.
Keep reading for the ingredient tips, simple decorating ideas, and step-by-step instructions that will help you make a beautiful Red White and Blue Cake right at home.
Why You’ll Love This Red White and Blue Cake
- Easy to make: The recipe uses simple baking ingredients and straightforward steps, making it approachable even if you are new to layer cakes.
- Perfect for patriotic celebrations: The red, white, and blue colors make this cake a natural choice for the Fourth of July, Memorial Day, Labor Day, summer parties, and other festive gatherings.
- Soft and fluffy texture: The cake layers bake up tender and light, giving each bite a delicate crumb that pairs beautifully with creamy frosting.
- Beautiful without complicated decorating: You do not need advanced cake-decorating skills. Simple colored layers, smooth frosting, and a few fresh berries create an eye-catching finish.
- Fresh summer flavor: Strawberries and blueberries add a naturally sweet, fruity contrast to the rich frosting and tender cake.
- Easy to customize: You can adjust the colors, use different berries, change the frosting, or decorate the top to match your celebration.
- Great make-ahead dessert: The cake can be assembled ahead of time and chilled until you are ready to serve, which makes it convenient when preparing food for a party.
- A real crowd-pleaser: The festive appearance catches everyone’s attention, while the familiar combination of vanilla cake, creamy frosting, and fresh berries makes it easy to enjoy.
Ingredients
This Red White and Blue Cake comes together with simple baking staples, creamy frosting ingredients, and fresh berries. For the best texture and color, use room-temperature ingredients whenever possible.
For the Cake
- 2 1/2 cups all-purpose flour
- 2 1/2 teaspoons baking powder
- 1/2 teaspoon salt
- 3/4 cup unsalted butter, softened
- 1 3/4 cups granulated sugar
- 4 large eggs, room temperature
- 2 teaspoons vanilla extract
- 1 cup whole milk, room temperature
- Red gel food coloring
- Blue gel food coloring
For the Creamy Frosting
- 1 cup unsalted butter, softened
- 4 cups powdered sugar
- 2 teaspoons vanilla extract
- 3 to 4 tablespoons heavy cream or milk
- Pinch of salt
For Decorating
- 1 cup fresh strawberries, sliced or halved
- 1 cup fresh blueberries
- Additional frosting, as needed for decorating
Ingredient Preparation Tips
Before you begin, let the butter, eggs, and milk come to room temperature. This helps the ingredients blend smoothly and creates a more even cake batter.
For the red and blue layers, gel food coloring works particularly well because it gives you bright, bold colors without adding much extra liquid to the batter. Start with a small amount and gradually add more until you reach the shade you want.
Fresh strawberries and blueberries are ideal for decorating because they add natural color and a fresh fruit flavor. Choose berries that are firm, ripe, and free from bruises for the prettiest finish.
Ingredient Notes & Substitutions
A few simple ingredient choices can make a noticeable difference in the texture, flavor, and appearance of your Red White and Blue Cake. Here are some helpful options if you need to adjust the recipe.
All-Purpose Flour
All-purpose flour gives the cake enough structure while keeping the crumb tender. For a slightly softer texture, you can replace a small portion of the flour with cake flour, but avoid changing the total amount of flour too much.
Unsalted Butter
Unsalted butter lets you control the amount of salt in the recipe. If you only have salted butter, simply reduce or skip the added salt.
For the best cake texture and frosting consistency, allow the butter to soften at room temperature rather than melting it.
Whole Milk
Whole milk adds richness and moisture to the cake. You can substitute 2% milk if needed.
For a slightly richer result, buttermilk can also be used. Keep in mind that it may give the cake a subtle tangy flavor.
Granulated Sugar
Regular white granulated sugar works best for this recipe because it provides sweetness while helping create a light cake texture. Avoid replacing it with liquid sweeteners, as that can change the batter consistency.
Eggs
Use large eggs at room temperature. They help create a smoother batter and allow the ingredients to combine more evenly.
Gel Food Coloring
Gel food coloring is recommended for achieving strong red and blue cake layers without adding much extra moisture to the batter.
Liquid food coloring can be used in a pinch, but you may need more of it to achieve the same intensity.
Heavy Cream
Heavy cream makes the frosting smooth and rich. Milk can be used instead if you prefer a lighter frosting, although you may need slightly less liquid.
Add the liquid gradually so the frosting does not become too thin.
Fresh Strawberries
Strawberries provide a bright red color and fresh fruit flavor. Raspberries can be used instead if you prefer a more tart berry topping.
If using frozen berries, thaw and drain them thoroughly before decorating. Excess moisture can soften the frosting.
Fresh Blueberries
Fresh blueberries are ideal for the blue decoration because they hold their shape and add a natural pop of color.
Blackberries can be substituted for a deeper purple-blue appearance, although the final cake will have a slightly different look.
Dairy-Free Option
For a dairy-free version, use a plant-based butter suitable for baking and replace the milk or heavy cream with an unsweetened dairy-free alternative. Check the labels of all ingredients to make sure they meet your dietary needs.
Gluten-Free Option
To make a gluten-free Red White and Blue Cake, use a reliable cup-for-cup gluten-free baking flour blend designed to replace all-purpose flour. Choose a blend that contains xanthan gum if recommended by the manufacturer.
Budget-Friendly Tip
You do not need specialty decorating ingredients to make this cake look festive. Basic powdered sugar, butter, vanilla, strawberries, blueberries, and affordable gel food coloring are enough to create a colorful celebration cake.
Kitchen Tools Needed
You do not need professional cake-decorating equipment to make this Red White and Blue Cake. A few basic kitchen tools will make the process much easier.
Essential Tools
- Three 8-inch round cake pans: These are ideal for baking the red, white, and blue cake layers evenly.
- Large mixing bowl: Use this for preparing the cake batter.
- Medium mixing bowl: Helpful for combining the dry ingredients.
- Electric hand mixer or stand mixer: Makes creaming the butter and sugar much quicker and helps create a smooth batter.
- Measuring cups and spoons: Accurate measurements are important for consistent baking results.
- Rubber spatula: Useful for scraping the sides of the bowl and gently folding the batter.
- Cooling rack: Allows the baked cake layers to cool evenly without becoming soggy underneath.
- Offset spatula: Makes spreading frosting between the layers and around the cake much easier.
- Cake turntable: Optional, but helpful if you want to create a smoother frosting finish.
Helpful Extras
- Parchment paper: Helps prevent the cake layers from sticking to the pans.
- Small cookie scoop: Useful if you want to add small decorative frosting details.
- Piping bag and decorating tip: Optional for creating simple borders or swirls on top of the cake.
- Serrated knife: Helpful for trimming uneven cake tops and creating neat, level layers.
Before You Start
Prepare your cake pans before mixing the batter. Grease the pans well and line the bottoms with parchment paper. This small step can save you from struggling with stuck cake layers later.
Also make sure you have enough refrigerator space for the assembled cake. Chilling the cake briefly after frosting helps the layers become more stable and makes slicing much cleaner.
Step-by-Step Instructions
Making a Red White and Blue Cake is much easier when you prepare each part in order. Take your time with the batter, let the cake layers cool completely, and avoid rushing the frosting stage.
1. Prepare the Cake Pans
Preheat your oven to 350°F (175°C). Grease three 8-inch round cake pans and line the bottoms with parchment paper.
Lightly grease the parchment as well. Set the pans aside while you prepare the batter.
2. Mix the Dry Ingredients
In a medium bowl, whisk together the all-purpose flour, baking powder, and salt.
Whisking the ingredients first helps distribute the baking powder evenly throughout the flour, which encourages the cake to rise consistently.
3. Cream the Butter and Sugar
Add the softened butter and granulated sugar to a large mixing bowl.
Using an electric mixer, beat them together for about 2 to 3 minutes, until the mixture looks pale, light, and fluffy.
Do not rush this step. Properly creamed butter and sugar help give the cake a soft, tender crumb.
4. Add the Eggs and Vanilla
Add the eggs one at a time, mixing well after each addition.
Scrape down the sides of the bowl as needed, then mix in the vanilla extract.
The batter should look smooth and creamy. If it appears slightly curdled, do not worry. It will come together when the dry ingredients and milk are added.
5. Combine the Wet and Dry Ingredients
Add about one-third of the dry ingredients to the butter mixture and mix on low speed until just combined.
Pour in about half of the milk and mix gently.
Continue alternating the remaining dry ingredients and milk, finishing with the dry ingredients.
Mix only until the batter is smooth. Overmixing can develop too much gluten and leave the finished cake dense instead of fluffy.
6. Divide and Color the Batter
Divide the batter evenly among three bowls.
Leave one portion plain for the white layer.
Add red gel food coloring to the second portion and blue gel food coloring to the third. Stir gently until each color is evenly distributed.
Add the coloring gradually. It is much easier to deepen the shade than to correct batter that has become too dark.
7. Bake the Cake Layers
Transfer each colored batter to a prepared cake pan and spread it gently into an even layer.
Bake for approximately 20 to 25 minutes, or until a toothpick inserted into the center comes out clean or with only a few moist crumbs attached.
The cake should look lightly golden around the edges and feel springy when gently pressed in the center.
Avoid opening the oven repeatedly during baking because sudden temperature changes can affect how the layers rise.
8. Cool the Cake Layers
Allow the cakes to cool in their pans for about 10 minutes.
Run a thin knife around the edges if necessary, then carefully remove the layers and transfer them to a cooling rack.
Let them cool completely before adding frosting.
This is important. Frosting a warm cake can cause the buttercream to soften and slide between the layers.
9. Make the Frosting
Add the softened butter to a clean mixing bowl and beat until smooth and creamy.
Gradually add the powdered sugar, mixing on low speed at first to prevent a cloud of sugar from covering your kitchen.
Add the vanilla extract, salt, and enough heavy cream or milk to reach a smooth, spreadable consistency.
Increase the mixer speed and beat until the frosting becomes light and fluffy.
If the frosting feels too thick, add a small amount of cream. If it becomes too soft, add a little more powdered sugar.
10. Level the Cake Layers
Once the cake layers are completely cool, check their tops.
If any layer has a noticeable dome, carefully trim it with a serrated knife so the layers can stack evenly.
A level cake is much easier to frost and will give your finished Red White and Blue Cake a cleaner appearance.
11. Assemble the Cake
Place the first cake layer on a serving plate or cake board.
Spread an even layer of frosting over the top.
Add the second cake layer and gently press it into place. Spread another layer of frosting over the top.
Place the final cake layer on top.
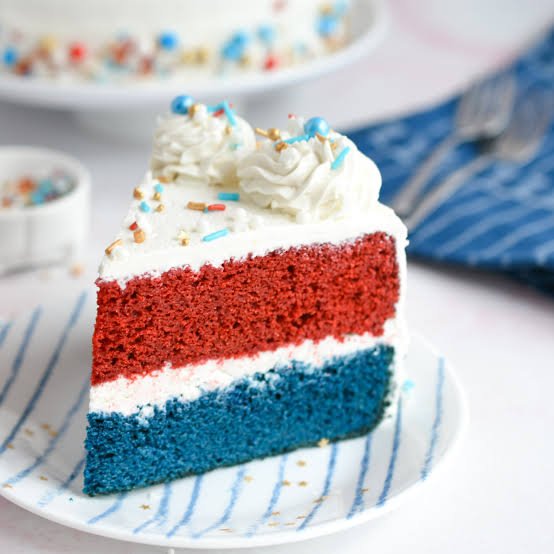
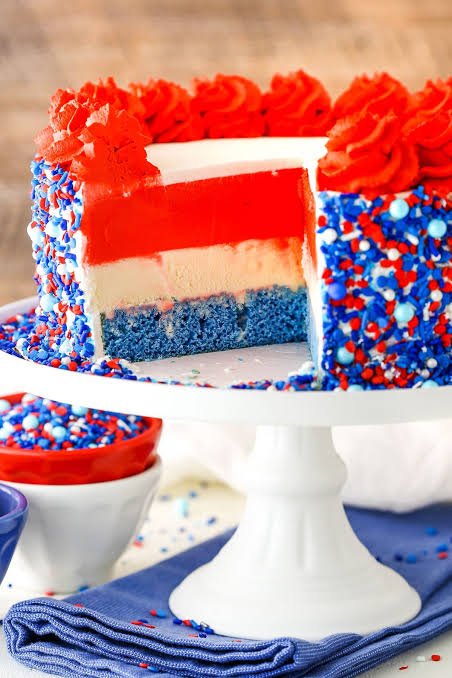
For a traditional red, white, and blue appearance, you can arrange the layers so the red layer is on the bottom, the plain white layer is in the middle, and the blue layer is on top.
12. Apply a Crumb Coat
Spread a thin layer of frosting over the entire cake.
This first coating does not need to look perfect. Its purpose is to trap loose cake crumbs so they do not appear in the final frosting layer.
Place the cake in the refrigerator for about 15 to 20 minutes, or until the frosting feels firm.
13. Add the Final Frosting Layer
Spread the remaining frosting around the chilled cake.
Use an offset spatula to smooth the sides and top. You can leave the frosting slightly rustic for a homemade look or smooth it more carefully for a polished finish.
Do not press too hard against the cake layers, especially around the edges, because this can pull crumbs into the frosting.
14. Decorate With Fresh Berries
Arrange the strawberries and blueberries over the top of the cake.
You can create a simple alternating pattern, place the berries around the border, or pile them loosely in the center.
For a classic patriotic look, keep the red strawberries and blue blueberries clearly visible against the white frosting.
Make sure the berries are washed and thoroughly dried before decorating. Extra water can cause the frosting to become slippery.
15. Chill Before Serving
Refrigerate the finished cake for about 20 to 30 minutes before slicing.
This gives the frosting time to firm up and helps the cake layers stay securely stacked.
Remove the cake from the refrigerator shortly before serving so the frosting can soften slightly and the cake can be enjoyed at its best texture.
Common Mistakes to Avoid
Do not overmix the batter. Once the flour is incorporated, mix only until combined.
Do not frost warm cake. Even slightly warm layers can soften the frosting and make the cake difficult to assemble.
Do not add too much food coloring at once. Gel coloring is concentrated, so add it gradually.
Do not skip leveling if your layers are very domed. Uneven layers can make the finished cake lean.
Do not decorate with wet berries. Pat them completely dry before placing them on the frosting.
Do not cut the cake immediately after assembling it. A short chill helps the frosting set and makes cleaner slices.
Expert Tips
A few small baking techniques can make a big difference in how your Red White and Blue Cake looks and tastes. These tips will help you get soft layers, smooth frosting, and a cleaner finish.
Use Room-Temperature Ingredients
Bring the butter, eggs, and milk to room temperature before mixing. Room-temperature ingredients blend more evenly and help create a smoother cake batter.
Cold ingredients can cause the butter to firm up and leave small lumps in the batter.
Measure Flour Carefully
Too much flour can make the cake dry and heavy. For the most accurate results, spoon the flour into your measuring cup and level the top with a knife instead of scooping directly from the flour container.
If you have a kitchen scale, weighing the flour is even better.
Do Not Overmix the Batter
Once the flour has been added, mix only until the ingredients are combined.
Overmixing can make the cake less tender. A few tiny streaks of flour are better than continuing to beat the batter for too long.
Choose Gel Food Coloring
Gel food coloring gives you stronger red and blue shades without adding much extra liquid.
For especially vibrant layers, use a concentrated gel color and add it a little at a time until the desired shade is reached.
Bake the Layers Evenly
Try to divide the batter as evenly as possible between the three pans. Uneven amounts can result in layers that finish baking at different times.
For precise portions, use a kitchen scale to weigh the batter before transferring it to the pans.
Let the Cake Cool Completely
This is one of the most important steps.
If the cake layers are even slightly warm when you begin frosting, the buttercream can soften and slide. Allow the layers to cool completely before assembling the cake.
For an even easier assembly, you can wrap the cooled layers and chill them briefly before frosting.
Make the Frosting Smooth
Beat the butter until creamy before adding the powdered sugar. This creates a smoother base and helps prevent lumps.
Add the powdered sugar gradually, then adjust the consistency with small amounts of cream or milk.
Use a Crumb Coat
A thin first layer of frosting locks loose crumbs into place.
After applying the crumb coat, chill the cake before adding the final layer. This makes it much easier to achieve clean white frosting.
Keep the Berry Decoration Fresh
Choose firm strawberries and plump blueberries. Avoid berries that are overly soft or bruised.
Wash the fruit ahead of time and dry it thoroughly. Even a small amount of excess moisture can affect the frosting.
Chill for Cleaner Slices
A short refrigeration period before serving helps the frosting firm up and keeps the cake layers stable.
For especially neat slices, use a sharp knife and wipe the blade clean between cuts.
Give the Cake Time to Soften Before Serving
If the cake has been refrigerated for several hours, let it sit at room temperature for about 20 to 30 minutes before serving.
This allows the frosting to become creamy again and brings out the soft texture of the cake.
Variations
One of the best things about this Red White and Blue Cake is how easily you can change the flavors, colors, and decorations. Keep the classic version or try one of these variations for your next celebration.
Fresh Berry Red White and Blue Cake
For a fruit-forward version, add a thin layer of sliced strawberries or blueberries between the cake layers along with the frosting.
The fresh berries add a juicy texture and a pleasant contrast to the sweet, creamy frosting.
Strawberry and Blueberry Filling
Make the filling even more noticeable by preparing separate strawberry and blueberry layers.
Spread strawberry preserves or finely chopped strawberries over one layer and blueberry preserves over another. Keep the filling thin so the cake remains stable when stacked.
Cream Cheese Frosting
Replace the buttercream with a smooth cream cheese frosting for a slightly tangy flavor.
The mild tang from cream cheese works especially well with vanilla cake and sweet summer berries.
Whipped Cream Frosting
For a lighter-tasting dessert, use stabilized whipped cream instead of traditional buttercream.
Because whipped cream is softer, keep the finished cake refrigerated until close to serving time.
Chocolate Red White and Blue Cake
For a richer dessert, replace part of the vanilla cake batter with chocolate cake batter.
You can keep the red and blue layers colorful while adding a chocolate layer for a fun flavor contrast.
Lemon Berry Cake
Add 1 to 2 teaspoons of finely grated lemon zest to the cake batter or frosting.
The bright citrus flavor pairs beautifully with strawberries and blueberries and gives the cake a fresh summer character.
Coconut Version
Add a small amount of unsweetened shredded coconut to the batter or sprinkle it over the frosting.
Coconut adds a gentle tropical flavor that works nicely with the fresh berries.
Gluten-Free Version
Use a good-quality cup-for-cup gluten-free flour blend in place of all-purpose flour.
Check the flour blend instructions to determine whether additional xanthan gum is required.
Dairy-Free Version
Use dairy-free baking butter and a suitable plant-based milk. For the frosting, choose a dairy-free butter alternative and adjust the powdered sugar and liquid until you reach a smooth consistency.
Reduced-Sugar Option
You can slightly reduce the granulated sugar in the cake, although changing the amount too much can affect the texture.
For a naturally less-sweet finish, use fresh berries and a lighter layer of frosting rather than making major changes to the cake formula.
Cupcake Version
Turn the recipe into festive red, white, and blue cupcakes.
Divide the colored batter among cupcake liners and bake until a toothpick inserted into the center comes out clean. Once cooled, pipe or spread white frosting over each cupcake and finish with strawberries and blueberries.
Sheet Cake Version
For an easier option when serving a crowd, bake the batter in a suitable rectangular cake pan instead of assembling multiple round layers.
Once cooled, frost the entire cake and decorate the top with red strawberries and blue blueberries.
This version is especially convenient for picnics, potlucks, and large family gatherings.
Patriotic Sprinkle Cake
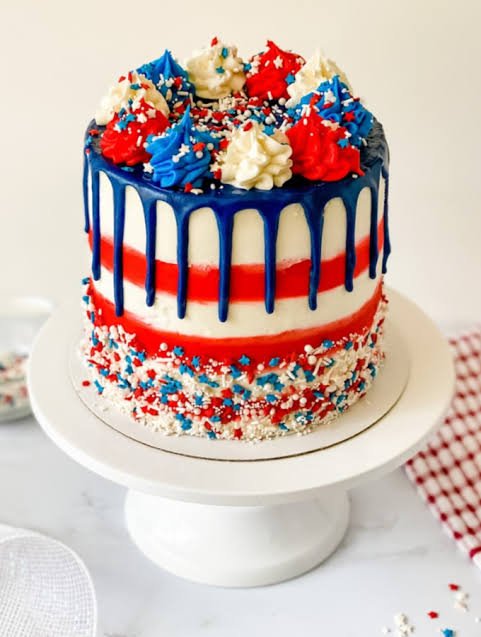
Add red, white, and blue sprinkles to the top of the frosted cake for extra color and texture.
Choose simple nonpareils or jimmies and add them immediately after frosting so they stick properly.
Fourth of July Firework Cake
For a festive Fourth of July presentation, arrange blueberries in small clusters and use thin strawberry slices to create a simple starburst pattern across the white frosting.
Keep the decoration uncomplicated so the colorful cake layers remain the main attraction.
Storage Instructions
Because this Red White and Blue Cake is covered with creamy frosting and decorated with fresh berries, proper storage will help keep the cake moist while protecting the frosting and fruit.
Refrigerator Storage
Store the assembled cake in the refrigerator in a covered cake container or loosely covered with plastic wrap.
It will keep well for about 3 to 4 days when properly refrigerated.
If possible, add the fresh berries shortly before serving. This helps prevent the fruit from releasing excess moisture onto the frosting.
Before serving, let the refrigerated cake sit at room temperature for about 20 to 30 minutes. This allows the cake to soften slightly and gives the frosting a smoother, creamier texture.
Storing Individual Slices
For leftovers, cut the cake into individual slices and place them in airtight containers.
If you need to stack slices, place a piece of parchment paper between them to prevent the frosting from sticking.
Keep the containers refrigerated and enjoy the slices within 3 to 4 days.
Freezing the Cake Layers
The unfrosted cake layers can be frozen successfully.
Once the layers have cooled completely, wrap each one tightly in plastic wrap, then place them in a freezer-safe bag or container.
Freeze for up to 2 to 3 months for the best quality.
When you are ready to assemble the cake, thaw the wrapped layers in the refrigerator overnight. Once thawed, unwrap them and allow them to sit briefly before frosting.
Can You Freeze the Finished Cake?
Yes, but freezing the fully decorated cake is less ideal because fresh strawberries and blueberries can become soft and watery after thawing.
If you need to freeze the finished cake, freeze it without the fresh berry decoration whenever possible.
Place the frosted cake in the freezer uncovered for about an hour, or until the frosting becomes firm. Then wrap it carefully and place it in a freezer-safe container.
Thaw the cake in the refrigerator and add fresh berries after it has completely thawed.
How to Keep the Cake Fresh for a Party
If you are making the cake ahead for a celebration, prepare the cake layers and frosting in advance.
Assemble and frost the cake the day before serving, then keep it refrigerated. Add the fresh berries on the day of the event for the freshest appearance.
Avoid leaving the cake in direct sunlight or in a warm room for extended periods, especially during summer gatherings.
Storage Tip
Always keep an eye on the berries. If they begin releasing juice or looking soft, remove them from leftover slices before storing them for another day. This helps prevent excess moisture from soaking into the frosting and cake.
Frequently Asked Questions
Can I make Red White and Blue Cake ahead of time?
Yes. You can bake the cake layers a day or two ahead and keep them tightly wrapped. You can also prepare the frosting in advance and refrigerate it. Bring the frosting to room temperature and beat it briefly before using if it becomes firm.
Can I use liquid food coloring instead of gel?
Yes, but gel food coloring is preferred because it produces stronger colors without adding much liquid to the batter. If using liquid coloring, add it gradually and avoid adding so much that the batter becomes too thin.
Why did my colored cake layers turn pale?
The amount and type of food coloring can affect the final shade. Gel coloring generally produces brighter results. Also remember that the baked cake may look slightly lighter than the raw batter.
Can I use frozen berries?
Fresh berries are best for decorating because they hold their shape and look brighter. Frozen berries can be used for fillings, but thaw and drain them well before adding them to the cake.
How do I keep the cake layers from sticking to the pans?
Grease the pans thoroughly and line the bottoms with parchment paper. Allow the baked cakes to cool for about 10 minutes before carefully removing them from the pans.
Why is my cake dry?
Overbaking and adding too much flour are common causes of dry cake. Measure the flour carefully and begin checking the cake near the lower end of the suggested baking time.
Why is my frosting too thin?
The frosting may contain too much milk or cream. Add powdered sugar a little at a time until it reaches a thick but spreadable consistency. Chilling the frosting briefly can also help firm it up.
Why is my frosting too thick?
Add a small amount of heavy cream or milk and mix again. Continue adding liquid gradually until the frosting reaches the consistency you need.
Can I make this cake without a stand mixer?
Absolutely. A hand mixer works well for this recipe. You can also mix the batter by hand, although creaming the butter and sugar thoroughly will require more effort.
Can I make this recipe as cupcakes?
Yes. Divide the batter among lined muffin cups and bake until the centers spring back lightly and a toothpick comes out clean. Once cooled, frost and decorate with fresh strawberries and blueberries.
How should I arrange the red, white, and blue layers?
A classic arrangement is red on the bottom, white in the middle, and blue on top. You can also reverse the order or create your own pattern depending on the look you want.
Can I use a different frosting?
Yes. Cream cheese frosting, whipped cream frosting, or another vanilla frosting can work well. Choose a frosting that is firm enough to support the cake layers.
How long can the cake sit at room temperature?
For the best quality, keep the cake refrigerated and take it out shortly before serving. If the room is warm, especially during summer, return the cake to the refrigerator rather than leaving it out for a long period.
How do I get clean slices?
Chill the assembled cake before slicing and use a sharp knife. Wipe the knife clean between cuts to keep the red, white, and blue layers looking neat.
Can I make this cake gluten-free?
Yes. Replace the all-purpose flour with a reliable cup-for-cup gluten-free baking flour blend. Check the blend’s instructions to determine whether xanthan gum is needed.
Can I make the cake dairy-free?
Yes. Use dairy-free butter and a suitable plant-based milk or cream alternative. Check all ingredient labels carefully if you are preparing the cake for someone with a dairy allergy.
What is the best way to decorate Red White and Blue Cake?
A simple layer of white frosting topped with fresh strawberries and blueberries creates a classic patriotic look. You can also add red, white, and blue sprinkles or piped frosting details for extra decoration.

Red White And Blue Cake
Ingredients
Method
- Preheat the oven to 350°F (175°C). Grease three 8-inch round cake pans and line the bottoms with parchment paper.
- Whisk together the flour, baking powder, and salt in a medium bowl.
- In a large bowl, beat the softened butter and sugar until pale, light, and fluffy, about 2 to 3 minutes.
- Add the eggs one at a time, mixing well after each addition. Mix in the vanilla extract.
- Add the dry ingredients and milk alternately, beginning and ending with the dry ingredients. Mix just until the batter is smooth. Do not overmix.
- Divide the batter evenly among three bowls. Leave one portion plain. Color one portion red and another blue using gel food coloring.
- Pour each batter into a prepared cake pan and spread evenly.
- Bake for 20 to 25 minutes, or until a toothpick inserted into the center comes out clean or with a few moist crumbs.
- Cool the cakes in their pans for about 10 minutes, then transfer them to a cooling rack. Allow them to cool completely.
- To make the frosting, beat the softened butter until creamy. Gradually add the powdered sugar, followed by vanilla, salt, and enough cream or milk to create a smooth, spreadable consistency.
- If necessary, level the tops of the cooled cake layers with a serrated knife.
- Place the red cake layer on a serving plate and spread frosting over the top. Add the white layer, followed by another layer of frosting. Finish with the blue cake layer.
- Spread a thin crumb coat over the entire cake and refrigerate for 15 to 20 minutes
- Apply the remaining frosting and smooth the top and sides with an offset spatula.
- Arrange the fresh strawberries and blueberries over the top of the cake.
- Chill the finished cake for 20 to 30 minutes before slicing and serving
Video
Notes
- Use room-temperature butter, eggs, and milk for the smoothest batter.
- Gel food coloring gives the most vibrant red and blue layers.
- Do not frost the cake until the layers are completely cool.
- Dry the berries thoroughly before placing them on the frosting.
- For cleaner slices, chill the cake before cutting.
- Store leftover cake covered in the refrigerator for up to 3 to 4 days.
- For the best texture, allow refrigerated slices to sit at room temperature for about 20 to 30 minutes before serving.
Final Thoughts
This Red White and Blue Cake is a wonderful way to turn a simple homemade dessert into the centerpiece of a special celebration. The soft vanilla cake, creamy frosting, and fresh strawberries and blueberries create a combination that feels both classic and festive.
You do not need complicated decorating techniques to make it beautiful. The colorful cake layers do most of the work, while a smooth layer of white frosting and fresh berries add the finishing touch.
Whether you are baking for the Fourth of July, a summer birthday, Memorial Day, or a family gathering, this cake is easy to customize and simple enough to prepare at home.
For the best results, give yourself plenty of time to let the cake layers cool completely before assembling. Take care when adding the frosting, keep the berries dry, and chill the finished cake before slicing.
Once you cut into it, the red, white, and blue layers make every slice feel special. Serve it chilled or slightly softened at room temperature with your favorite summer drinks, and enjoy a festive homemade dessert made for sharing.
If you make this recipe, consider adding your own favorite berries, frosting style, or patriotic decoration to make it uniquely yours.