Fruity Pebble Ice Cream Cake
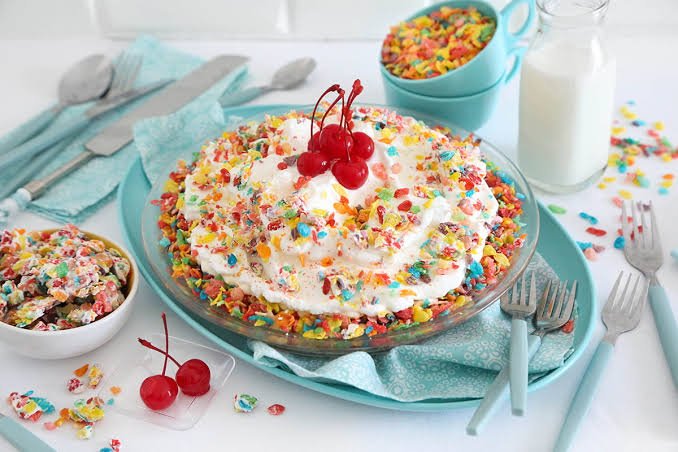
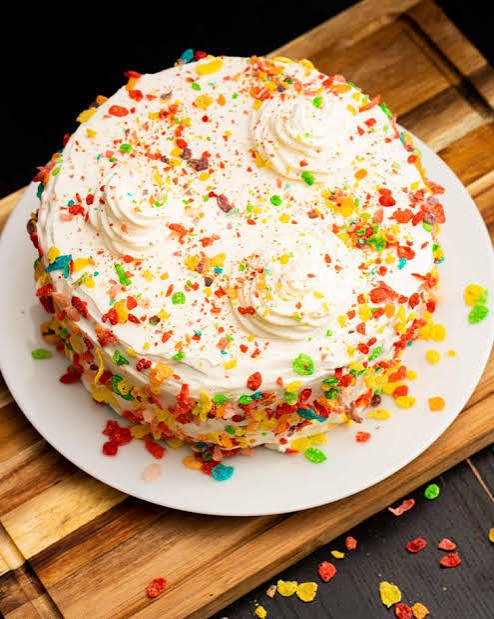
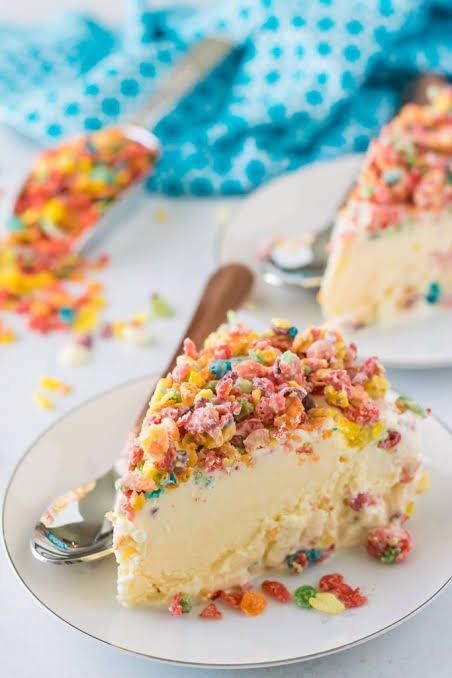
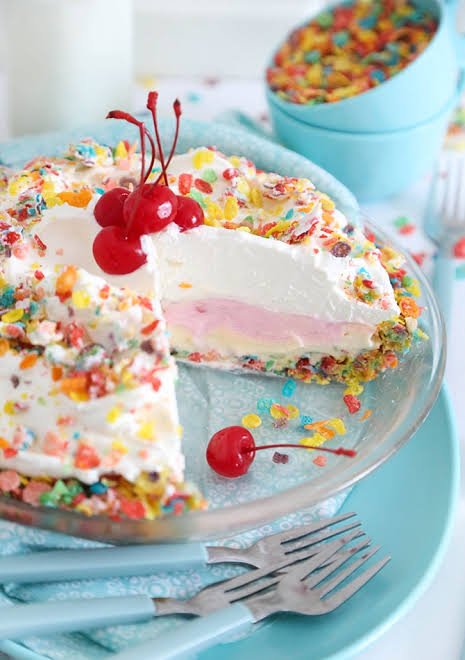
If you love the colorful crunch of Fruity Pebbles and the creamy sweetness of ice cream, this Fruity Pebble Ice Cream Cake brings both together in one fun, nostalgic dessert. A crisp cereal crust, smooth vanilla ice cream, and a creamy cereal-infused topping create layers of contrasting textures and bright fruity flavor in every slice.
The best part is that this ice cream cake looks impressive without requiring complicated baking skills. There is no elaborate cake decorating or difficult frosting technique to worry about. Most of the work happens in the freezer, making it an easy make-ahead dessert for birthdays, summer gatherings, family celebrations, or any time you want something a little more playful than a traditional cake.
Each bite starts with the buttery crunch of the cereal crust before melting into cool, velvety ice cream. The colorful cereal adds plenty of texture, while the creamy topping brings everything together. It is simple enough for a beginner to make and special enough to become the centerpiece of a dessert table.
Why You’ll Love This Recipe
This Fruity Pebble Ice Cream Cake is the kind of dessert that makes an ordinary celebration feel a little more special. It combines familiar cereal with creamy ice cream in a simple frozen dessert that is easy to prepare ahead of time.
- No complicated baking: Most of the recipe comes together without a traditional oven-baked cake.
- Easy to make ahead: The cake needs time to freeze, so you can prepare it well before serving.
- Fun fruity flavor: Fruity Pebbles add a sweet, colorful cereal flavor that pairs beautifully with vanilla ice cream.
- Great texture: The crunchy cereal crust contrasts with the soft, creamy ice cream layer.
- Perfect for celebrations: Its bright colors make it especially fitting for birthdays, kids’ parties, summer gatherings, and family celebrations.
- Beginner-friendly: You do not need advanced decorating skills to create a dessert that looks polished.
- Easy to customize: Change the ice cream, toppings, or cereal layers to create your own version.
- Freezer-friendly: Once assembled, the cake can stay frozen until you are ready to slice and serve.
The combination of creamy ice cream and crisp cereal also gives this dessert a nostalgic feel, while the layered presentation makes it feel more like a special occasion cake than an everyday frozen treat.
Ingredients
You only need a handful of simple ingredients to make this colorful Fruity Pebble Ice Cream Cake. For the best texture, use full-fat ice cream and allow it to soften slightly before assembling the layers.
For the Fruity Pebble Crust
- 4 cups Fruity Pebbles cereal
- 5 tablespoons unsalted butter, melted
For the Ice Cream Layer
- 1 1/2 quarts vanilla ice cream, slightly softened
- 1 cup Fruity Pebbles cereal
For the Creamy Topping
- 1 1/2 cups heavy whipping cream, cold
- 1/3 cup powdered sugar
- 1 teaspoon pure vanilla extract
- 1/2 cup Fruity Pebbles cereal
For Decorating
- 1/2 cup Fruity Pebbles cereal
- Extra whipped cream, optional
- Fruity Pebbles or colorful sprinkles, optional
Ingredient Overview
The cereal provides both the signature fruity flavor and satisfying crunch, while melted butter helps bind the crust together. Vanilla ice cream creates a smooth, creamy center that lets the cereal flavor shine without becoming overwhelming.
For the topping, cold heavy cream whipped with powdered sugar creates a light, creamy finish. A final sprinkle of Fruity Pebbles adds color and crunch just before serving.
Ingredient Notes & Substitutions
A few small ingredient choices can make a noticeable difference in the texture and flavor of your Fruity Pebble Ice Cream Cake. Here are some practical substitutions to help you make the recipe with what you already have.
Fruity Pebbles
Fruity Pebbles give the cake its signature fruity flavor, bright color, and crisp texture. For the closest result, use the original cereal.
If you cannot find Fruity Pebbles, another colorful fruit-flavored crisp rice cereal can work. Keep in mind that the flavor and color may vary depending on the cereal you choose.
Vanilla Ice Cream
A good-quality vanilla ice cream gives the cake a rich and creamy center. Regular full-fat vanilla ice cream is ideal because it freezes firmly while remaining pleasant to slice.
You can substitute French vanilla or vanilla bean ice cream for a slightly richer flavor. Avoid very soft or low-fat varieties if possible, as they may produce a less stable cake.
Unsalted Butter
Unsalted butter is used to bind the crushed cereal crust. If you only have salted butter, you can use it without making any other changes. The small amount of salt can actually balance the sweetness.
For a dairy-free version, use a plant-based butter that is suitable for baking.
Heavy Whipping Cream
Heavy whipping cream creates the smooth, fluffy topping. For the best volume, make sure the cream is thoroughly chilled before whipping.
For a dairy-free cake, use a reliable dairy-free whipping cream that can be whipped and frozen successfully.
Powdered Sugar
Powdered sugar sweetens the whipped topping while helping it maintain a smooth texture. If needed, a small amount of superfine sugar can be used instead, although powdered sugar blends more easily.
Vanilla Extract
Pure vanilla extract adds a warm background flavor that balances the sweetness of the cereal and ice cream. You can use vanilla bean paste if you want a stronger vanilla flavor.
Gluten-Free Option
Fruity Pebbles are commonly made without gluten-containing ingredients, but ingredient formulations can vary by product and region. If you need the cake to be strictly gluten-free, check the package label and choose certified gluten-free ingredients where appropriate.
Nut-Free Option
The basic recipe does not require nuts. If you are serving the cake to someone with a nut allergy, check all ingredient labels carefully, especially the ice cream, cereal, sprinkles, and whipped topping, to avoid products with allergen warnings or cross-contact concerns.
Budget-Friendly Tip
There is no need to buy premium ice cream or specialty decorating ingredients. A standard tub of vanilla ice cream, regular heavy cream, and one box of cereal are enough to create a festive dessert with plenty of flavor and texture.
Kitchen Tools Needed
You do not need a long list of specialty equipment to make this Fruity Pebble Ice Cream Cake. A few basic kitchen tools will make the process easier and help you create clean, even layers.
- 9-inch springform pan: Makes it much easier to remove the frozen cake without damaging the edges.
- Food processor: Useful for crushing the Fruity Pebbles into fine crumbs for the crust. A sturdy zip-top bag and rolling pin can also work.
- Mixing bowls: Use separate bowls for the crust and whipped topping.
- Measuring cups and spoons: Helpful for keeping the ingredient proportions accurate.
- Rubber spatula: Ideal for pressing the cereal crust firmly and spreading the ice cream evenly.
- Electric hand mixer or stand mixer: Makes whipping the cream quick and easy.
- Flat-bottomed measuring cup: Helpful for pressing the cereal crust into an even layer.
- Plastic wrap or aluminum foil: Use it to cover the cake while it freezes.
- Sharp chef’s knife: For cutting neat slices when serving.
Optional Helpful Tools
A cake turntable is not necessary, but it can make decorating easier if you plan to add a decorative whipped cream border. An offset spatula can also help smooth the ice cream layer and create cleaner edges.
For the easiest release, you can line the bottom of the springform pan with parchment paper before adding the crust. This small step makes transferring the finished cake much simpler.
Step-by-Step Instructions
Making this Fruity Pebble Ice Cream Cake is mostly about building simple layers and giving each one enough time to set. The key is to work quickly once the ice cream begins to soften so the cake stays firm and easy to slice.
1. Prepare the Pan
Line the bottom of a 9-inch springform pan with parchment paper. Lightly grease the sides if desired.
Place the prepared pan on a flat surface that can easily fit in your freezer. Having the pan ready before you begin will make assembly much easier.
2. Make the Fruity Pebble Crust
Place the Fruity Pebbles in a food processor and pulse until they become fine crumbs. Do not process them into a completely smooth powder. A few slightly larger pieces will add pleasant texture to the crust.
Transfer the cereal crumbs to a mixing bowl and pour in the melted butter. Stir until the crumbs are evenly coated and the mixture resembles damp sand.
3. Press the Crust Into the Pan
Transfer the cereal mixture to the prepared springform pan.
Use the bottom of a measuring cup or a flat spatula to press the crumbs firmly into an even layer. Pay special attention to the edges so the crust holds together when sliced.
Place the pan in the freezer for about 15 to 20 minutes, or until the crust feels firm.
4. Soften the Ice Cream
Remove the vanilla ice cream from the freezer and let it sit at room temperature just until it becomes soft enough to spread.
The ice cream should be scoopable and creamy, but it should not be melted or runny. If it becomes too soft, return it to the freezer for a few minutes before continuing.
5. Add the Ice Cream Layer
Scoop the softened vanilla ice cream over the chilled cereal crust.
Use a rubber spatula or offset spatula to gently spread the ice cream into an even layer. Work from the center toward the edges, pressing lightly rather than aggressively.
Sprinkle 1 cup of Fruity Pebbles evenly over the ice cream and gently press them into the surface.
6. Freeze Until Firm
Cover the pan tightly with plastic wrap or foil.
Place the cake in the freezer for at least 4 to 6 hours, or preferably overnight. The center should be completely firm before you add the topping.
For the cleanest slices, do not rush this step. A cake that is only partially frozen can become difficult to decorate and may lose its shape when sliced.
7. Make the Whipped Cream Topping
When the cake is nearly ready, pour the cold heavy whipping cream into a chilled mixing bowl.
Add the powdered sugar and vanilla extract. Beat with an electric mixer until the cream becomes thick and fluffy and forms medium-to-stiff peaks.
Be careful not to overbeat the cream. Stop once it holds its shape but still looks smooth and creamy.
8. Finish the Cake
Remove the frozen cake from the freezer and carefully release the sides of the springform pan.
Spread the whipped cream over the top in an even layer. You can also pipe small swirls around the edge if you want a more decorated presentation.
Scatter Fruity Pebbles over the whipped cream. Add extra cereal or colorful sprinkles if desired.
Work quickly during decorating so the ice cream remains frozen and firm.
9. Let It Sit Before Slicing
Return the decorated cake to the freezer for about 30 minutes to 1 hour.
Before serving, let the cake sit at room temperature for approximately 5 to 10 minutes. This gives the ice cream just enough time to soften slightly, making it easier to cut without allowing the cake to become too soft.
10. Slice and Serve
Dip a sharp knife in hot water, wipe it dry, and use it to cut the cake into slices. Repeat the process between cuts for cleaner edges.
Serve the slices immediately with extra Fruity Pebbles sprinkled over the top if desired.
Common Mistakes to Avoid
Do not melt the ice cream completely. Softened ice cream should still be thick enough to hold its shape.
Do not skip the crust chilling step. A firm crust provides a stable foundation for the ice cream layer.
Do not overwhip the cream. Stop when it reaches a smooth, fluffy consistency with firm peaks.
Do not leave the finished cake out too long. Ice cream cake softens quickly, especially in a warm kitchen.
Do not cut it straight from the freezer. A short resting period makes slicing much easier and gives each piece a smoother texture.
Expert Tips
A few simple techniques can make your Fruity Pebble Ice Cream Cake easier to assemble and much cleaner to serve. These tips focus on texture, flavor, and presentation.
Crush the Cereal to the Right Texture
For the crust, aim for mostly fine crumbs with a few small pieces remaining. Completely powdered cereal can create a dense crust, while large pieces may prevent the layer from holding together.
Press the Crust Firmly
Use the flat bottom of a measuring cup to compact the crust evenly. A firm, level base helps prevent the cake from crumbling when you cut into it.
Keep the Ice Cream Cold
Softening the ice cream is necessary, but do not let it become liquid. If the ice cream starts melting while you assemble the cake, place the pan in the freezer for a few minutes before continuing.
Chill Your Whipping Bowl
For a fluffier whipped cream topping, place the mixing bowl and beaters in the refrigerator or freezer for several minutes before whipping the cream. Cold equipment helps the cream whip more efficiently.
Freeze Between Important Layers
If your kitchen is warm or the ice cream is becoming too soft, return the cake to the freezer between steps. A short freeze can make assembly much easier and helps maintain distinct layers.
Add Cereal Just Before Serving
Fruity Pebbles soften when exposed to moisture. For the crispiest topping, add a generous sprinkle of fresh cereal shortly before serving rather than putting all of it on the cake hours in advance.
Use a Warm Knife for Clean Slices
Run a sharp knife under hot water, wipe it dry, and then slice the cake. The gentle warmth helps the blade move through the frozen layers more smoothly.
Give the Cake a Few Minutes to Soften
Do not serve the cake immediately after removing it from a very cold freezer. Letting it rest for about 5 to 10 minutes makes the ice cream creamier and easier to slice while keeping the cake firm.
Make It Ahead
This dessert is ideal for preparing in advance. Once the cake is fully frozen and tightly covered, it can be ready and waiting in the freezer for your gathering. Add the freshest cereal garnish closer to serving time for the best crunch.
Keep the Layers Even
When spreading the ice cream, take a moment to smooth the surface before adding the cereal layer. Even layers make every slice look more polished and ensure a balanced combination of crust, ice cream, and topping in every bite.
Variations
Once you have the basic Fruity Pebble Ice Cream Cake down, it is easy to customize the flavors, colors, and toppings. These variations let you adjust the recipe for different occasions or dietary preferences.
Chocolate Fruity Pebble Ice Cream Cake
Swap the vanilla ice cream for chocolate ice cream for a richer dessert. The chocolate flavor pairs surprisingly well with the sweet fruity cereal. Add a light drizzle of chocolate sauce over the top before serving.
Strawberry Fruity Pebble Cake
Use strawberry ice cream instead of vanilla and add thin slices of fresh strawberries between the ice cream and topping. The berry flavor complements the fruity cereal while adding a fresh contrast.
Birthday Cake Version
Choose birthday cake or cake batter ice cream and decorate the top with colorful sprinkles. Add a few small whipped cream swirls around the edge for a festive presentation.
Cookies and Cereal Version
Fold crushed vanilla sandwich cookies into the softened ice cream before spreading it over the crust. Finish the cake with extra cereal and cookie crumbs for a crunchy topping.
Berry Crunch Version
Add a layer of finely chopped strawberries, raspberries, or blueberries over the ice cream. Keep the fruit layer thin so excess moisture does not make the cake difficult to slice.
Dairy-Free Version
Use dairy-free vanilla ice cream, plant-based butter, and dairy-free whipping cream. Check each package carefully to make sure the products meet your dietary requirements.
Gluten-Free Version
If you need a strictly gluten-free dessert, choose cereal and all other ingredients that are specifically labeled gluten-free. Always check current package labels because formulations can change.
Lower-Sugar Approach
For a lighter version, use a reduced-sugar ice cream and reduce the amount of powdered sugar in the whipped topping. Keep in mind that the cereal itself contributes sweetness, so the overall flavor will still be dessert-like.
Extra Crunch Version
For more texture, reserve some Fruity Pebbles and sprinkle them over individual slices immediately before serving. This keeps the cereal crisp and creates a stronger contrast with the creamy ice cream.
Different Ice Cream Flavors
Vanilla is a natural choice, but you can experiment with other flavors such as strawberry, birthday cake, chocolate, or coconut. Choose flavors that complement rather than overpower the fruity cereal.
Storage Instructions
Because this is a frozen dessert, proper storage is important for keeping the Fruity Pebble Ice Cream Cake firm, creamy, and easy to slice.
Freezer Storage
Keep the finished cake tightly covered in the freezer. Once the cake has fully set, wrap the pan or individual portions well with plastic wrap, then add a layer of aluminum foil for extra protection against freezer odors and ice crystals.
For the best texture and freshest cereal flavor, enjoy the cake within about 1 week. It can remain frozen longer when properly wrapped, but the cereal topping may gradually lose its crispness.
Storing Individual Slices
If you have leftovers, cut the cake into individual portions and wrap each slice separately. Place the wrapped slices in a freezer-safe airtight container or freezer bag.
Individual slices are convenient when you want to serve only a small portion without repeatedly exposing the whole cake to room temperature.
Before Serving
Remove the cake from the freezer and let it sit at room temperature for approximately 5 to 10 minutes. This short resting period softens the ice cream slightly and makes slicing easier.
If the cake is still too firm, give it another couple of minutes rather than leaving it out for a long period.
Keeping the Cereal Crunchy
Fruity Pebbles can soften over time when exposed to moisture. If you are preparing the cake several days ahead, consider reserving some cereal for the final garnish.
Add the fresh cereal shortly before serving for the best contrast between the crisp topping and creamy ice cream.
Can You Refrigerate It?
Refrigeration is not recommended for long-term storage because the ice cream will melt. If the cake has softened significantly, return it to the freezer as soon as possible and allow it to become firm again before serving.
Can You Reheat Ice Cream Cake?
No. This dessert should not be reheated. Simply allow it to soften slightly at room temperature before slicing and serving.
Frequently Asked Questions
Can I make Fruity Pebble Ice Cream Cake ahead of time?
Yes. This is an excellent make-ahead dessert. Assemble the cake, freeze it until completely firm, and keep it tightly covered until you are ready to serve. Add fresh cereal to the top shortly before serving for the best crunch.
How long does Fruity Pebble Ice Cream Cake need to freeze?
For the most reliable results, freeze the assembled cake for at least 4 to 6 hours. Overnight is even better because it gives the ice cream plenty of time to become completely firm.
Can I use a different ice cream flavor?
Absolutely. Vanilla works especially well because it allows the fruity cereal flavor to stand out, but strawberry, birthday cake, chocolate, or vanilla bean ice cream can also work nicely.
How do I keep the cereal from getting soggy?
Cereal naturally softens when exposed to moisture. Keep the cake tightly covered in the freezer and reserve some Fruity Pebbles for the final garnish. Add that fresh cereal just before serving.
Can I make this without a springform pan?
Yes. A deep pie dish or another freezer-safe cake pan can work. Line the pan with parchment paper, leaving some overhang, so you can lift the frozen cake out more easily.
Why is my cereal crust falling apart?
The crust may not have enough butter or may not have been pressed firmly enough. Make sure the cereal crumbs are evenly coated with melted butter and compact the mixture firmly into the pan before freezing.
Why is my ice cream layer melting while I assemble the cake?
The ice cream may have softened too much. It should be spreadable but still thick. If it becomes runny, return the cake to the freezer for several minutes before continuing.
How do I get clean slices?
Use a sharp knife warmed under hot water, then wipe it dry before cutting. Let the frozen cake rest for about 5 to 10 minutes before slicing, and clean and rewarm the knife between cuts when necessary.
Can I make this cake dairy-free?
Yes. Use dairy-free vanilla ice cream, plant-based butter, and a dairy-free whipping cream suitable for freezing. Check the labels of all ingredients if the cake is being prepared for someone with food allergies.
Is Fruity Pebble Ice Cream Cake gluten-free?
The answer depends on the specific products you use and the labeling requirements where you live. If gluten-free preparation is important, check the current packaging for the cereal, ice cream, whipped topping, sprinkles, and other ingredients.
Can I add fruit to the cake?
Yes. Thinly sliced strawberries or other berries can add a fresh contrast to the sweet ice cream and cereal. Avoid adding too much fresh fruit because excess moisture can affect the texture of the frozen layers.
How long can leftovers stay in the freezer?
For the best quality, enjoy the cake within about 1 week when tightly wrapped. It may remain safe longer under proper freezer conditions, but the cereal can gradually lose its crisp texture and the ice cream may develop freezer burn.

Fruity Pebble Ice Cream Cake
Ingredients
Method
- Line the bottom of a 9-inch springform pan with parchment paper.
- Pulse the Fruity Pebbles for the crust in a food processor until mostly fine crumbs form.
- Combine the cereal crumbs with melted butter until evenly coated.
- Press the mixture firmly into the bottom of the prepared pan.
- Freeze the crust for 15 to 20 minutes, until firm
- Allow the vanilla ice cream to soften slightly. It should be creamy and spreadable but not melted.
- Spread the softened ice cream evenly over the chilled crust.
- Sprinkle 1 cup of Fruity Pebbles over the ice cream and gently press them into the surface.
- Cover the pan tightly and freeze for at least 4 to 6 hours, preferably overnight.
- When the cake is almost ready, beat the cold heavy cream, powdered sugar, and vanilla until smooth and fluffy with medium-to-stiff peaks.
- Remove the frozen cake from the springform pan and spread the whipped cream over the top.
- Decorate with the remaining Fruity Pebbles and optional sprinkles.
- Freeze for another 30 minutes to 1 hour.
- Let the cake rest at room temperature for 5 to 10 minutes before slicing.
- Cut with a sharp, warm knife and serve immediately.
Video
Notes
- Use full-fat vanilla ice cream for the creamiest texture.
- Do not allow the ice cream to melt completely during assembly.
- Chill the crust before adding the ice cream so the layers stay distinct.
- Keep the cake tightly covered while frozen to protect it from freezer odors and ice crystals.
- Add some fresh Fruity Pebbles shortly before serving for extra crunch.
- For cleaner slices, warm and dry the knife between cuts.
- If your kitchen is warm, return the cake to the freezer whenever the ice cream becomes too soft.
Final Thoughts
This Fruity Pebble Ice Cream Cake is a simple way to turn a familiar childhood cereal into a fun frozen dessert that feels special enough for a celebration. The crisp cereal crust, creamy vanilla ice cream, and fluffy whipped topping create a satisfying mix of textures in every slice.
It is also an easy recipe to prepare ahead, which makes it especially useful when you are planning a birthday party, summer gathering, or family dinner. Once it is assembled and frozen, most of the work is already done.
For the best result, give the cake plenty of time to freeze, keep it well covered, and add a little fresh Fruity Pebbles just before serving. That final sprinkle brings back the crunch and gives each slice its colorful finish.
If you make this recipe, try experimenting with your favorite ice cream flavor or one of the variations above. A small change can give the cake an entirely different personality while keeping the same easy frozen-dessert base.
Slice it, serve it cold, and enjoy a sweet combination of creamy ice cream and crunchy fruity cereal that is both nostalgic and wonderfully simple.