No Bake Pumpkin Lush Icebox Cake
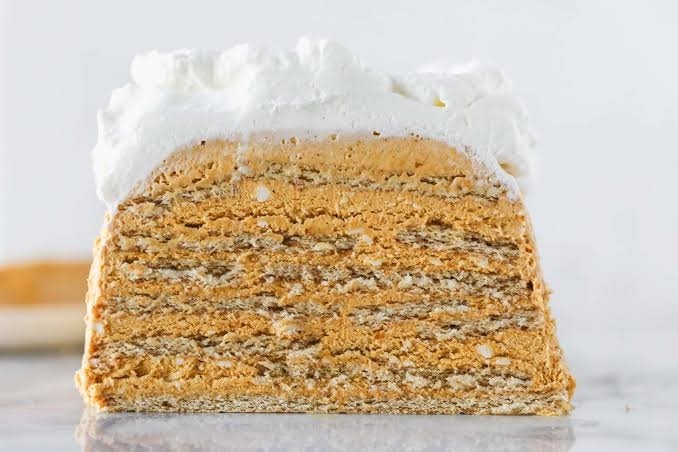
When pumpkin season arrives, there is something especially comforting about a dessert that tastes like classic pumpkin pie but requires no oven at all. This No-Bake Pumpkin Lush Icebox Cake layers a buttery cookie crust with a creamy pumpkin cheesecake filling and a light, spiced whipped topping for a dessert that is rich, smooth, and wonderfully easy to prepare.
Each chilled slice brings together sweet pumpkin, warm autumn spices, and a soft, velvety filling against a crisp cookie base. The best part is that the refrigerator does most of the work. Once assembled, the dessert simply needs time to chill and set, making it a practical choice for Thanksgiving, fall gatherings, potlucks, or any occasion when you want a make-ahead pumpkin dessert without turning on the oven.
The texture is what makes this pumpkin icebox cake so special. The cookie crust adds a delicate crunch, while the pumpkin layer becomes creamy and cheesecake-like as it chills. A cloud of cinnamon-spiced whipped cream finishes everything with just the right amount of sweetness. It is an easy no-bake dessert that feels polished enough for a holiday table but simple enough for a beginner to make.
Why You’ll Love This Recipe
There is a lot to appreciate about this No-Bake Pumpkin Lush Icebox Cake, especially when you want a simple fall dessert that looks impressive without a complicated baking process.
- No oven required: Everything comes together in the refrigerator, making this an easy choice when you want to keep the kitchen cool.
- Creamy pumpkin flavor: Pumpkin puree, cream cheese, and warm spices create a smooth filling with the comforting taste of pumpkin pie.
- Buttery cookie crust: A crisp, sweet crust gives the soft pumpkin layers a delicious contrast in texture.
- Make-ahead friendly: The cake needs time to chill, so you can prepare it well before guests arrive.
- Perfect for fall gatherings: Its pumpkin and cinnamon flavors make it especially fitting for Thanksgiving dinners, holiday parties, and autumn potlucks.
- Beginner-friendly: There is no complicated baking technique or decorating skill required.
- Beautiful layered dessert: The distinct crust, pumpkin filling, and whipped topping create an inviting dessert when sliced and served chilled.
- Easy to customize: You can adjust the spices, change the cookie crust, or add your favorite toppings to make the dessert your own.
Ingredients
For this No-Bake Pumpkin Lush Icebox Cake, you will need a handful of simple ingredients. Most are easy to find at any grocery store, and each one plays an important role in creating the creamy layers and balanced fall flavor.
For the Cookie Crust
- 2 cups finely crushed graham crackers or vanilla sandwich cookies
- 6 tablespoons unsalted butter, melted
- 2 tablespoons granulated sugar
For the Pumpkin Layer
- 8 ounces cream cheese, softened
- 1 cup pumpkin puree
- 1 cup powdered sugar
- 1 teaspoon pure vanilla extract
- 1 teaspoon ground cinnamon
- 1/2 teaspoon ground ginger
- 1/4 teaspoon ground nutmeg
- 1/8 teaspoon ground cloves
- 1 cup whipped topping or freshly whipped cream
For the Creamy Topping
- 1 1/2 cups cold heavy whipping cream
- 1/3 cup powdered sugar
- 1 teaspoon vanilla extract
- 1/2 teaspoon ground cinnamon
For Garnishing
- A light sprinkle of cinnamon
- Crushed cookies or graham cracker crumbs, optional
- A few small swirls of whipped cream, optional
For the smoothest pumpkin filling, use pure pumpkin puree rather than pumpkin pie filling. Pumpkin pie filling already contains sugar and spices, which can make the finished dessert overly sweet and difficult to balance.
Ingredient Notes & Substitutions
A few small ingredient choices can make a noticeable difference in the texture and flavor of this No-Bake Pumpkin Lush Icebox Cake. Here are some simple ways to adjust the recipe based on what you have available.
Pumpkin Puree
Use plain canned pumpkin puree, not pumpkin pie filling. The puree gives you control over the sweetness and spice level. Homemade pumpkin puree can also work, but make sure it is thick and well drained so the filling does not become watery.
Cookie Crust
Graham crackers create a classic buttery crust, but you can easily switch things up. Vanilla wafer cookies, gingersnaps, or other crisp cinnamon-friendly cookies all work well. Gingersnaps are especially nice if you want a stronger spiced flavor.
Cream Cheese
Full-fat cream cheese gives the pumpkin layer the richest texture and helps it set firmly after chilling. Reduced-fat cream cheese can be used, although the filling may be slightly softer.
Make sure the cream cheese is softened before mixing. Cold cream cheese can leave small lumps in an otherwise smooth filling.
Heavy Cream
Cold heavy whipping cream is best for making a stable, fluffy topping. Keep the cream refrigerated until you are ready to whip it. If you prefer convenience, prepared whipped topping can be substituted.
Sweetener
Powdered sugar blends smoothly into the cream cheese mixture without adding a grainy texture. If you prefer a less-sweet dessert, reduce it slightly rather than replacing it with granulated sugar.
Warm Spices
Cinnamon, ginger, nutmeg, and cloves give the dessert its familiar pumpkin pie character. You can replace the individual spices with pumpkin pie spice for convenience. Start with about 1 1/2 teaspoons and adjust to taste.
Dairy-Free Option
For a dairy-free version, use dairy-free cream cheese, plant-based butter, and a dairy-free whipped topping or suitable plant-based whipping cream. Check the labels on your cookies to make sure they are also dairy-free.
Gluten-Free Option
Use certified gluten-free graham crackers or cookies for the crust. The remaining ingredients are generally easy to adapt, but always check package labels if you are preparing the dessert for someone with celiac disease or a gluten sensitivity.
A Simple Budget-Friendly Tip
There is no need to buy several different specialty ingredients. A basic graham cracker crust, canned pumpkin puree, cream cheese, and homemade whipped cream are enough to create a creamy, satisfying dessert with plenty of pumpkin flavor.
Kitchen Tools Needed
You do not need any specialized equipment to make this No-Bake Pumpkin Lush Icebox Cake. A few basic kitchen tools are all it takes to assemble the layers and get the dessert ready for chilling.
- 9 x 13-inch baking dish: A rectangular dish gives you even layers and makes the cake easy to slice and serve.
- Food processor: Useful for turning cookies or graham crackers into fine crumbs. A sealed plastic bag and rolling pin also work.
- Mixing bowls: Use separate bowls for the pumpkin filling and whipped topping.
- Electric hand mixer: Makes whipping the cream and beating the cream cheese much easier. A stand mixer works too.
- Rubber spatula: Ideal for gently folding whipped cream into the pumpkin mixture without losing too much air.
- Measuring cups and spoons: Accurate measurements help keep the filling balanced and properly set.
- Flat-bottomed measuring cup: Helpful for firmly pressing the cookie crumbs into an even crust.
- Plastic wrap: Cover the finished dessert while it chills to prevent it from absorbing refrigerator odors.
For clean slices, a sharp knife is helpful. Wiping the blade with a warm, damp towel between cuts can also give you neater layers when serving.
Step-by-Step Instructions
1. Prepare the Cookie Crust
Start by finely crushing the graham crackers or cookies until they resemble fine crumbs. Mix the crumbs with melted butter and granulated sugar until everything is evenly moistened.
Press the mixture firmly into the bottom of a 9 x 13-inch baking dish. Use the bottom of a measuring cup to create a smooth, compact layer.
Place the crust in the refrigerator while you prepare the pumpkin filling. Chilling it first helps the crust firm up and makes the finished dessert easier to slice.
2. Make the Pumpkin Filling
In a large mixing bowl, beat the softened cream cheese until completely smooth and creamy. Add the pumpkin puree, powdered sugar, vanilla, cinnamon, ginger, nutmeg, and cloves.
Beat until the mixture is evenly combined and has a smooth, thick consistency.
Take a moment to scrape down the sides of the bowl so no pockets of cream cheese or spices remain unmixed.
3. Fold in the Whipped Cream
Add the whipped topping or freshly whipped cream to the pumpkin mixture.
Using a rubber spatula, gently fold it in rather than vigorously stirring. The goal is to keep the mixture light and fluffy while combining it evenly.
The finished pumpkin layer should look creamy, airy, and thick enough to hold its shape.
4. Add the Pumpkin Layer
Remove the chilled crust from the refrigerator. Spoon the pumpkin mixture over the crust and spread it into an even layer.
Work gently from the center toward the edges so the crust stays intact underneath.
Smooth the surface with a spatula. If the filling seems unusually loose, chill it for a few minutes before adding the topping.
5. Whip the Cream
Pour the cold heavy whipping cream into a clean mixing bowl. Add the powdered sugar, vanilla extract, and cinnamon.
Beat with an electric mixer until soft to medium peaks form. The cream should be fluffy and hold its shape without becoming grainy.
Avoid overbeating, as whipped cream can quickly turn thick and buttery if taken too far.
6. Add the Creamy Topping
Spread the freshly whipped cream evenly over the pumpkin layer.
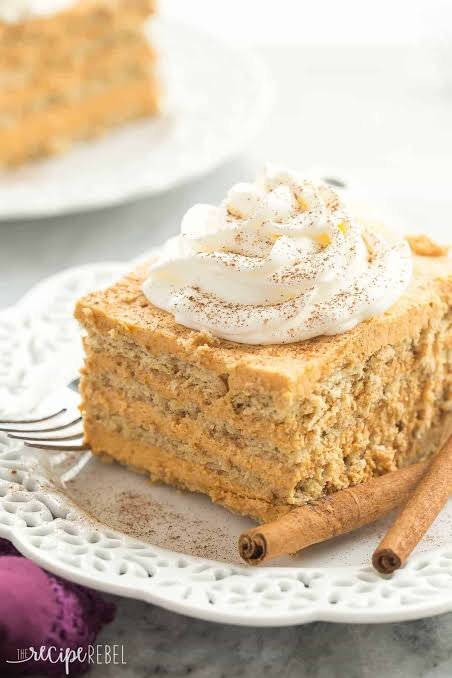
For a more decorative finish, you can pipe small swirls of whipped cream around the edges instead of spreading all of it flat.
Finish with a light dusting of cinnamon or a scattering of cookie crumbs.
7. Chill Until Firm
Cover the baking dish with plastic wrap and refrigerate the cake for at least 4 hours, preferably overnight.
This chilling time is important. It allows the crust to firm up and gives the pumpkin layer enough time to set into a sliceable, creamy consistency.
Do not rush this step. A properly chilled icebox cake will hold its layers much better when cut.
8. Slice and Serve
When ready to serve, remove the cake from the refrigerator and use a sharp knife to cut it into squares.
For cleaner slices, wipe the knife with a warm, damp towel between cuts.
Serve the pumpkin lush cake cold, with an extra sprinkle of cinnamon or a few cookie crumbs if desired.
Common Mistakes to Avoid
- Using pumpkin pie filling: It already contains sugar and spices, which can throw off the recipe.
- Skipping the chill time: The layers need several hours to firm up properly.
- Using cold cream cheese: Softened cream cheese creates a much smoother pumpkin filling.
- Overmixing the whipped cream: Stop once it reaches the desired peaks to keep it light and fluffy.
- Making a loose crust: Press the cookie mixture firmly into the dish so it stays together when sliced.
- Cutting immediately after assembly: Give the cake enough refrigerator time to develop its proper texture.
Expert Tips
A few simple techniques can make this No-Bake Pumpkin Lush Icebox Cake easier to assemble and even better to serve. These small details help create clean layers, a smooth filling, and a dessert that holds its shape.
Soften the Cream Cheese Properly
Let the cream cheese sit at room temperature until it is soft before mixing. This helps it blend smoothly with the pumpkin puree and powdered sugar. If the cream cheese is still firm, the finished filling may have small lumps.
Use Thick Pumpkin Puree
Canned pumpkin can vary slightly in moisture. If yours looks especially watery, let it drain briefly in a fine-mesh strainer before adding it to the filling. A thicker pumpkin puree gives the dessert a more stable texture.
Make the Crust Firm
Do not simply scatter the cookie crumbs into the dish. Press them down firmly and evenly. A compact crust creates a sturdy base that will stay together when you cut the chilled cake.
Keep the Whipping Cream Cold
Cold heavy cream whips more quickly and creates a better texture. For especially warm kitchens, chill the mixing bowl and beaters for a few minutes before whipping.
Do Not Overmix
Once the whipped cream is incorporated, use gentle folding motions. Overmixing can deflate the air in the cream and leave the pumpkin layer heavier than intended.
Give It Enough Time to Chill
Four hours is the minimum chilling time, but overnight is even better when your schedule allows. The extra time helps the layers firm up and allows the cinnamon and pumpkin flavors to settle together.
Chill Before Slicing
Keep the cake refrigerated until you are ready to serve it. If it sits at room temperature for too long, the creamy layers can soften and become harder to cut neatly.
Make Cleaner Slices
Run a sharp knife under warm water, wipe it dry, and then make your cut. Repeat between slices for neat, defined layers.
Add the Finishing Touches Just Before Serving
A light dusting of cinnamon, extra cookie crumbs, or a few whipped cream swirls can make the dessert look polished without requiring elaborate decoration.
For the Best Flavor
If you have time, prepare the cake the day before serving. The overnight rest gives the cookie crust time to soften slightly while the pumpkin filling becomes creamy and well set. The result is a more cohesive texture from the first bite to the last.
Variations
Once you have the basic No-Bake Pumpkin Lush Icebox Cake down, there are several easy ways to customize it. Keep the creamy pumpkin base and change the crust, spices, toppings, or fillings to suit the occasion.
Gingersnap Pumpkin Lush Cake
Replace the graham crackers with finely crushed gingersnap cookies. Their crisp texture and spicy flavor pair beautifully with pumpkin, cinnamon, and nutmeg.
Chocolate Pumpkin Version
Use chocolate sandwich cookies for the crust and finish the cake with chocolate shavings. The slight bitterness of chocolate balances the sweet pumpkin filling.
Maple Pumpkin Icebox Cake
Add 1 to 2 tablespoons of pure maple syrup to the pumpkin filling. Reduce the powdered sugar slightly if needed to keep the sweetness balanced.
Pecan Pumpkin Version
Mix finely chopped toasted pecans into the cookie crust or sprinkle them over the whipped cream. Toasting the pecans first gives them a deeper, nuttier flavor.
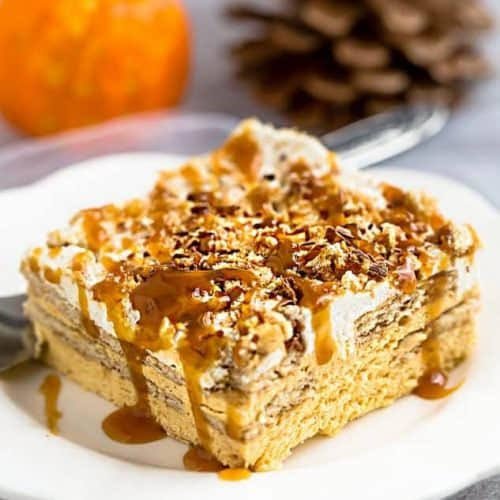
Caramel Pumpkin Cake
Drizzle a small amount of caramel sauce over the whipped topping just before serving. Add a sprinkle of chopped pecans for a classic fall combination.
Lighter Version
Use reduced-fat cream cheese and a lighter whipped topping. You can also slightly reduce the powdered sugar for a less-sweet dessert while keeping the pumpkin and spice flavors prominent.
Dairy-Free Version
Choose dairy-free cream cheese, plant-based butter, and dairy-free whipped topping or plant-based whipping cream. Use a dairy-free cookie for the crust as well.
Gluten-Free Version
Choose certified gluten-free graham crackers or cookies for the crust and verify that your other packaged ingredients are gluten-free.
Extra-Spiced Pumpkin Version
For a stronger pumpkin spice flavor, increase the cinnamon slightly and add a little extra ginger or pumpkin pie spice. Add spices gradually so the warm flavors enhance the pumpkin rather than overpowering it.
Individual Pumpkin Lush Cups
Instead of using one large baking dish, layer the crust, pumpkin filling, and whipped cream in small dessert glasses or jars. This makes the dessert easy to portion for dinner parties and holiday gatherings.
Mini Holiday Dessert Bars
Prepare the recipe in a smaller square dish for thicker layers. Chill thoroughly, then cut into smaller portions for a dessert tray or holiday buffet.
Storage Instructions
Because this No-Bake Pumpkin Lush Icebox Cake contains creamy dairy-based layers, it should be kept refrigerated until serving. Proper storage also helps preserve the soft, creamy texture and distinct layers.
Refrigerator Storage
Cover the baking dish tightly with plastic wrap or transfer individual portions to airtight containers. Store the cake in the refrigerator for up to 4 days.
For the best texture, keep it well chilled and avoid leaving it at room temperature for extended periods.
Make-Ahead Instructions
This is an excellent make-ahead dessert. You can assemble the entire cake the day before serving and refrigerate it overnight. The extra chilling time allows the layers to firm up and the flavors to blend.
If you are preparing it for a holiday meal, making it the night before can save valuable kitchen time on the day of the event.
Freezer Storage
The assembled cake can be frozen for a firmer, semifrozen texture. Cover it tightly with plastic wrap, followed by a layer of aluminum foil to help protect it from freezer odors and freezer burn.
For the best quality, use it within 1 month.
How to Thaw
Move the frozen cake to the refrigerator and allow it to thaw gradually for several hours or overnight. Avoid thawing it on the kitchen counter, as the creamy layers can soften too quickly.
The texture may be slightly different after freezing, especially in the whipped topping, but it can still make a convenient make-ahead dessert.
Can You Freeze Individual Slices?
Yes. Cut the chilled cake into individual portions and place them in airtight freezer-safe containers. Separate layers with parchment paper if stacking them.
This makes it easy to take out only the amount you need without thawing the entire dessert.
Reheating Instructions
This dessert should not be reheated. Serve it chilled or allow a frozen portion to thaw in the refrigerator before serving.
Frequently Asked Questions
Can I make No-Bake Pumpkin Lush Icebox Cake ahead of time?
Yes. It is actually ideal for making ahead. Prepare the cake the day before and let it chill overnight. This gives the layers plenty of time to firm up and makes slicing easier.
Can I use pumpkin pie filling instead of pumpkin puree?
It is best to use plain pumpkin puree. Pumpkin pie filling already contains sweeteners and spices, which can change the flavor and consistency of the dessert.
How long does pumpkin lush cake need to chill?
Chill the assembled cake for at least 4 hours. For the firmest layers and easiest slicing, refrigerate it overnight.
Why is my pumpkin filling too soft?
The filling can become loose if the pumpkin puree contains excess moisture, the cream cheese was not properly softened and blended, or the cake has not chilled long enough. Refrigerate it longer before slicing.
Can I use store-bought whipped topping?
Yes. Prepared whipped topping is a convenient alternative to homemade whipped cream and works well in the pumpkin layer and on top of the cake.
Can I use homemade whipped cream?
Absolutely. Freshly whipped cream gives the dessert a light, airy texture and a fresh dairy flavor. Keep it cold and avoid overwhipping.
What cookies work best for the crust?
Graham crackers are a classic option, but vanilla wafers, gingersnaps, and crisp cinnamon cookies can also work beautifully. Choose a cookie that complements the pumpkin and warm spices.
Can I make this dessert gluten-free?
Yes. Use certified gluten-free graham crackers or cookies for the crust and check the labels of your other packaged ingredients.
Can I make it dairy-free?
Yes. Use dairy-free cream cheese, plant-based butter, and a dairy-free whipped topping or whipping cream. Make sure the cookies used for the crust are dairy-free as well.
How long does pumpkin lush cake last in the refrigerator?
When covered and properly refrigerated, it should keep well for about 4 days. Keep it chilled until you are ready to serve.
Can I freeze pumpkin lush cake?
Yes. Wrap it tightly and freeze it for up to 1 month for the best quality. Thaw it gradually in the refrigerator before serving.
How do I get clean slices?
Make sure the cake is thoroughly chilled. Use a sharp knife warmed under hot water, wipe it dry, and cut straight through the layers. Clean and rewarm the knife between slices for the neatest results.

No Bake Pumpkin Lush Icebox Cake
Ingredients
Method
- Make the crust: Combine the crushed cookies, melted butter, and granulated sugar. Press firmly into the bottom of a 9 x 13-inch baking dish. Refrigerate while preparing the filling.
- Prepare the pumpkin layer: Beat the softened cream cheese until smooth. Add pumpkin puree, powdered sugar, vanilla, cinnamon, ginger, nutmeg, and cloves. Mix until creamy and evenly combined.
- Fold in the whipped cream: Gently fold 1 cup of whipped topping or freshly whipped cream into the pumpkin mixture until light and smooth.
- Layer the filling: Spread the pumpkin mixture evenly over the chilled crust.
- Make the topping: Beat the cold heavy cream, powdered sugar, vanilla, and cinnamon until soft to medium peaks form.
- Finish the cake: Spread the whipped cream evenly over the pumpkin layer. Sprinkle with cinnamon or cookie crumbs if desired.
- Chill: Cover and refrigerate for at least 4 hours, preferably overnight, until the layers are firm.
- Serve: Cut into squares with a sharp knife and serve cold
Video
Notes
- Use plain pumpkin puree rather than pumpkin pie filling.
- Make sure the cream cheese is softened before mixing.
- Press the cookie crust firmly so it holds together when sliced.
- Do not skip the chilling time. The dessert needs several hours to set properly.
- For the cleanest slices, warm and wipe the knife between cuts.
- The cake can be prepared a day ahead and stored covered in the refrigerator for up to 4 days.
- Gingersnaps, vanilla wafers, or gluten-free cookies can be used instead of graham crackers.
Final Thoughts
This No-Bake Pumpkin Lush Icebox Cake is the kind of dessert that makes fall entertaining a little easier. With its buttery cookie crust, creamy pumpkin filling, warm spices, and fluffy whipped topping, every layer brings a different texture while keeping the overall dessert light and comforting.
It is especially convenient when you want to prepare dessert ahead of time. Assemble it the day before, let the refrigerator do the work, and simply slice and serve when you are ready. You can also switch up the crust, add toasted pecans, drizzle on caramel, or give it a stronger ginger or cinnamon flavor to make it your own.
Whether you are planning a Thanksgiving dessert table, a fall potluck, or a cozy weekend treat, this pumpkin icebox cake is an easy addition to the menu. Give it plenty of time to chill, serve it cold, and enjoy those creamy pumpkin layers with every bite.