
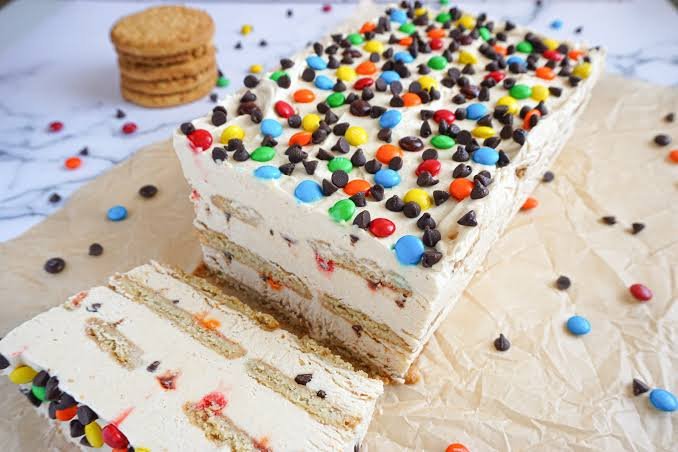
No Bake Monster Cookie Icebox Cake
There is something wonderfully comforting about a dessert that comes together without turning on the oven. This No Bake Monster Cookie Icebox Cake combines soft oatmeal cookies, creamy peanut butter filling, chewy cookie dough, and colorful chocolate candies in one irresistible layered dessert. As it chills, the cookies soften into a tender, cake-like texture while the peanut butter cream becomes smooth and rich.
This easy icebox cake is a great choice when you want a homemade dessert without complicated baking steps. Each chilled slice brings together creamy peanut butter, hearty oats, sweet chocolate candies, and soft cookies for a fun twist on the classic monster cookie. It is especially handy for parties, birthdays, potlucks, or make-ahead dessert tables because the refrigerator does most of the work.
The best part is the contrast between the creamy layers and little bites of cookie dough and chocolate throughout. Give the cake enough time to chill, and the layers come together beautifully, making every slice easy to serve and wonderfully satisfying.
Why You’ll Love This Recipe
This No Bake Monster Cookie Icebox Cake is the kind of dessert that makes entertaining feel easy. You get the fun flavors of a classic monster cookie in a creamy, chilled cake that requires no oven and very little hands-on work.
- No baking required: Everything comes together in the refrigerator, making this a simple option for warm days or busy schedules.
- Easy to assemble: The dessert is built in layers, so there is no need to worry about complicated baking techniques.
- Classic monster cookie flavors: Peanut butter, oats, chocolate, and colorful candy pieces create the familiar flavor combination in every bite.
- Creamy and soft texture: Chilling allows the cookies to soften while the filling becomes smooth and velvety.
- Great make-ahead dessert: Prepare it several hours before serving so the layers have plenty of time to set.
- Perfect for celebrations: The colorful candy pieces make this icebox cake especially fun for birthdays, family gatherings, and potlucks.
- Easy to customize: You can switch up the cookies, candies, or toppings to create your own favorite combination.
- Beginner-friendly: With simple ingredients and straightforward assembly, this is an approachable dessert even if you do not bake often.
Ingredients
For this No Bake Monster Cookie Icebox Cake, you only need a handful of simple ingredients. Most are easy to find at any grocery store, and several can be adjusted to suit what you already have in your pantry.
For the Cookie Layers
- 24 to 30 soft oatmeal cookies
- 1 cup mini chocolate candies, such as M&M’s
- 1/2 cup mini chocolate chips
- 1/2 cup prepared edible cookie dough, cut into small pieces
For the Peanut Butter Cream
- 8 ounces cream cheese, softened
- 1/2 cup creamy peanut butter
- 1/2 cup powdered sugar
- 1 teaspoon vanilla extract
- 1 cup heavy whipping cream, cold
For the Topping
- 1/2 cup whipped cream
- 1/4 cup mini chocolate candies
- 2 tablespoons mini chocolate chips
- Small pieces of oatmeal cookie or edible cookie dough, for garnish
Ingredient Notes at a Glance
Choose soft oatmeal cookies rather than crisp cookies when possible. They soften beautifully as the cake chills and help create the tender, cake-like texture that makes an icebox cake special.
For the best peanut butter cream, use creamy peanut butter and make sure the cream cheese is softened before mixing. Cold heavy cream will whip more easily and help give the filling a light, fluffy consistency.
If you are using edible cookie dough, select a variety specifically made to be eaten without baking. This keeps the dessert safe to enjoy straight from the refrigerator.
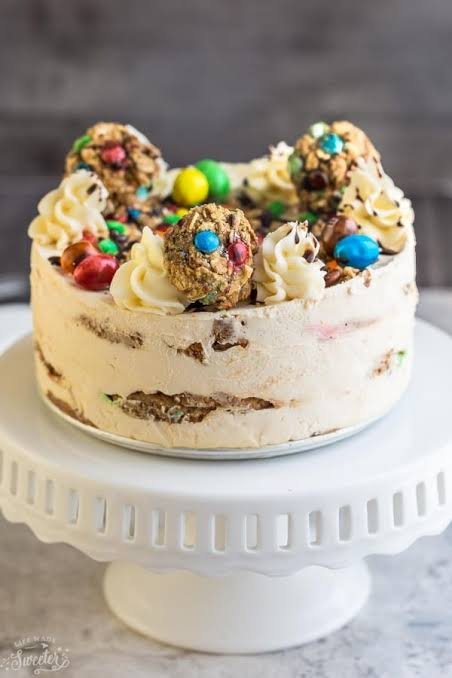
Ingredient Notes & Substitutions
A few small ingredient choices can make a big difference in the texture and flavor of your No Bake Monster Cookie Icebox Cake. Here are some easy swaps and helpful tips to make the recipe work with what you have available.
Oatmeal Cookies
Soft oatmeal cookies are ideal because they become tender as they chill. If you cannot find oatmeal cookies, soft chocolate chip cookies can be used instead. For a stronger oatmeal flavor, homemade oatmeal cookies also work beautifully.
Cream Cheese
Full-fat cream cheese gives the peanut butter filling a rich, creamy texture. Reduced-fat cream cheese can be substituted, although the filling may be slightly softer.
Make sure the cream cheese is softened before mixing. Cold cream cheese can leave small lumps in the filling.
Peanut Butter
Creamy conventional peanut butter works best for a smooth filling. Natural peanut butter can also be used, but stir it thoroughly before measuring because the oil can separate.
For a slightly different flavor, try a crunchy peanut butter and enjoy tiny bits of peanuts throughout the creamy layers.
Heavy Whipping Cream
Heavy whipping cream creates a light, airy texture in the filling. For convenience, you can use prepared whipped topping, although the finished texture and flavor will be somewhat different.
Keep the cream cold until you are ready to whip it for the best volume.
Chocolate Candies
Mini chocolate candies add color and a satisfying chocolate crunch. Regular-size candies can be roughly chopped if that is what you have on hand.
You can also use chocolate-covered peanut candies, chopped peanut butter cups, or another small chocolate candy for a different twist.
Mini Chocolate Chips
Semi-sweet mini chocolate chips balance the sweetness of the peanut butter filling. Milk chocolate chips can be used if you prefer a sweeter dessert, while dark chocolate chips provide a deeper chocolate flavor.
Edible Cookie Dough
Use commercially prepared edible cookie dough or a homemade version that is specifically prepared for eating without baking. Cut it into small pieces so that the cookie dough is distributed evenly throughout the cake.
Allergy-Friendly Options
For a peanut-free version, use sunflower seed butter or another suitable peanut-free seed butter. Choose cookies and chocolate candies that are certified free from the allergens you need to avoid.
For a gluten-free cake, use certified gluten-free oatmeal cookies and gluten-free edible cookie dough. Always check package labels carefully because ingredients and manufacturing practices can vary.
Budget-Friendly Tip
There is no need to buy several specialty toppings. If you already have chocolate chips, cookies, and a favorite colorful candy at home, use those to decorate the cake. The layers are what make this dessert special, so the garnish can be simple.
Kitchen Tools Needed
You do not need any special baking equipment to make this No Bake Monster Cookie Icebox Cake. A few basic kitchen tools are enough to assemble the layers and create a smooth, creamy filling.
- 9 x 13-inch baking dish: Gives the icebox cake plenty of room for several layers.
- Large mixing bowl: Use this for preparing the peanut butter cream.
- Electric hand mixer: Makes whipping the cream and blending the filling quick and easy.
- Rubber spatula: Helps fold ingredients together gently and spread each layer evenly.
- Measuring cups and spoons: Useful for getting consistent ingredient amounts.
- Small offset spatula: Optional, but helpful for smoothing the cream into an even layer.
- Sharp knife: Use it to cut cookie dough and larger chocolate candies into smaller pieces.
- Plastic wrap: Covers the assembled cake while it chills in the refrigerator.
Helpful Tip
If you do not have an electric mixer, a sturdy whisk will work for whipping the cream, although it will take more effort. The most important tool is really the baking dish, since a straight-sided dish makes it much easier to create neat, even layers.
Step-by-Step Instructions
Making this No Bake Monster Cookie Icebox Cake is mostly about creating smooth layers and giving the dessert enough time to chill. Take your time with the assembly, and the finished cake will have a soft, creamy texture throughout.
1. Prepare the Baking Dish
Lightly grease a 9 x 13-inch baking dish or line it with parchment paper if you want easier serving later.
Set the dish aside while you prepare the filling.
2. Make the Peanut Butter Cream
Place the softened cream cheese and creamy peanut butter in a large mixing bowl. Beat until the mixture is smooth and completely blended.
Add the powdered sugar and vanilla extract. Mix again until the filling looks creamy and there are no visible lumps.
3. Whip the Cream
In a separate bowl, beat the cold heavy whipping cream until it forms firm peaks.
The cream should hold its shape when you lift the beaters, but avoid whipping it too far or it can become grainy.
4. Fold the Whipped Cream Into the Peanut Butter Mixture
Add the whipped cream to the peanut butter mixture in portions. Gently fold with a rubber spatula until the filling is light, fluffy, and evenly combined.
Avoid vigorous stirring because you want to keep as much air in the whipped cream as possible.
5. Create the First Cookie Layer
Arrange a single layer of oatmeal cookies across the bottom of the prepared baking dish.
Try to cover as much of the surface as possible. If there are small gaps, break a few cookies into pieces and use them to fill the spaces.
6. Add the Peanut Butter Cream
Spread a generous layer of the peanut butter cream over the cookies.
Use an offset spatula or the back of a spoon to gently smooth the filling into an even layer.
7. Add the Monster Cookie Mix-Ins
Sprinkle some mini chocolate candies, mini chocolate chips, and small pieces of edible cookie dough over the cream.
Distribute them evenly so every slice gets a little bit of the cookie and chocolate mixture.
8. Repeat the Layers
Add another layer of oatmeal cookies, followed by more peanut butter cream and the remaining mix-ins.
Continue layering until the ingredients are used, finishing with a smooth layer of peanut butter cream on top.
Do not press down firmly on the cookies. Keeping the layers loose helps the cream move between the cookies as the cake chills.
9. Decorate the Top
Spread or pipe whipped cream over the top of the cake.
Finish with mini chocolate candies, mini chocolate chips, and a few small pieces of oatmeal cookie or edible cookie dough.
For a cleaner presentation, arrange the toppings in small clusters rather than covering every inch of the surface.
10. Chill the Cake
Cover the baking dish tightly with plastic wrap and refrigerate for at least 6 hours, preferably overnight.
This resting time is important. The cookies absorb some of the moisture from the creamy filling, becoming soft and tender while still holding enough structure to create distinct layers.
11. Slice and Serve
Once the cake has chilled completely, remove it from the refrigerator and let it sit for a few minutes before slicing.
Use a sharp knife to cut the cake into squares. Wipe the knife clean between cuts if you want especially neat slices.
Serve cold and keep any leftovers refrigerated.
Common Mistakes to Avoid
Using crisp cookies: Very crisp cookies may need more time to soften and can make the cake harder to slice. Soft oatmeal cookies are the easiest choice.
Skipping the chilling time: The cake needs several hours in the refrigerator for the cookies and filling to develop the right texture.
Overmixing the whipped cream: Fold gently to keep the filling light and fluffy.
Using warm ingredients: Softened cream cheese is helpful, but the whipping cream should remain cold so it whips properly.
Adding too much topping: A generous sprinkle is enough. Too many candies or cookie pieces can make the top difficult to slice cleanly.
Expert Tips
A few simple techniques can make your No Bake Monster Cookie Icebox Cake easier to assemble and even better to serve. These small details help create creamy layers, tender cookies, and clean slices.
Chill the Mixing Bowl
If your kitchen is warm, place the bowl and beaters in the refrigerator for about 10 minutes before whipping the heavy cream. A cold bowl helps the cream whip faster and hold its shape.
Do Not Rush the Chilling Time
The refrigerator does the most important work in this recipe. Give the cake at least 6 hours to chill, and overnight is even better. The cookies need time to absorb moisture from the filling and develop that soft, cake-like texture.
Keep the Peanut Butter Cream Smooth
Make sure the cream cheese is fully softened before mixing it with the peanut butter. This prevents small lumps and gives the finished filling a silky consistency.
Fold Instead of Stir
Once the whipped cream is ready, gently fold it into the peanut butter mixture. Slow, careful folding keeps the filling airy instead of making it dense.
Make Even Layers
Spread each layer as evenly as possible. A consistent layer of cookies and cream makes the cake easier to cut and ensures that each serving has a good balance of peanut butter cream, cookies, chocolate, and cookie dough.
Cut the Cookie Dough Small
Small pieces of edible cookie dough distribute more evenly throughout the cake. Large chunks can make individual slices harder to cut.
Add Toppings Just Before Serving
For the freshest texture and appearance, reserve some candies, chocolate chips, and cookie pieces for the top. This keeps the decorations crisp and colorful.
Use a Warm Knife for Cleaner Slices
For neat squares, run a sharp knife under warm water, dry it thoroughly, and then slice. Repeat between cuts as needed. This helps the knife glide through the chilled layers without dragging the filling.
Let the Cake Rest Briefly Before Cutting
If the cake has been refrigerated overnight and feels very firm, let it sit at room temperature for about 5 to 10 minutes before slicing. It should remain cold, but the filling will be easier to cut cleanly.
Variations
One of the best things about a No Bake Monster Cookie Icebox Cake is how easy it is to customize. Keep the creamy peanut butter base, then switch up the cookies, chocolate, or toppings to create a version that fits the occasion.
Chocolate Monster Cookie Cake
For a richer chocolate dessert, replace some or all of the oatmeal cookies with soft chocolate cookies. Add extra mini chocolate chips between the layers for a deeper cocoa flavor.
Peanut Butter Cup Version
Add chopped peanut butter cups between the cookie layers and scatter a few pieces over the top. This creates an even stronger peanut butter and chocolate combination.
Extra Crunchy Version
Use crunchy peanut butter in the cream filling and add chopped roasted peanuts between the layers. The nuts provide a pleasant contrast to the soft cookies and creamy filling.
Birthday Party Version
Use colorful candy-coated chocolates in your favorite colors to match the celebration. Add a few extra candies around the top just before serving for a festive finish.
Chocolate Chip Cookie Version
Swap the oatmeal cookies for soft chocolate chip cookies. The result has a more classic chocolate chip cookie flavor while keeping the same creamy icebox cake texture.
Gluten-Free Version
Use certified gluten-free oatmeal cookies and gluten-free edible cookie dough. Check every packaged ingredient, including chocolate candies and cream cheese, to make sure it meets your dietary requirements.
Dairy-Free Version
Use dairy-free cream cheese, dairy-free whipping cream, and dairy-free chocolate candies. Choose cookies and edible cookie dough that are also made without dairy.
Peanut-Free Version
Replace the peanut butter with sunflower seed butter or another suitable peanut-free alternative. Choose a peanut-free cookie and chocolate candy combination to keep the entire dessert safe for your needs.
Less-Sweet Version
Choose dark chocolate chips and use slightly less candy for the filling and topping. A darker chocolate helps balance the sweetness of the creamy peanut butter mixture.
Individual Icebox Cakes
Instead of using one large baking dish, assemble the dessert in small jars, cups, or ramekins. Break the cookies into pieces and layer them with the peanut butter cream and toppings. This makes individual portions that are convenient for parties and gatherings.
Seasonal Twist
Change the candy colors and toppings to match the season. Pastel candies work well for spring celebrations, while red and green candies can give the dessert a festive holiday appearance.
Storage Instructions
Because this No Bake Monster Cookie Icebox Cake contains a creamy filling, it should stay refrigerated until you are ready to serve it. Proper storage also helps maintain the soft cookie texture and creamy layers.
Refrigerator Storage
Cover the baking dish tightly with plastic wrap or transfer individual slices to airtight containers. Keep the cake refrigerated for up to 4 days.
The cookies will continue to soften as the cake sits, so the texture may become more tender over time. For the best balance of creamy filling and soft cookies, enjoy it within the first few days.
Freezer Storage
You can freeze the assembled cake if you want to prepare it farther in advance. Cover it tightly with plastic wrap, followed by a layer of aluminum foil to help prevent freezer odors and freezer burn.
Freeze for up to 1 month for the best quality.
For easier serving, you can also freeze individual slices in airtight freezer-safe containers.
How to Thaw
Move the frozen cake or individual slices to the refrigerator and allow them to thaw slowly. A full cake may need several hours or overnight, while individual portions will thaw more quickly.
Avoid thawing the cake at room temperature for an extended period because the creamy filling should remain properly chilled.
Before Serving
If the cake has been refrigerated overnight, let it sit at room temperature for about 5 to 10 minutes before slicing. This takes a little chill off the filling and makes cutting easier.
If you plan to freeze the cake, add delicate toppings such as extra candies, cookie pieces, or whipped cream after thawing whenever possible. This keeps the decoration looking fresher.
Can You Make It Ahead?
Absolutely. This is an excellent make-ahead dessert. Assemble the cake the day before serving and refrigerate it overnight. The extra chilling time allows the cookies to soften and the flavors to blend beautifully.
Frequently Asked Questions
Can I make No Bake Monster Cookie Icebox Cake the day before?
Yes. In fact, making it the day before is a great option. The extra refrigeration time allows the oatmeal cookies to soften and the creamy peanut butter filling to set properly.
How long does an icebox cake need to chill?
For the best texture, refrigerate the cake for at least 6 hours. Overnight chilling is ideal if you have the time.
Can I use store-bought whipped topping?
Yes. Prepared whipped topping can replace homemade whipped cream for a convenient shortcut. Keep in mind that the texture and sweetness may be slightly different.
Can I use crunchy peanut butter?
Absolutely. Crunchy peanut butter adds small pieces of peanuts to the creamy filling and gives the dessert a little extra texture.
What type of cookies work best?
Soft oatmeal cookies are the best choice for this recipe because they become tender as they chill. Soft chocolate chip cookies or chocolate cookies can also work well as substitutes.
Can I make this dessert without peanut butter?
Yes. For a peanut-free version, replace the peanut butter with sunflower seed butter or another suitable seed butter. Make sure the cookies, candy, and other ingredients are also peanut-free if needed.
Can I freeze No Bake Monster Cookie Icebox Cake?
Yes. Cover it tightly and freeze for up to 1 month for the best quality. Thaw the cake in the refrigerator before serving.
Why is my icebox cake too firm?
If the cake has been refrigerated for a very long time, the filling may become quite firm. Let it sit at room temperature for 5 to 10 minutes before slicing.
Why did my filling turn lumpy?
The most common reason is that the cream cheese was too cold. Allow it to soften at room temperature before mixing it with the peanut butter and powdered sugar.
Can I make individual servings?
Yes. Layer the cookies, peanut butter cream, cookie dough, and chocolate candies in small dessert cups or jars. Chill them until the cookies become tender.
How long will leftovers last?
Store leftover cake covered in the refrigerator for up to 4 days. Keep it chilled whenever it is not being served.
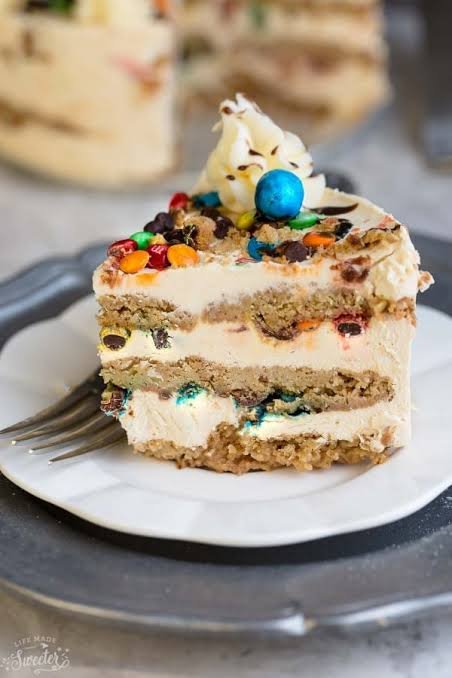

No Bake Monster Cookie Icebox Cake
Ingredients
Method
- Lightly grease a 9 x 13-inch baking dish and set it aside.
- Beat the softened cream cheese and peanut butter in a large bowl until smooth
- Add the powdered sugar and vanilla extract. Beat until creamy and well combined.
- In a separate bowl, whip the cold heavy cream until firm peaks form.
- Gently fold the whipped cream into the peanut butter mixture until light and smooth
- Arrange a layer of oatmeal cookies across the bottom of the prepared baking dish
- Spread a layer of peanut butter cream over the cookies
- Sprinkle with some mini chocolate candies, chocolate chips, and small pieces of edible cookie dough
- Repeat the cookie, cream, and topping layers until the ingredients are used, finishing with peanut butter cream
- Decorate the top with whipped cream, chocolate candies, chocolate chips, and cookie pieces
- Cover tightly and refrigerate for at least 6 hours, preferably overnight.
- Let the cake sit for 5 to 10 minutes before slicing, then serve chilled
Video
Notes
- Use soft oatmeal cookies for the most tender icebox cake texture.
- Keep the heavy cream cold before whipping.
- Make sure the cream cheese is softened to prevent lumps.
- Fold the whipped cream gently to keep the filling light.
- Use edible cookie dough that is specifically made to be eaten without baking.
- For cleaner slices, use a sharp knife warmed briefly under hot water and dried before cutting.
- Store leftovers covered in the refrigerator for up to 4 days.
- The assembled cake can be frozen for up to 1 month.
Final Thoughts
This No Bake Monster Cookie Icebox Cake is a simple way to turn familiar cookie flavors into a creamy, chilled dessert that feels special without requiring any baking. The soft oatmeal cookies, smooth peanut butter cream, chocolate candies, and little pieces of cookie dough come together in layers that are both comforting and fun.
It is especially useful when you need a dessert that can be prepared ahead of time. Assemble it earlier in the day or the night before, let the refrigerator do the work, and slice it when you are ready to serve.
Whether you are making it for a birthday, potluck, family gathering, or an easy weekend treat, this icebox cake is flexible enough to customize with your favorite cookies and toppings.
Give it plenty of time to chill, keep the layers even, and do not be afraid to make it your own. Once you have tried the basic version, experiment with different cookies, candies, or chocolate flavors to create your own signature monster cookie dessert.
If you make this recipe, consider sharing how you customized your icebox cake and which toppings you used. Your variation might inspire someone else to try a new combination.
One Comment