How To Blind Bake A Pie Crust
Learning how to blind bake a pie crust is one of those simple baking skills that can make homemade pies look and taste so much better. A properly baked crust should be crisp, golden, buttery, and sturdy enough to hold everything from silky cream fillings to rich custards without turning soggy.
The good news is that blind baking a pie crust is much easier than it sounds. With a chilled crust, a sheet of parchment paper, and the right amount of pie weights, you can create a beautifully shaped crust with a crisp bottom and evenly browned edges. Once you understand when to partially bake or fully bake the crust, the process becomes straightforward.
This easy guide walks you through how to blind bake a pie crust from start to finish, including how to prevent shrinking, bubbling, and underbaking. Whether you are making a cream pie, custard pie, quiche, or another favorite dessert, these simple techniques will help you get a dependable crust every time.
Why You’ll Love This Recipe
If you have ever pulled a pie from the oven only to find a pale, soggy, or shrunken crust, blind baking can make all the difference. This method gives you more control over the crust before adding your filling.
- Beginner-friendly: The process uses simple ingredients and basic kitchen tools.
- Crisp and golden: Baking the crust before filling helps create a firm, flaky texture.
- Helps prevent soggy bottoms: A properly blind baked crust creates a better barrier between the pastry and moist fillings.
- Great for many pies: Use it for cream pies, custard pies, no-bake pies, tarts, and other recipes that need a pre-baked crust.
- Easy to prepare ahead: The crust can be blind baked before you are ready to finish your pie.
- Better shape and structure: Pie weights help keep the pastry from puffing and sliding while it bakes.
- Flexible baking method: You can partially blind bake the crust when the filling will be baked afterward or fully bake it for fillings that do not require oven time.
- Reliable results: A few simple techniques, such as chilling the dough and docking the bottom, help reduce common pastry problems.
Ingredients
Blind baking a pie crust does not require a long list of ingredients. In fact, the crust itself can be made with just a few basic pantry staples. If you are using a store-bought refrigerated or frozen pie crust, you can skip making the pastry and focus on the blind baking method.
For the Pie Crust
- 1 unbaked 9-inch pie crust, homemade or store-bought
- 1 tablespoon all-purpose flour, for lightly dusting the work surface if making homemade dough
- 1 tablespoon cold water, only if needed when preparing homemade dough
For Blind Baking
- Parchment paper or aluminum foil
- Pie weights, dried beans, or uncooked rice, enough to cover the bottom of the crust
Optional
- A little extra flour for rolling homemade dough
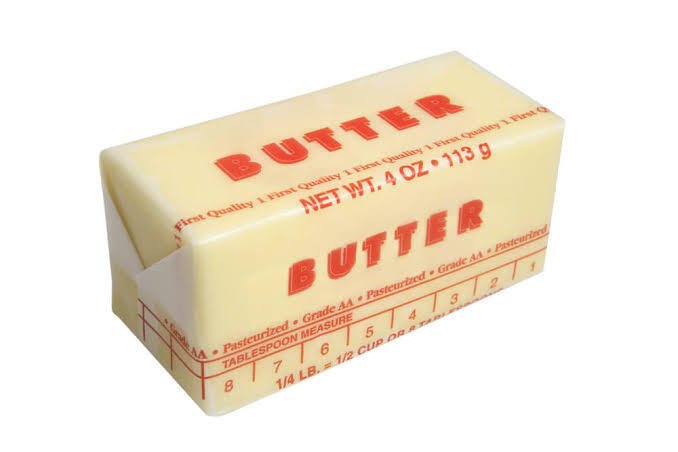
- A small amount of butter for greasing the pie plate, if your crust recipe calls for it
For the easiest approach, start with a prepared 9-inch pie crust. The most important part of blind baking is not adding extra ingredients, but handling the pastry correctly, keeping it cold, and using enough weight to hold the crust in place while it bakes.
Ingredient Notes & Substitutions
The ingredients for blind baking are simple, but each one has a specific purpose. A few small choices can make a noticeable difference in the final crust.
Pie Crust
You can use your favorite homemade pie dough or a refrigerated store-bought crust. Homemade pastry gives you more control over flavor and texture, while refrigerated dough is a convenient option when you want to save time.
For a gluten-free pie, use a reliable gluten-free pie crust recipe or a prepared gluten-free crust. Keep in mind that gluten-free pastry can be more delicate, so handle it gently when transferring it to the pie plate.
Parchment Paper
Parchment paper makes it easy to lift the pie weights out after baking. Cut or tear a piece large enough to cover the bottom and reach slightly up the sides of the crust.
Aluminum foil can also be used if parchment is not available. Press it gently against the crust so it follows the shape without tearing the pastry.
Pie Weights
Commercial pie weights are convenient and reusable, but they are not required. Dried beans or uncooked rice work well as inexpensive alternatives.
If you use beans or rice for blind baking, label and store them separately afterward. They can be reused as pie weights, but they should not be cooked and eaten after being used this way.
Flour
A light dusting of all-purpose flour is useful when rolling homemade pie dough. Avoid adding too much flour, because excess flour can make the crust tougher and drier.
For gluten-free baking, use the flour recommended by your specific crust recipe rather than substituting it directly with regular flour.
Homemade vs. Store-Bought Crust
Both options can produce a crisp, golden crust. Homemade dough is ideal when you want a buttery, flaky pastry with a homemade flavor. A quality refrigerated crust is a practical choice when convenience matters most.
The key is to keep either type of crust chilled before it goes into the oven. Cold pastry holds its shape better and is less likely to shrink during baking.
Kitchen Tools Needed
You only need a few basic tools to blind bake a pie crust successfully. Most are probably already in your kitchen.
- 9-inch pie plate: A standard pie dish works well for most pie crust recipes.
- Rolling pin: Needed if you are rolling homemade pie dough.
- Parchment paper: Makes removing the pie weights quick and easy.
- Pie weights: These keep the bottom of the crust from puffing during baking. Dried beans or uncooked rice can be used instead.
- Fork: Useful for docking the bottom of the pastry and creating small holes that allow steam to escape.
- Pastry brush: Optional, but helpful if you want to brush the crust with egg wash for extra browning.
- Baking sheet: Placing the pie plate on a baking sheet makes it easier to move in and out of the oven and catches any small drips or crumbs.
- Sharp knife or kitchen scissors: Helpful for trimming excess pastry around the edge of the pie plate.
Optional Helpful Tools
A pastry cutter can be useful when making homemade pie dough, while a pie crust shield can help protect the edges if they begin browning too quickly.
A glass pie plate is also helpful for beginners because you can see the color of the bottom crust as it bakes. That makes it easier to tell when the pastry has developed a light golden color.
Step-by-Step Instructions
Blind baking a pie crust is all about temperature, timing, and keeping the pastry in place. Follow these steps for a crisp, evenly baked crust.
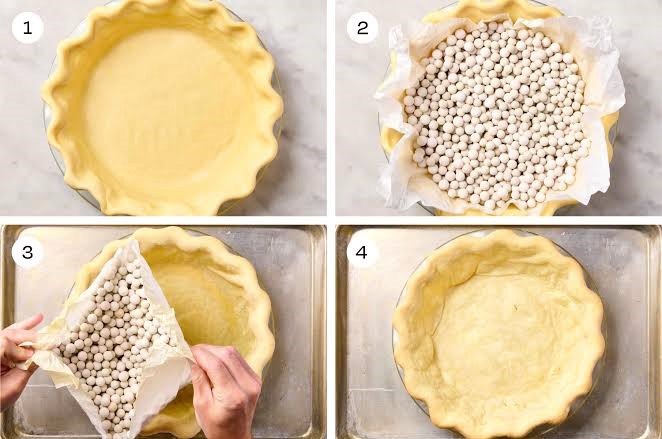
1. Prepare the Pie Crust
If you are using homemade pie dough, roll it out on a lightly floured surface until it is slightly larger than your pie plate. Carefully transfer the dough to the dish and gently press it into the bottom and sides.
Trim any excess dough, then crimp or shape the edges as desired.
If you are using a refrigerated crust, follow the package directions for placing it into your pie plate.
2. Chill the Crust
Place the prepared crust in the refrigerator for at least 30 minutes. For an especially firm crust, you can chill it for about 45 minutes.
This step is important because cold pastry is less likely to shrink or lose its shape in the oven.
3. Preheat the Oven
Preheat your oven to 375°F.
Let the oven fully preheat before baking. A properly heated oven helps the butter in the pastry create steam quickly, which contributes to a flaky texture.
4. Dock the Bottom
Use a fork to gently prick the bottom of the chilled crust several times.
Do not poke deeply into the pastry. A few evenly spaced holes are enough to give steam a place to escape and reduce bubbling.
5. Add the Parchment and Pie Weights
Place a sheet of parchment paper over the crust, pressing it gently into the bottom and corners.
Add enough pie weights, dried beans, or uncooked rice to cover the bottom of the crust and reach toward the sides. The weight should hold the pastry down without pressing it aggressively into the dish.
6. Bake With the Weights
Place the pie plate on a baking sheet and bake for about 15 to 20 minutes.
At this stage, the edges should begin to look set while the center remains pale. Carefully remove the pie from the oven.
7. Remove the Weights
Lift the parchment paper and pie weights out of the crust. Be careful because both the weights and pie plate will be hot.
Return the crust to the oven without the weights.
8. Continue Baking
For a partially blind baked crust, bake for another 5 to 10 minutes, or until the bottom looks dry and lightly golden. This is a good choice when the pie filling will also be baked.
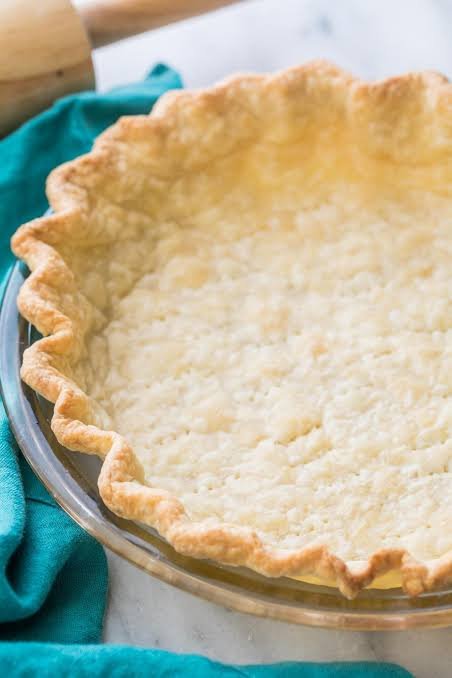
For a fully blind baked crust, continue baking for about 10 to 15 minutes more, until the bottom and sides are golden and the pastry looks completely baked.
Watch the edges closely during this stage. If they are browning faster than the center, cover them loosely with a pie crust shield or strips of aluminum foil.
9. Cool Before Filling
Remove the crust from the oven and place it on a cooling rack.
Let it cool completely before adding a chilled or no-bake filling. Adding filling while the pastry is still very hot can affect its texture and may cause some fillings to soften.
Common Mistakes to Avoid
Skipping the chilling step: Warm dough is more likely to shrink and lose its shape.
Using too few pie weights: The pastry may puff or slide down the sides of the dish.
Over-docking the crust: Too many or overly deep holes can weaken the bottom.
Removing the weights too early: The crust needs enough time under the weights to set its shape.
Ignoring the edges: The rim can become dark before the bottom is fully baked. Use a pie shield when necessary.
Cutting into the crust too soon: Allowing it to cool gives the pastry time to firm up and makes it easier to fill without breaking.
Expert Tips for the Best Blind Baked Pie Crust
A few small techniques can make blind baking much more predictable. These are the details that help you get a crust that stays crisp, holds its shape, and develops an even golden color.
Keep the Dough Cold
Cold pastry is easier to work with and less likely to shrink in the oven. If the shaped crust feels soft after rolling or fitting it into the pie plate, chill it again before baking.
For especially warm kitchens, place the prepared pie crust in the freezer for about 10 to 15 minutes before adding the parchment and pie weights.
Do Not Skip the Pie Weights
Pie weights are more than a convenience. They keep the bottom flat and help support the sides of the crust while the pastry sets.
Spread the weights evenly across the entire bottom rather than creating one large pile in the center.
Use Enough Weight
The parchment should sit snugly against the pastry, and the weights should reach close to the edges. If only the center is weighted, the sides can puff or slide downward during baking.
Dried beans and uncooked rice are inexpensive alternatives if you do not own dedicated pie weights.
Bake on a Preheated Baking Sheet
For a firmer bottom crust, place the pie plate on a preheated baking sheet. The direct heat from the hot surface can help the bottom pastry begin baking more quickly.
This is particularly useful when you are trying to avoid a pale or soft bottom.
Watch the Crust, Not Just the Clock
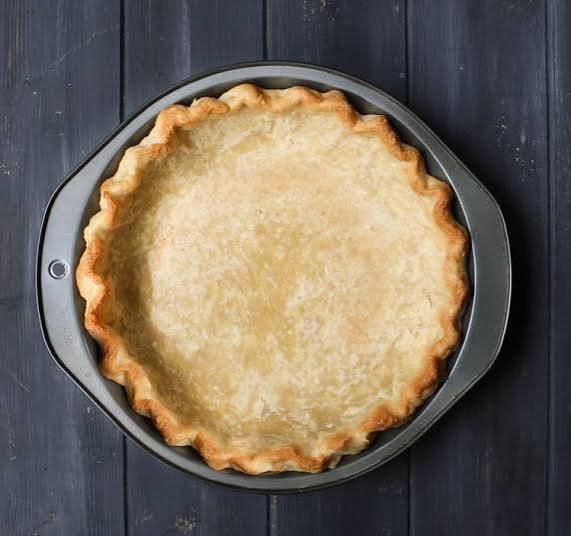
Oven temperatures can vary, so use visual cues as your guide. A partially baked crust should look set and dry but still fairly pale. A fully blind baked crust should have a golden-brown color across the bottom and edges.
Protect the Edges
The outer rim is usually thinner than the rest of the pastry, so it can brown quickly. If the edges become golden before the center is finished, cover them with a pie shield or aluminum foil.
Let the Crust Cool Properly
A fully baked crust needs time to cool and firm up before filling. Moving too quickly can lead to cracks or a delicate bottom that breaks under the weight of the filling.
Choose Partial or Full Blind Baking Carefully
Use partial blind baking when the filling will be baked in the crust afterward, such as with many custard or quiche recipes.
Use full blind baking when the filling is added after the crust has completely baked, such as for many cream pies and chilled desserts.
Always follow the specific filling recipe when it gives different baking instructions.
For Extra Crispness
If your filling is particularly moist, brush the warm baked crust lightly with beaten egg and return it to the oven for a minute or two. This can create a thin protective layer that helps reduce moisture from soaking into the pastry.
Be careful not to overbake the crust during this final step.
Variations
Blind baking is a flexible technique, so you can adjust the crust and method to suit different diets, fillings, and flavor preferences.
Gluten-Free Pie Crust
Use your favorite gluten-free pie dough or a prepared gluten-free crust. Gluten-free pastry can be more fragile than traditional dough, so chill it thoroughly and handle it gently when transferring it to the pie plate.
Dairy-Free Pie Crust
For a dairy-free version, choose a pie crust made with vegetable shortening, dairy-free butter, or another suitable plant-based fat. The blind baking process remains essentially the same.
Whole Wheat Pie Crust
Replace part of the all-purpose flour in a homemade crust with whole wheat flour for a nuttier flavor and a slightly heartier texture. Avoid replacing all the flour unless your recipe is specifically designed for whole wheat pastry.
Graham Cracker Crust
A graham cracker crust can also be pre-baked when a recipe calls for a firmer base. Instead of using pie weights, press the crumb mixture firmly into the pie plate and bake according to your specific crust recipe.
Chocolate Pie Crust
For chocolate pies, try a chocolate pastry crust made with cocoa powder. The deeper flavor pairs especially well with creamy vanilla, chocolate, peanut butter, and coffee-based fillings.
Mini Pie Crusts
The same technique works for tartlets and mini pies. Because smaller crusts bake more quickly, begin checking them earlier than a standard 9-inch pie crust.
Sweet or Savory Fillings
A blind baked crust works for much more than traditional dessert pies. Use a partially baked crust for savory fillings such as quiche, or fully bake it before adding chilled fillings such as pastry cream, whipped cream, or fresh fruit.
Extra-Crispy Crust
For fillings that contain plenty of moisture, fully blind bake the crust until deeply golden. A completely baked pastry provides a sturdier base and holds up better under creamy or juicy fillings.
Storage Instructions
A blind baked pie crust can be prepared ahead of time, which makes it especially useful when you are planning a pie for a gathering or holiday meal.
Room Temperature
Once the crust has cooled completely, cover it loosely and keep it at room temperature for up to 1 day. Store it somewhere cool and dry, away from direct sunlight or heat.
Avoid sealing a warm crust in an airtight container. Trapped steam can soften the pastry and take away some of its crisp texture.
Refrigerator
For longer storage, place the completely cooled crust in the refrigerator and cover it well. A fully baked crust is best used within 2 to 3 days.
Before filling, allow the crust to sit at room temperature for a short time if your recipe calls for a room-temperature crust.
Freezer
A fully blind baked crust can be frozen for longer storage. Let it cool completely, then wrap it carefully in plastic wrap followed by aluminum foil or place it in a freezer-safe container.
Freeze for up to 1 month for the best quality.
How to Thaw a Frozen Pie Crust
Transfer the frozen baked crust to the refrigerator and let it thaw overnight. For best results, keep it wrapped while thawing so condensation does not collect directly on the pastry.
Once thawed, unwrap it and let it sit briefly before adding your filling.
Can You Reheat a Blind Baked Crust?
If the crust has softened slightly during storage, place it in a 325°F oven for about 5 to 8 minutes to help restore some of its crisp texture. Let it cool before filling.
Avoid microwaving the crust because microwave heat can make pastry soft and chewy.
Storage Instructions
A blind baked pie crust can be prepared ahead of time, which makes it especially useful when you are planning a pie for a gathering or holiday meal.
Room Temperature
Once the crust has cooled completely, cover it loosely and keep it at room temperature for up to 1 day. Store it somewhere cool and dry, away from direct sunlight or heat.
Avoid sealing a warm crust in an airtight container. Trapped steam can soften the pastry and take away some of its crisp texture.
Refrigerator
For longer storage, place the completely cooled crust in the refrigerator and cover it well. A fully baked crust is best used within 2 to 3 days.
Before filling, allow the crust to sit at room temperature for a short time if your recipe calls for a room-temperature crust.
Freezer
A fully blind baked crust can be frozen for longer storage. Let it cool completely, then wrap it carefully in plastic wrap followed by aluminum foil or place it in a freezer-safe container.
Freeze for up to 1 month for the best quality.
How to Thaw a Frozen Pie Crust
Transfer the frozen baked crust to the refrigerator and let it thaw overnight. For best results, keep it wrapped while thawing so condensation does not collect directly on the pastry.
Once thawed, unwrap it and let it sit briefly before adding your filling.
Can You Reheat a Blind Baked Crust?
If the crust has softened slightly during storage, place it in a 325°F oven for about 5 to 8 minutes to help restore some of its crisp texture. Let it cool before filling.
Avoid microwaving the crust because microwave heat can make pastry soft and chewy.
Recipe Card
How to Blind Bake a Pie Crust
Prep Time: 10 minutes
Chill Time: 30 minutes
Cook Time: 25 to 35 minutes
Total Time: 1 hour 5 minutes to 1 hour 15 minutes
Servings: 1 9-inch pie crust
Calories: Approximately 1,100 calories for the full crust, depending on the dough used
Course: Baking Basics
Cuisine: American
Skill Level: Beginner
Ingredients
- 1 unbaked 9-inch pie crust, homemade or store-bought
- Parchment paper or aluminum foil
- Pie weights, dried beans, or uncooked rice
Instructions
- Prepare the pie crust in a 9-inch pie plate, trimming and crimping the edges as desired.
- Refrigerate the shaped crust for at least 30 minutes so the pastry becomes firm.
- Preheat the oven to 375°F.
- Prick the bottom of the chilled crust lightly with a fork.
- Cover the crust with parchment paper and fill it with pie weights, dried beans, or uncooked rice.
- Place the pie plate on a baking sheet and bake for 15 to 20 minutes.
- Carefully remove the parchment and pie weights.
- For a partially baked crust, return it to the oven for another 5 to 10 minutes, until the bottom looks dry and lightly golden.
- For a fully baked crust, continue baking for another 10 to 15 minutes, until the bottom and edges are golden brown.
- Cool the crust completely on a wire rack before adding the filling.
Notes
- Keep the pastry cold before it goes into the oven to help prevent shrinking.
- Use enough pie weights to cover the bottom and support the sides.
- Choose a partially baked crust when the filling will be baked afterward.
- Choose a fully baked crust for fillings that are added after baking.
- Protect the edges with a pie shield if they begin browning too quickly.
- Dried beans and uncooked rice can be saved and reused as pie weights, but they should not be cooked and eaten afterward.
- Baking times can vary between ovens, so use the crust’s color and texture as your guide.
Nutrition
Approximate nutrition per 1/8 of the crust, based on a traditional butter pie pastry:
Calories: 138
Total Fat: 8 g
Saturated Fat: 5 g
Cholesterol: 27 mg
Sodium: 105 mg
Carbohydrates: 15 g
Fiber: 1 g
Sugar: 1 g
Protein: 2 g
Nutrition information will vary depending on the pie crust recipe or store-bought crust used.

How To Blind Bake A Pie Crust
Ingredients
Method
- Prepare the pie crust in a 9-inch pie plate, trimming and crimping the edges as desired.
- Refrigerate the shaped crust for at least 30 minutes so the pastry becomes firm
- Preheat the oven to 375°F
- Prick the bottom of the chilled crust lightly with a fork
- Cover the crust with parchment paper and fill it with pie weights, dried beans, or uncooked rice
- Place the pie plate on a baking sheet and bake for 15 to 20 minutes
- Carefully remove the parchment and pie weights
- For a partially baked crust, return it to the oven for another 5 to 10 minutes, until the bottom looks dry and lightly golden
- For a fully baked crust, continue baking for another 10 to 15 minutes, until the bottom and edges are golden brown
- Cool the crust completely on a wire rack before adding the filling.
Video
Notes
- Keep the pastry cold before it goes into the oven to help prevent shrinking.
- Use enough pie weights to cover the bottom and support the sides.
- Choose a partially baked crust when the filling will be baked afterward.
- Choose a fully baked crust for fillings that are added after baking.
- Protect the edges with a pie shield if they begin browning too quickly.
- Dried beans and uncooked rice can be saved and reused as pie weights, but they should not be cooked and eaten afterward.
- Baking times can vary between ovens, so use the crust’s color and texture as your guide.
Final Thoughts
Once you know how to blind bake a pie crust, many homemade pies become much easier to prepare. The process is simple, but details such as chilling the pastry, using enough pie weights, and watching the crust’s color can make a big difference.
A crisp, golden crust gives creamy, custard, fruit, and chilled fillings a sturdy base while adding that familiar buttery texture every good pie needs. Whether you are preparing a partially baked crust for a baked filling or a fully baked shell for a no-bake dessert, the same basic technique will serve you well.
The next time a pie recipe calls for a pre-baked crust, you can approach the step with confidence. Keep the pastry cold, give it plenty of support while it bakes, and let the finished crust cool completely before filling.
Once you have mastered the technique, blind baking becomes a simple part of your baking routine rather than a tricky extra step. Try it with your favorite pie recipe and see how much of a difference a crisp, well-baked crust can make.